This was a simple Cantilever Slab Project that a member from 
 http://www.gardenexpress.com.au/ Bonsai Forum challenged and inspired me to make . I used 2 slabs of Ironstone to construct the setting . I set about working on a suitable angle for the Raft ,when the angle looked pleasing i began with an angle grinder and marked the base slab at the point of intersection . Grinding the rock at the anticipated angle and to the desired depth , removing the access as i made a series of cuts .

 http://www.gardenexpress.com.au/ Bonsai Forum challenged and inspired me to make . I used 2 slabs of Ironstone to construct the setting . I set about working on a suitable angle for the Raft ,when the angle looked pleasing i began with an angle grinder and marked the base slab at the point of intersection . Grinding the rock at the anticipated angle and to the desired depth , removing the access as i made a series of cuts .

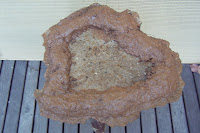
With the base complete i began on the Raft to fit the groove in the base . Very little effort was required as i used a Diamond tipped Masonry wheel . With the Raft and Base fitting snug together in the groove i removed a small piece of material in order to accommodate a trunk into which i will mount a tree .For added depth i removed material around the base to make a depression for the root ball of the desired bonsai . Cross hatching the Slab and Base to assist drainage and the root system took place after fitting together of the slabs.

This project took 20-30 minutes to complete and at the end i have a fantastic new Landscape base to work with