[Pearcy] Olive First Styling

Forum for discussion of Evergreen bonsai – Buxus, Cotoneaster, Olive etc.
User avatar
Pearcy001
Aussie Bonsai Fan
Aussie Bonsai Fan
Posts: 1307
Joined: February 8th, 2015, 7:23 pm
Favorite Species: Natives and Exotics
Bonsai Age: 0
Location: Yarraville, VIC
Been thanked: 81 times

[Pearcy] Olive First Styling

Post by Pearcy001 »

So I thought it might try my hand at a progression thread (although still very early days). It's an Olive I picked up a couple of months back and just recently styled.
Image
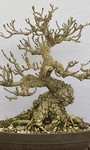
It originally stood out as an informal upright, but for something different I'm going to attempt my first slanted style. I took off the top growth and selecting a new leader, it will hopefully enhance the top over the next couple of seasons as it was a bit too long and straight. The lowest branch on the right will eventually hang low and thick, hopefully not adding too much weight that it could tip in a small pot. All the branching on the left will probably be kept short as if it was wind damaged, but that's not a definite as yet. When slanted its currently sitting approximately 200mm high (soil to tip) by 240mm wide (nabari to tip). As always all comments and critiques are welcome.

(Apologies in advance if the photos are abysmal, my only available weapon's of choice were a Samsung Galaxy and an envelope.)
Image

Image

Image
Cheers,
Pearcy.
Last edited by Pearcy001 on June 21st, 2015, 3:34 pm, edited 3 times in total.
User avatar
Elmar
Aussie Bonsai Fan
Aussie Bonsai Fan
Posts: 1205
Joined: October 12th, 2013, 10:33 pm
Favorite Species: living trees!
Bonsai Age: 2
Location: Port Hedland
Been thanked: 1 time
Contact:

Re: [Pearcy] Olive First Styling

Post by Elmar »

Love the fact you're on the roof, Mr. P!
I have an olive but has been identified as a European olive - good for producing olives, not so good for Bonsai, but I don't always listen too good so I'm gonna have a go anyway.
Mine responds well to trimming and has come back from old wood so it's a good thing for me!!!
I feed it the same as any other and it's going strong, although slow!

Good luck - I think you'll have fun with it!


Cheers
Elmar
Cheers
Elmar
User avatar
Pearcy001
Aussie Bonsai Fan
Aussie Bonsai Fan
Posts: 1307
Joined: February 8th, 2015, 7:23 pm
Favorite Species: Natives and Exotics
Bonsai Age: 0
Location: Yarraville, VIC
Been thanked: 81 times

Re: [Pearcy] Olive First Styling

Post by Pearcy001 »

CoGRedeMptioN wrote:Love the fact you're on the roof, Mr. P!

Cheers
Elmar
Haha I had nowhere that received enough sun for my liking, so I made somewhere!

I built a frame that slid between the corrogations on the roof (no damage if I ever sell up), then made a 1.5m x 0.5m merbu deck to go on top of it running along at window height. Due to it being a bit windier in winter I've since added a 0.5m x 0.5m merbu wall on either side to block alot of the wind.
Image
Image
Image
It doesn't fit all my trees (luckily I'm only starting out and don't have a large collection) but the deciduous don't need any sun at the moment, so I'll extend it across to the next window when it begins to warm.
Last edited by Pearcy001 on June 21st, 2015, 8:57 pm, edited 3 times in total.
User avatar
MoGanic
Aussie Bonsai Fan
Aussie Bonsai Fan
Posts: 1250
Joined: May 3rd, 2012, 7:15 pm
Favorite Species: Shimpaku
Bonsai Age: 0
Location: Victoria

Re: [Pearcy] Olive First Styling

Post by MoGanic »

Pearcy, I have to say the angle selection is spot on for my liking. It makes use of the awkward bend and the current root spread very well.

In future this angle may change but for now, I think its really the best option.

Well done mate.

Mo


Sent from my iPhone using Tapatalk
There are many ways to do things, but only one "best" way.
shibui
Aussie Bonsai Fan
Aussie Bonsai Fan
Posts: 7669
Joined: August 22nd, 2009, 8:41 pm
Favorite Species: trident maple
Bonsai Age: 41
Bonsai Club: Albury/Wodonga; BSV; Canberra; VNBC
Location: Yackandandah
Has thanked: 66 times
Been thanked: 1415 times
Contact:

Re: [Pearcy] Olive First Styling

Post by shibui »

Elmar, European olives do make great bonsai. Granted the African subspecies does have smaller leaves but both are excellent to work with and will suit your climate very well.

Nice start to this one Pearcy. Now just need to keep growing and trimming to develop the branches and get plenty of ramification.
http://shibuibonsai.com.au/" onclick="window.open(this.href);return false;
Daluke
Aussie Bonsai Fan
Aussie Bonsai Fan
Posts: 1023
Joined: September 15th, 2014, 8:04 pm
Favorite Species: Juniper
Bonsai Age: 8
Location: Melbourne
Has thanked: 17 times
Been thanked: 105 times

Re: [Pearcy] Olive First Styling

Post by Daluke »

I look forward to the next update.
User avatar
Pearcy001
Aussie Bonsai Fan
Aussie Bonsai Fan
Posts: 1307
Joined: February 8th, 2015, 7:23 pm
Favorite Species: Natives and Exotics
Bonsai Age: 0
Location: Yarraville, VIC
Been thanked: 81 times

Re: [Pearcy] Olive First Styling

Post by Pearcy001 »

Daluke wrote:I look forward to the next update.
shibui wrote:Elmar, European olives do make great bonsai. Granted the African subspecies does have smaller leaves but both are excellent to work with and will suit your climate very well.

Nice start to this one Pearcy. Now just need to keep growing and trimming to develop the branches and get plenty of ramification.
MoGanic wrote:Pearcy, I have to say the angle selection is spot on for my liking. It makes use of the awkward bend and the current root spread very well.

In future this angle may change but for now, I think its really the best option.

Well done mate.

Mo


Sent from my iPhone using Tapatalk
Thanks guys, I'm happy with the initial design.

You can't tell from the photo, but the trunk moves back and up where it initially bends left, giving it more movement then what's seen in the photo (you can see it in the pre-styled photo).

Branches are going out at pretty much all directions except the front, once I get a bit of growth and ramification, it'll be on its way with a good head of hair! (Hopefully).

Eventually the three bits of deadwood on the lower trunk may be jinned (although I do like the natural look), I guess answers like these will come to me in time.

Cheers,
Pearcy.
Last edited by Pearcy001 on June 22nd, 2015, 11:29 am, edited 2 times in total.
User avatar
Matt S
Aussie Bonsai Fan
Aussie Bonsai Fan
Posts: 755
Joined: February 21st, 2015, 8:57 am
Favorite Species: Olive
Bonsai Age: 30
Bonsai Club: S.A. Bonsai Society, Victorian Native Bonsai Club
Location: Adelaide
Has thanked: 538 times
Been thanked: 435 times

Re: [Pearcy] Olive First Styling

Post by Matt S »

Hi Pearcy,

I also think you've chosen the best option given the straightness of the trunk. In the future you may want to lose some of those branches as the tree progresses but for now it looks really good.
One bit of advice I'd give is to let the lowest branches grow unheeded for a season or two until they are at least a quarter of the thickness of the trunk where they join. Only then chop them back to a couple of centimeters and then start working with the resulting shoots. Too often I see olives with lower branches are too thin with little taper, which then need to be corrected with sacrifice shoots and this takes longer than if it was done correctly in the first place.
While you're waiting for the lower branches (and the apex) to fatten you can start trimming the upper branches to get ramification started.
Nice tree. Have fun.

Matt.
User avatar
Pearcy001
Aussie Bonsai Fan
Aussie Bonsai Fan
Posts: 1307
Joined: February 8th, 2015, 7:23 pm
Favorite Species: Natives and Exotics
Bonsai Age: 0
Location: Yarraville, VIC
Been thanked: 81 times

Re: [Pearcy] Olive First Styling

Post by Pearcy001 »

Matt S wrote:Hi Pearcy,

I also think you've chosen the best option given the straightness of the trunk. In the future you may want to lose some of those branches as the tree progresses but for now it looks really good.
One bit of advice I'd give is to let the lowest branches grow unheeded for a season or two until they are at least a quarter of the thickness of the trunk where they join. Only then chop them back to a couple of centimeters and then start working with the resulting shoots. Too often I see olives with lower branches are too thin with little taper, which then need to be corrected with sacrifice shoots and this takes longer than if it was done correctly in the first place.
While you're waiting for the lower branches (and the apex) to fatten you can start trimming the upper branches to get ramification started.
Nice tree. Have fun.

Matt.
Hi Matt, thanks for the tips mate.

The lowest right branch will have to be as thick as possible to give it a strong look I think. As for when to cut it back, I did not know so thank you for the info. Re the branches up top; the protruding knob to the top right is currently just an anchor point for the wire and will be removed when I'm done with it.

As for the branching on the left, I think one of those will eventually go to de-clutter it a little, but time will tell as to which one. I'm guessing the new leader will throw off a branch so possibly the top left branch will go to create a little negative space?
User avatar
Matt S
Aussie Bonsai Fan
Aussie Bonsai Fan
Posts: 755
Joined: February 21st, 2015, 8:57 am
Favorite Species: Olive
Bonsai Age: 30
Bonsai Club: S.A. Bonsai Society, Victorian Native Bonsai Club
Location: Adelaide
Has thanked: 538 times
Been thanked: 435 times

Re: [Pearcy] Olive First Styling

Post by Matt S »

Yeah, the lowest branch will need to be quite thick to give strength to the design.
No need to decide which of the left branches to lose but at the moment the middle one creates a bar branch with the one on the right, so that might be a candidate. Wait and see what the tree looks like after some growth.
Also, don't be afraid to let the lower branches get really long! I usually wire the tips up when doing this so that the tree doesn't take up as much space and the resulting straight up growth can be taller than me, even on a small tree. As long as the base of the branch is fattening up, it's all good.
Matt.
User avatar
Pearcy001
Aussie Bonsai Fan
Aussie Bonsai Fan
Posts: 1307
Joined: February 8th, 2015, 7:23 pm
Favorite Species: Natives and Exotics
Bonsai Age: 0
Location: Yarraville, VIC
Been thanked: 81 times

Re: [Pearcy] Olive First Styling

Post by Pearcy001 »

Matt S wrote:No need to decide which of the left branches to lose but at the moment the middle one creates a bar branch with the one on the right, so that might be a candidate.
Not quite a bar branch but unsure if it will make the same bulge where it is? the branch to the left (when looking front on) is actually at the rear of the tree bending around to the side (lower right in this photo).

Image

In the aerial shot they are the bottom and bottom left branches. Would it still make the unsightly bulge from here?

Image
Image

I may just bend the rear one back and keep it short to fill out any gaps that need it.

Cheers,
Pearcy.
Last edited by Pearcy001 on June 22nd, 2015, 2:01 pm, edited 7 times in total.
User avatar
Matt S
Aussie Bonsai Fan
Aussie Bonsai Fan
Posts: 755
Joined: February 21st, 2015, 8:57 am
Favorite Species: Olive
Bonsai Age: 30
Bonsai Club: S.A. Bonsai Society, Victorian Native Bonsai Club
Location: Adelaide
Has thanked: 538 times
Been thanked: 435 times

Re: [Pearcy] Olive First Styling

Post by Matt S »

I may just bend the rear one back and keep it short to fill out any gaps that need it.
You're going to need a back branch for depth so that sounds like a plan. Nice placement of the branches too. From above no branch shades out a lower one, so you should get good even growth.

Matt.
User avatar
Jarad
Aussie Bonsai Fan
Aussie Bonsai Fan
Posts: 1232
Joined: November 27th, 2014, 1:04 pm
Favorite Species: Juniperus, Melaleuca, Taxodium
Bonsai Age: 9
Location: Perth, WA
Has thanked: 22 times
Been thanked: 13 times

Re: [Pearcy] Olive First Styling

Post by Jarad »

What do you use to seal your cuts? It looks like playdough.
-Jarad

I don't trust Bonsai, they are a little shady.
User avatar
Pearcy001
Aussie Bonsai Fan
Aussie Bonsai Fan
Posts: 1307
Joined: February 8th, 2015, 7:23 pm
Favorite Species: Natives and Exotics
Bonsai Age: 0
Location: Yarraville, VIC
Been thanked: 81 times

Re: [Pearcy] Olive First Styling

Post by Pearcy001 »

Jarad wrote:What do you use to seal your cuts? It looks like playdough.
You know the green lid putty everyone seems to use? Well apparently that is meant for Conifers and Pines etc.
The one I used is the white lidded(?) version, apparently meant for all other types of trees.

Probably just good marketing and they all work the same but sell twice as much haha.
Tree Sealer.jpg
You do not have the required permissions to view the files attached to this post.
Last edited by Pearcy001 on June 22nd, 2015, 10:57 pm, edited 2 times in total.
User avatar
Jarad
Aussie Bonsai Fan
Aussie Bonsai Fan
Posts: 1232
Joined: November 27th, 2014, 1:04 pm
Favorite Species: Juniperus, Melaleuca, Taxodium
Bonsai Age: 9
Location: Perth, WA
Has thanked: 22 times
Been thanked: 13 times

Re: [Pearcy] Olive First Styling

Post by Jarad »

Oh cool, I've never seen that stuff before. Haven't been around bonsai for long.

The stuff I use is in a tube and it smells like craft glue.
-Jarad

I don't trust Bonsai, they are a little shady.
Post Reply

Return to “Evergreen”