[Tutorial] How to build a timber bonsai bench
Posted: August 12th, 2009, 10:48 am
Have you ever wanted to display your bonsai on a beautiful timber bench that you built yourself?
Well now you can with the following step by step tutorial which has been written by Jerry Norbury and reproduced here with his permission.
After thirty years working with bonsai, Jerry decided enough was enough – He needed one or more benches to display his ever growing collection of bonsai. It took him a further three years to finally get round to building the bench. It's the first large woodworking project he has ever undertaken which didn't originate from an Ikea flat-pack.
Following Jerry's step by step instructions makes the job of building a bonsai bench nearly as easy as an Ikea one!
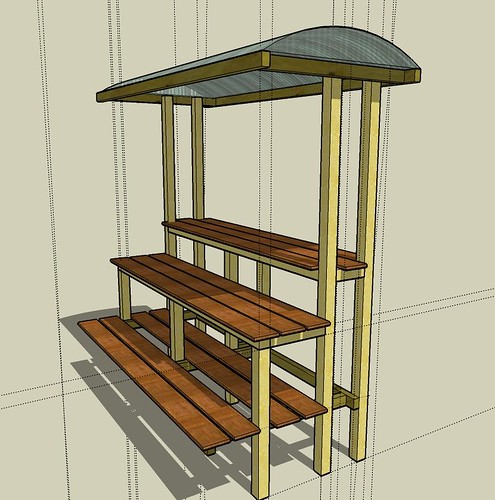
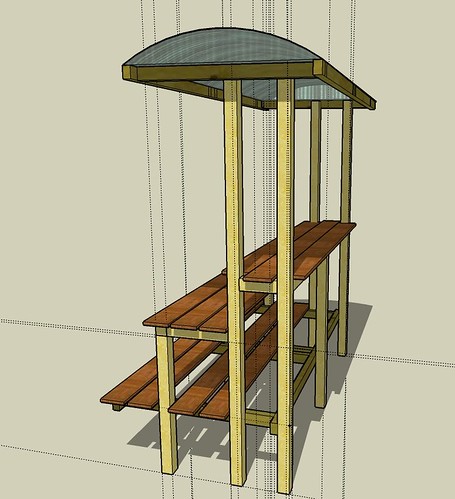
The basic design is built around the use of “standard” sized hardwood decking planks supported by a simple frame of treated pine. The deck planks are 215cm x 14cm x 2cm (7’ x 5.5” x ¾”). The rest of the framework is essentially sized around these dimensions. If you have different wood sizes you would need to adjust the overall sizes around your standard component dimensions.
Component list
All the wood used for the frame is treated pine. There are two sizes used – 65mm square and 65mm x 48mm.
The planks used for the shelves are hardwood decking.
Length x Quantity - Description
208cm x 3 - Horizontal beams (65mm x 65mm)
110cm x 6 - Back and middle legs (65mm x 65mm) – the long legs…
82cm x 3 - Front legs (65mm x 65mm) – the short legs.
20cm x 3 - Top cross beam (65mm x 65mm)
35cm x 3 - Lower cross beam (65mm x 45mm)
10cm x 21 - Stainless steel bolts (100mm x 8 mm)
208cm x 2 - Back and front lateral beams (45mm)
89cm x 4 - Horizontal leg support beams (45mm thick)
8cm x 16 - Stainless steel bolts (80mm x 8mm)
215cm x 10 - Hardwood planks (215cm x 14 cm x 2cm) – uncut
40-ish x Stainless steel wood screws for attaching the decking to the frame.
Additionally you need the following tools:
A saw – unless the wood is pre-cut. I used a circular saw.
An electric drill
A 22mm wood drill bit for sinking holes
An 8mm drill bit
A ratchet wrench (11mm for the bolts I used)
A hammer for tapping the bolts through the beams.
A set square
A spirit level
An electric screwdriver
Assembly
The assembly sequence is as follows:
1. Cut the wood to size. All joints are 90 degrees.
2. Assemble the top-most frame element from 2 x 208cm beams and 3x 20cm pieces. The centre support does not need to be exactly in the middle – but the centre legs DO need to be exactly in the middle. Sink the holes with a 22mm drill – to hide the bolt heads. Drill through the long beams with an 8mm drill – do not drill the short pieces; it’s unnecessary. Use 100mm bolts for all the 65mm square wood. Tap the bolts through the beams with the hammer into ends of the 20cm cross beams. Then use the wrench to screw the pieces together.
3. Attach the 6 long legs (do not tighten the bolts fully – the legs need to be able to turn to allow the drilling of some holes later..). The legs go exactly in the corners and exactly in the middle. The photo also shows how the ends of the top frame element appear after assembly. Note: The holes need to be offset at the corners since there are two bolts which essentially cross each other at 90 degrees – one simply needs to be closer to the end of the beam than the other and then there’s no problem.
4. Complete all the long legs the same way. Use a workmate (if you have one) to hold the frame during assembly. Do not fully tighten the bolts yet...
5. Using one of the short front legs, mark out on the back side of the front legs where a sink hole must be drilled. The hole will be used to attach the second level to the long legs. Theoretically the position of this hole is the length of the front leg plus half the width of the support beam which will be on top of the leg (82cm + half of 6.5cm from the bottom of the front leg). Twist the front legs (the reason the legs were not tightened earlier) and drill through all three front long legs from the back.
6. Attach the front 3 short legs under the last remaining 208cm beam. Ensure that the centre leg is exactly in the middle of the beam. The beam goes on top of the legs.
7. Attach the 3 x 35cm support members at the corners and the middle of the beam to create an inverted “L” shape. This is unstable and needs to be held in the workmate. Again you have bolts crossing each other at 90degree in the corners and in the middle and will need to be offset. The middle leg and middle support must be EXACTLY in the middle of the beam – otherwise they won’t align with the legs on the taller frame.
8. Attach the short front assembly to the long legs using the holes previously drilled through the long legs. The main frame is now complete however still unstable.
9. Making the lowest shelf supports. Measure a point on the back long legs 50cm off the ground. We will attach the back support beam (208cm x 65mmx 48mm) here. This photo (Step 9.) shows the back beam attached AND the first front to back support. We use the shorter bolts now because the wood is not as thick. Get the main frame level (paper under the legs etc ) and then attach the back support beam to the left back leg – clamp the beam into place (level) and bolt in the right leg – then bolt in the middle back leg to the beam. We go through the beam INTO the leg this time.
10. Attach the 4 front to back supports (89cm) on the side of the legs. They need to be perfectly level!
11. Finally attach the front beam. The frame is now complete. Tighten ALL the bolts.
12. Start screwing the decking onto the frame. Add the two internal pieces first and paint them with wood oil (later they are harder to get to). Paint whole frame now with wood oil and leave to dry.
13. Add the other shelves (three on top – no gap between, three in the middle with small gaps and two on the bottom with a small gap between) and screw into place (avoiding the corners where the bolt heads are!). The front of the deck hangs over the frame by roughly 4cm at the front and at the sides. The top level also hangs over the back of the frame by roughly 4cm. In my design I was initially aiming to have only 2 planks on the top – but that resulted in a big gap and no overhangs – which wasn’t attractive. I then went to three planks and no gaps.
14. Oil the planks.
15. Stand around looking content after a job well done!
Following are some pictures of the completed bench, in place and loaded with bonsai; Well, that's it. Looks simple doesn't it?
A big thank you to Jerry for letting me post his plans here!
Regards,
Steven
Edit: For some other examples of timber bonsai benches, see these threads here on AusBonsai;
Brad's new bonsai stand
Steven's Building a timber bonsai stand
Damo's new bonsai bench
Well now you can with the following step by step tutorial which has been written by Jerry Norbury and reproduced here with his permission.
After thirty years working with bonsai, Jerry decided enough was enough – He needed one or more benches to display his ever growing collection of bonsai. It took him a further three years to finally get round to building the bench. It's the first large woodworking project he has ever undertaken which didn't originate from an Ikea flat-pack.
Following Jerry's step by step instructions makes the job of building a bonsai bench nearly as easy as an Ikea one!
The basic design is built around the use of “standard” sized hardwood decking planks supported by a simple frame of treated pine. The deck planks are 215cm x 14cm x 2cm (7’ x 5.5” x ¾”). The rest of the framework is essentially sized around these dimensions. If you have different wood sizes you would need to adjust the overall sizes around your standard component dimensions.
Component list
All the wood used for the frame is treated pine. There are two sizes used – 65mm square and 65mm x 48mm.
The planks used for the shelves are hardwood decking.
Length x Quantity - Description
208cm x 3 - Horizontal beams (65mm x 65mm)
110cm x 6 - Back and middle legs (65mm x 65mm) – the long legs…
82cm x 3 - Front legs (65mm x 65mm) – the short legs.
20cm x 3 - Top cross beam (65mm x 65mm)
35cm x 3 - Lower cross beam (65mm x 45mm)
10cm x 21 - Stainless steel bolts (100mm x 8 mm)
208cm x 2 - Back and front lateral beams (45mm)
89cm x 4 - Horizontal leg support beams (45mm thick)
8cm x 16 - Stainless steel bolts (80mm x 8mm)
215cm x 10 - Hardwood planks (215cm x 14 cm x 2cm) – uncut
40-ish x Stainless steel wood screws for attaching the decking to the frame.
Additionally you need the following tools:
A saw – unless the wood is pre-cut. I used a circular saw.
An electric drill
A 22mm wood drill bit for sinking holes
An 8mm drill bit
A ratchet wrench (11mm for the bolts I used)
A hammer for tapping the bolts through the beams.
A set square
A spirit level
An electric screwdriver
Assembly
The assembly sequence is as follows:
1. Cut the wood to size. All joints are 90 degrees.
2. Assemble the top-most frame element from 2 x 208cm beams and 3x 20cm pieces. The centre support does not need to be exactly in the middle – but the centre legs DO need to be exactly in the middle. Sink the holes with a 22mm drill – to hide the bolt heads. Drill through the long beams with an 8mm drill – do not drill the short pieces; it’s unnecessary. Use 100mm bolts for all the 65mm square wood. Tap the bolts through the beams with the hammer into ends of the 20cm cross beams. Then use the wrench to screw the pieces together.
3. Attach the 6 long legs (do not tighten the bolts fully – the legs need to be able to turn to allow the drilling of some holes later..). The legs go exactly in the corners and exactly in the middle. The photo also shows how the ends of the top frame element appear after assembly. Note: The holes need to be offset at the corners since there are two bolts which essentially cross each other at 90 degrees – one simply needs to be closer to the end of the beam than the other and then there’s no problem.
4. Complete all the long legs the same way. Use a workmate (if you have one) to hold the frame during assembly. Do not fully tighten the bolts yet...
5. Using one of the short front legs, mark out on the back side of the front legs where a sink hole must be drilled. The hole will be used to attach the second level to the long legs. Theoretically the position of this hole is the length of the front leg plus half the width of the support beam which will be on top of the leg (82cm + half of 6.5cm from the bottom of the front leg). Twist the front legs (the reason the legs were not tightened earlier) and drill through all three front long legs from the back.
6. Attach the front 3 short legs under the last remaining 208cm beam. Ensure that the centre leg is exactly in the middle of the beam. The beam goes on top of the legs.
7. Attach the 3 x 35cm support members at the corners and the middle of the beam to create an inverted “L” shape. This is unstable and needs to be held in the workmate. Again you have bolts crossing each other at 90degree in the corners and in the middle and will need to be offset. The middle leg and middle support must be EXACTLY in the middle of the beam – otherwise they won’t align with the legs on the taller frame.
8. Attach the short front assembly to the long legs using the holes previously drilled through the long legs. The main frame is now complete however still unstable.
9. Making the lowest shelf supports. Measure a point on the back long legs 50cm off the ground. We will attach the back support beam (208cm x 65mmx 48mm) here. This photo (Step 9.) shows the back beam attached AND the first front to back support. We use the shorter bolts now because the wood is not as thick. Get the main frame level (paper under the legs etc ) and then attach the back support beam to the left back leg – clamp the beam into place (level) and bolt in the right leg – then bolt in the middle back leg to the beam. We go through the beam INTO the leg this time.
10. Attach the 4 front to back supports (89cm) on the side of the legs. They need to be perfectly level!
11. Finally attach the front beam. The frame is now complete. Tighten ALL the bolts.
12. Start screwing the decking onto the frame. Add the two internal pieces first and paint them with wood oil (later they are harder to get to). Paint whole frame now with wood oil and leave to dry.
13. Add the other shelves (three on top – no gap between, three in the middle with small gaps and two on the bottom with a small gap between) and screw into place (avoiding the corners where the bolt heads are!). The front of the deck hangs over the frame by roughly 4cm at the front and at the sides. The top level also hangs over the back of the frame by roughly 4cm. In my design I was initially aiming to have only 2 planks on the top – but that resulted in a big gap and no overhangs – which wasn’t attractive. I then went to three planks and no gaps.
14. Oil the planks.
15. Stand around looking content after a job well done!
Following are some pictures of the completed bench, in place and loaded with bonsai; Well, that's it. Looks simple doesn't it?
A big thank you to Jerry for letting me post his plans here!
Regards,
Steven
Edit: For some other examples of timber bonsai benches, see these threads here on AusBonsai;
Brad's new bonsai stand
Steven's Building a timber bonsai stand
Damo's new bonsai bench