
Hi everyone,
Sorry I've not been active on the forum for a while.
My laptop computer is dying, and I don't want to lose all the Casuarina notes I wrote over the years.
So I've just uploaded them into a temporary thread. Its not formatted yet, and I'll delete this thread and re-do it once I have more time in a year or so to fix it and add the pictures too.
Casuarina growing notes - Unformatted
-
Rory
- Aussie Bonsai Fan

- Posts: 2809
- Joined: January 23rd, 2013, 11:19 pm
- Favorite Species: Baeckea Phebalium Casuarina & Banksia
- Bonsai Age: 24
- Location: Central Coast, NSW
- Has thanked: 22 times
- Been thanked: 459 times
Casuarina growing notes - Unformatted
Rory
I style Bonsai naturally, just as they would appear in the wild.
Central Coast, NSW
Bonsai: Casuarina Leptospermum Banksia Phebalium Baeckea Melalueca Ficus
Growing Australian natives as Bonsai: viewtopic.php?p=289480#p289480
Buying and repotting Native nursery material: viewtopic.php?f=78&t=30724
Growing tips for Casuarina as Bonsai: viewtopic.php?p=244995#p244995
How to reduce moss from the trunk without damaging the bark: viewtopic.php?p=295227#p295227
-
Rory
- Aussie Bonsai Fan
- Posts: 2809
- Joined: January 23rd, 2013, 11:19 pm
- Favorite Species: Baeckea Phebalium Casuarina & Banksia
- Bonsai Age: 24
- Location: Central Coast, NSW
- Has thanked: 22 times
- Been thanked: 459 times
Re: Casuarina growing notes - Unformatted
Genus: Allocasuarina & Casuarina
Species: cunninghamiana / glauca / distyla / torulosa / littoralis / nana
***INSERT PICTURES FOR EACH SPECIES FOLIAGE / BARK / WHOLE TREE***
------------------------
Casuarina cunninghamiana
------------------------
SUN: Prefers full sun, and does not tolerate strong shade
SOIL: Prefers well draining mix
DROUGHT-TOLERANCE: If kept as a bonsai this species has a medium tolerance to drought. Never allow the soil to become bone dry.
BARK: Rough, hard
GROWTH: Upright
TRUNK: Straight
FOLIAGE: Thin (1-2mm)
*Ensure that all the branches receive sun, otherwise the shaded branches have a high tendancy to die back.
*Best suited to single trunks, multiple trunks, clumps and group plantings.
*Does not like to be kept constantly wet, allow to become somewhat dry then thoroughly rewater.
----------------
Casuarina glauca
----------------
SUN: Prefers full sun, and tolerates strong shade
SOIL: Grows well in all mixes
DROUGHT-TOLERANCE: If kept as a bonsai this species has a medium tolerance to drought. Never allow the soil to become bone dry.
BARK: Rough, hard
GROWTH: Upright
TRUNK: Straight, often multi-trunk
FOLIAGE: Thin (1-2mm)
*Ensure that all the branches receive sun, otherwise the shaded branches have a medium tendancy to die back.
*Best suited to single trunks, multiple trunks, clumps and group plantings.
*Will tolerate poor drainage and you can safely over-water for extended periods, but best to thoroughly rewater when the soil is on the drier side.
---------------------
Allocasuarina distyla
---------------------
SUN: Prefers full sun, and does not tolerate strong shade or lots of rain/moisture.
SOIL: Prefers a high draining mix
DROUGHT-TOLERANCE: High, this species can tolerate drought but it does not tolerate being over-watered. Try not to let the soil become bone dry.
BARK:
GROWTH: Upright
TRUNK: This is a fairly slow growing species and doesn't trunk-thicken well.
FOLIAGE: Course (2-3mm)
This species does not grow well in humid area. Doesn't like shade or regular watering.
------------------------
Allocasuarina littoralis
------------------------
SUN: Prefers full sun, will tolerate part shade
SOIL: Prefers well draining mix
DROUGHT-TOLERANCE: If kept as a bonsai, this species is highly susceptible to drought. Never allow the soil to become bone dry.
BARK: Fissured, delicate
GROWTH: Upright, sometimes weeps
TRUNK: Tendency to bulge at base
FOLIAGE: Thin (1-2mm)
*Ensure that all the branches receive sun, otherwise the shaded branches have a medium tendancy to die back.
*Best suited to single trunks and multiple trunks.
*Does not like to be kept constantly wet, allow to become somewhat dry then thoroughly rewater.
----------------------
Allocasuarina torulosa
----------------------
SUN: Prefers full sun, will tolerate part shade
SOIL: Prefers well draining mix
DROUGHT-TOLERANCE: If kept as a bonsai, this species is highly susceptible to drought. Never allow the soil to become bone dry.
BARK: Deeply Fissured, fragile
GROWTH: Upright and weeping
TRUNK: Tendency to bulge at base
FOLIAGE: Thin (1-2mm)
*Ensure that all the branches receive sun, otherwise the shaded branches have a medium tendancy to die back.
*Best suited to single trunks and multiple trunks.
*Does not like to be kept constantly wet, allow to become somewhat dry then thoroughly rewater.
------------------
Allocasuarina nana
------------------
SUN:
SOIL:
DROUGHT-TOLERANCE:
BARK:
GROWTH:
TRUNK:
FOLIAGE:
----
INVERSE TAPER / BURIED TRUNK:
If you have acquired a new casuarina for the first time, check to see where the base of the trunk is. If the start of the trunk is below the soil line then there is a strong chance it might have reverse taper as they have a tendency to bulge at the soil line. (more so with torulosa and littoralis)
To rectify this (depending on when it was lost repotted try to wait at least 6 months) immediately repot the tree and ensure that the base of the trunk is now above the soil line.
If the buried portion of the trunk is thinner than the trunk above the soil line there are a few techniques to try. Firstly, lift the tree above the soil line so that the roots now start just below the soil line and the bulge/inverse taper is above the soil.
You can attempt either of the following:
1. Make sure the tree is in excellent health and you are fertilizing EVERY week with 'Powerfeed for Natives'.
Wait until spring and if the tree is in excellent health, trunk chop low and hard. The new shoots that emerge will hopefully have shoots coming from the base. Allow all these shoots up to the point of the reverse tapered trunk to develop and grow long and strong. (However, DO NOT allow shoots at the point of the old soil line or an inch above where the trunk is thicker to develop) Over time as these new shoots thicken, it should rectify the problem.
2. Obviously lift the tree above the soil line so that the roots now start just below the soil line and the bulge/inverse taper is above the soil.
If you don't want to trunk chop low because it already has a good structure, then again wait until spring.
Make sure the tree is in excellent health and you are fertilizing EVERY week with 'Powerfeed for Natives'
Cut off all the foliage and cut back each branch fairly hard, but you need to cut back every branch! This usually triggers lower growth and all over the tree.
Now keep doing either method every spring until it presents shoots down low to thicken the problem. Remember to fertilize EVERY week with 'Powerfeed for Natives' to encourage more growth during this period.
Also allow the thin base of the trunk to get full sun. Try to continually reduce the upper structure every few months or so, which should encourage the growth and allow more light to the lower problem areas.
Once your base is thicker and the problem is rectified, you can remove the sacrifice branches from down low. (But before you remove them, take a step back and make sure that if you kept one of the newly formed trunks, that it wouldn't increase the beauty of the whole design.)
----
CONTAINER: Growing pot / Bonsai pot (trunk-thickening):
If you want to increase the overall girth (circumference) of your trees trunk, do not grow your Casuarina in a bonsai pot. Place your tree into a growing pot or the optimal preference being an orchid pot. Orchid pots are fantastic. The reason they are so good for bonsai are the numerous drainage holes and side drainage. In contrast, a regular pot has probably only a few holes for drainage across the base. So if the pot is at a slight angle you might get water pooling in the pot. In particular the side drainage slits in orchid pots substantially assist the entire medium to drain well and thus promotes healthy roots.
If you really want to maximise growth in the growing phase and keep your roots healthy, you can place the orchid pot over the ground which will ensure that the roots start to penetrate the ground. This really thickens the tree while still having the side drainage as well. You will then need to lift the pot off the ground every year or so by cutting off the roots that have grown downwards. So effectively you are trying to keep the radial roots close to the trunk growing inside the pot, while quickly allowing the tree to increase its size.
*** Insert picture of orchid pot ***
With Casuarina it is a great idea to ground grow them in orchid pots because it allows the tree to survive periods of induced 'drought' whereby you may forget to properly water or assume the soil is still damp, when in fact the majority of the soil isn't. If the roots grow deep into the ground they will usually have 'insurance' by still being able to access water and thus increase the chances it survives if you happen to not water it on time.
Take note that if you are growing the trunk to increase its girth, try not to heavily over-pot a Casuarina tree if the medium you are using is 'heavy' or doesn't dry within a normal 24-36 hour period. (over-pot means placing the roots into a significantly larger container than the roots require). Otherwise it might stay too wet in the container for too long, especially over winter and even more so if you have removed a lot of the foliage. Some people will say that overpotting doesn't matter if you have exceptional drainage. But be careful ; for instance if you heavily overpot the tree and compensate that with very fast drainage, then it might be detrimental to the tree on a really hot windy day and completely dry out and die). So when you repot a tree try to make sure the pot you are now placing the roots into doesn't get too bogged down in the soil. There should still be a reasonably proportionate ratio of the roots to the room left in the pot to maintain a healthy root system. If you are trying to increase the trunk girth I usually wouldn't go more than 2 or 2.5 times the entire root ball of extra room. In my opinion though, ground growing is still a better option.
Once you are happy enough with the size of the trunk (the girth), it is best to then stop growing the tree in a 'growing pot' and repot the tree into an actual bonsai pot - mainly because it will slow down the significant growth you get from a growing pot. If you leave it in a growing pot it can over-thicken your upper branches too quickly with vigorous growth. By reducing the room for the roots to grow in you will usually get better ramification, provided you ensure the whole tree is well exposed to full sun.
So try to place the roots into a pot that reasonably accomodates it leaving only an inch or so of room to continue growing in.
BONSAI POT:
Try to lean towards the deeper sized bonsai pots for Casuarina.
In my opinion a shallow pot with room for the roots to grow laterally may look fancy, but is far too dangerous on continually hot, sunny and windy days for a Casuarina.
In my opinion a deep pot which allows the soil at the bottom to remain wet longer than a shallow pot would, gives Casuarina insurance against continually hot, sunny and windy days.
If you have put a lot of effort and love into a great tree, try not to display it in a factory produced cheap pot. Be sure to take a look at these potters from Australia to acquire a beautiful hand made pot for your Casuarina.
----
BRANCH DEVELOPMENT:
For casuarina the most important rule when developing the branches is to not let the branching grow unchecked. By this I mean casuarina is an interesting genus because it can very quickly thicken up areas from intense growth. Then all of a sudden your beautiful tree that you have worked so hard on can thicken up too much up top in just a matter of weeks/months. It is recommended to try and learn the basics of branch development and refinement for this genus and also how to minimize bulging.
With casuarina try not to let the upper branches become too bushy and overshadow the lower branch structure. If you put more effort into pruning the upper branch structure rather than the lower - and deciding which branches you want to keep earlier on than later - it will reduce the chances of upsetting your design. Any time you let a casuarina branch extend a lot it will usually thicken significantly at the start of the branch and so forth for each tier of branching. *take note* -> On the flip side, Casuarina doesn't always thicken the base of the trunk like other trees might, so it is important to remember to try and develop a good thickness on the main trunk before you concentrate on the trees branch structure. If you allow branching to develop somewhat evenly up the trunk it usually increases the trunk thickness accordingly.
I usually focus on the lower branches first, and just cut off the upper branches altogether for the early years. This way you don't end up with a tree that has heavy set branching in the upper half. Initially I grow the lower branches long and strong, but make sure you cut them back to stumps each time, to try and get some nice ramification. Once the branch is about 1cm thick you can cut back to stumps. If you have allowed the branch to get too long and thick, just cut it back hard, and only allow a few shoots to develop each time. On the other branches you can just allow more shoots to develop which depending on the road you take will allow them to reach the same thickness eventually.
If your goal is trunk thickness down low, then obviously do not be concerned about any bulging or over-thickening anywhere above this. Grow everything long and strong.
Sacrifice Branches:
A sacrficie branch is an advantage to thickening the trunk below this point. However with casuarina there are a few quirks to be aware of:
*Try not to start a sacrifice branch until the base of the trunk is about 3cm or more, otherwise you can develop unintentional bulging.
*Remove the sacrifice branch before it is half the thickness of the trunk. Otherwise you are sure to invite bulging at this point.
*Be careful of growing a sacrifice branch on littoralis/torulosa, as these can be more prone to bulging sooner than on cunninghamiana/glauca.
Clip-and-grow:
This is my preference but I rarely wire Casuarina. I prefer the 'clip-and-grow' method. I usually cut a bit beyond the point of growth where you want the branch to ramify and/or change direction. With branches that are thicker than 5mm you will usually get new shoots forming randomly so you can choose the ones you want to encourage and rub off the others. For me it appears cleaner and can sometimes create a more natural look, but it can also be difficult at the same time. Often Casuarina have those long wavy branches which you can still create from anchoring or allowing the branching to grow unhindered. If you need to style the entire branch or angle it a different way I recommend anchoring the branch to the pot or a branch below/above. I have found that wiring young branches of torulosa (less than 5mm) can cause die-back, so I just don't do it. For others it may work
[The size of the branch cuts in the following paragraphs clearly do not apply to shohin or mame]
To maximise the benefits of the clip-and-grow method it significantly helps if the branch is exposed to strong levels of sun. The optimal time to cut is all through Spring/Summer. I usually allow the branch to grow thick enough to decrease die-back before I cut, and sometimes I wait and see if the branch forms side shoots before I cut. When the branch is anywhere from 5mm to 10mm thick (0.5cm - 1cm thick) I usually make the first cut. Otherwise sometimes if you cut the branch too short the remaining stub occasionally can die off (though not common). Once you develop tertiary (3rd level) branching you almost never lose the whole branch to die back using clip-and-grow, provided it is getting strong sun exposure. Then you can happily clip-and-grow to your hearts content from there.
*** INSERT 2 pictures showing before and after of branching that was cut for 'clip-and-grow' method.
With casuarina simply allowing 2 or more branches to develop from the same point, (or even close to each other, usually up or down of 1 cm apart) will often produce bulging if the corresponding bar branches are more than say 1/2 the thickness of the primary branch/trunk that they are growing from.
If you don't like the effects of bar branching, then you need to avoid excessive branches developing from the same point.
***[insert picture of possible bulging starting from bar branching that is just up and down from each other about 1cm]***
However this is usually more of a problem if you are allowing the bar branches to grow long, thick and unchecked. If you maintain and keep the bar branches cut short and not allowed to continually extend, it can stop the bulging effect or slow it down significantly so that it wont be noticeable. (if it concerns you).
*** INSERT picture of bar branching forming bulging ***
*** INSERT picture of bar branching not forming bulging ***
As stated above I usually allow the trunk to thicken first before I concentrate too much on branching. I recommend starting with a thicker trunk to keep the branching aesthetically pleasing to the eye and not out of proportion. Otherwise if you start the branch development whilst the trunk is too slender, it can occasionally look contrived with heavy branching out of proportion.
But do not make the mistake of quickly developing thickness in the lower branches. The common mistake is you will grow the low branches too long and this will produce very thick low branches at the start. I feel it is better to gradually increase the ramification and thickness of the lower branching by cutting it back more regularly. The reason is that Casuarina can thicken very quickly, and it is a lot easier to gradually increase a branch thickness by allowing it to develop more ramification from continual cut-backs, than to try and rectify a branch that has grown too long and too thick for the design.
This is just a guide:
For torulosa and littoralis I recommend growing the base of the trunk diameter to approx (4cm to 5cm = 40mm to 50mm) before starting branch development
For cunninghamiana & glauca I recommend growing the base of the trunk diameter to approx (3cm to 4cm = 30mm to 40mm) before starting branch development
Keep an eye out for shoots that appear near the base. If the shoot forms in the desired position and you allow it to develop into a second smaller trunk it can look lovely and natural and compliment the design. Cunninghamiana and glauca quite often develop multiple clumping trunks which is very majestic. This can look very natural combined with relatively long, swirling branches.
With the benefit of being able to produce new shoots anywhere along the tree and from old wood, Casuarina becomes a brilliant bonsai candidate for this reason. So to some degree you can completely restyle the branching if you are not happy with the current design. Often if you have allowed the upper branching to thicken too quickly (common with casuarina), you may have to remove and start building the upper structure all over again otherwise it will look too top heavy.
I first focus on branch development from the ground up. In other words I focus on the first 2, or sometimes 4 branches. I allow one or 2 leaders to thicken the overall material in the mean time. Then after about 2 years I focus on the next 3 or 4 branches and so on and so on. Just remember while you are allowing the lower branching to grow and ramify, it is important to keep the upper half of the tree quite open. This means - try to avoid developing thick foliage up top which can shade the lower branching and hinder its growth.
By encouraging the tree to put its growth focus into the lower areas first, it accelerates the branch development and ramification down low sooner. So this way you don't have to wait until the entire trunk is the thickness you want before you start concentrating on low branching. I usually don't allow the leader(s) to grow more than about 20-30cm in height above the tree before I cut back hard, otherwise it allows the growth to dominate at the apex and hinder the lower branching. Then as the tree ages, you reduce the allowed growth height a little more each year.
One of the visually unappealing traits of a poor casuarina is when the branching is the same thickness all up and down the tree. If the apex of a casuarina is allowed to thicken too quickly - or not 'kept in check' - it will start to thicken too fast in the upper branching and result in a very top heavy looking tree.
However if you have allowed multiple upright branches to form, you don't have to instantly cut off the thickened area to create a more streamline tree. Sometimes you can take a step back and contemplate if it compliments the tree. In the middle and upper half of the tree they often develop a natural multi-trunk look in the wild. So you can utilize this oversight and cut back one of the potential trunks and allow it to become a smaller 2nd leader just like you often see in the wild. Then you just continually ramify and keep the growth in check on this smaller 2nd leader that you have created. The main leader should still be allowed to grow and thicken, and if you repeat this process with staggered leaders all over the top two-thirds of the trunk, it can create a very natural upright multi-trunking casuarina.
Foliage:
When you are reducing the length of the needles, do not cut the foliage if you are about to exhibit your tree for display. This can brown the ends of the needles as they die-back at the tips. Instead, pinch off the point of the needle you want to remove by holding the needle, then twist or pull off the excess.
The needles of casuarina have the capacity to develop into branches (but they don't always), so if you are wanting a branch to develop somewhere, you can sometimes wait for it to appear, especially after a trunk chop. Alternatively once the trunk/primary branch is roughly more than say (5mm or 0.5cm) you can just cut it and it will usually put out new growth around the point of the cut.
If you are trying to get a branch to develop somewhere remember to think outside the square with casuarina. In the wild their branches can grow very erratically, so if you have trouble trying to get a shoot to grow exactly where you want it to - don't be too discouraged and don't cut back the tree constantly just because it isn't putting out a branch where you want it. Try to open your mind to other possibilities.
However if you really want a branch to form somehwere, wait until Spring and then can cut a branch back hard that is just above or near that area. This can sometimes encourage new buds to appear from that point and also below the cut, which will hopefully promote new growth where you want it to. Remember to fertilize regularly which can encourage new shoots to form. Allow the area you want the new growth to develop to be fully exposed to the sun.
I have purchased Allocasuarina torulosa stock before from Padre pio nursery which was pot bound and had not been repotted for about 6-7 years and the needles did not get longer than 4cm-5cm all over. For the next year at my place the stock still continued to push out needles of length about 5cm. (Though at a significantly slow rate) About 2 weeks after giving them a careful repot into a slightly larger container, they shot all over. I then allowed them to grow for 6 months. After this time the growth resulted in needles of normal length of around 10cm plus. It is a quandry, because you don't want to leave your tree for so long without a repot otherwise it will be in poor health. But this questions whether you can have shorter needles by not repotting as often.
Anchoring/Wiring:
I prefer to anchor young branches to create the movement I want. I use plant ties which are very thin wires covered in a flat sheath of plastic. I tie one end to the pot (or a strong nearby branch) and then around the branch and pull it down, up or sideways - whatever I am after. I then tie the other end back to the pot/branch. Sometimes you will need multiple anchor points to get the right angle.
For torulosa and littoralis you can wrap/wire around the branch firmly as the growth on these species will eventually grow over any small scars.
For cunninghamiana and glauca I only wrap/wire over the branch once, (in other words don't encircle the branch which constricts and scars the growth).
If you are going to be wiring/anchoring stronger branches, I recommend doing this just before the tree needs its next watering. This way the branching is not quite as rigid and hopefully slightly increases its flexibility. I have wired Casuarina before and wasn't too concerned about leaving the wire on too long - particularly on torulosa and littoralis - because as the bark develops quickly it easily heals over the scars.
Branches can easily be broken or snapped off. So if you happen to hear the snap - from my experience do not lose heart. I again use plant ties and anchor the branch back so that there is reasonable amount of tension on the branch holding it back in place. I don't recommend wiring the branch in place after a snap, as while you are applying the wire you increase the chances of accidentally breaking the branch clean off. Using a plant tie creates perfect tension forching the cracked area to bind together tightly. I just use a plant tie and wrap it around the snapped branch, then tied back onto the trunk / pot, which doesn't allow the cut to be exposed in any way and it minimizes the man handling on the damaged branch. It is just one simple tie-over and anchored back. However if the branch is completely broken off you will probably want to use a different method, as I've not bothered with completely broken branches. I have had great success healing cracked branches using this method.
***[INSERT picture of branch being tied down with plant tie]***
Cutting (and healing scars):
If you are going to perform a signifcant cut (anything thicker than about 2cm or 20mm), you need to be aware of how the area around this will respond and grow. Try to make large branch removal decisions early on. It is better to perform these significant cuts whilst the tree is in the growing phase of its development (whilst you are still thickening the trunk) as the healing process will be much faster in this phase.
Firstly, dead exposed wood can not heal. An exposed cut (if cut flush) will eventually be enveloped by the normal growth enclosing AROUND AND OVER the dead wood. For this reason you have to remember that the tree is still going to grow and thicken around the remaining circumference that was not cut. So this growth will continue to put on thickness on the opposite and adjacent sides, while the exposed cut side will slowly be enveloped by the rolling growth over the cut. With casuarina this can look beautiful and once it completely heals over it gives you that slight angled look from nature when branches are naturally knocked off and heal over - sometimes with a bump. If you don't make the cut flush against the trunk then it can increase the time it takes to heal the scar. It is best to use a pair of proper large bonsai branch cutters for this if you have them, but it is not vital.
The important point to remember is that the trunk will thicken faster on the opposite side of the heavy cut, so you may need to factor this into your future design if it is a significant cut.
If you wish to encourage the 'healing process' faster, you have to use the natural growth of the tree to your advantage. This is best utilized by planning ahead and NOT removing any growth or branching near the area you have cut. By leaving this growth near the cut, these branches will thicken - which in turn accelerates the rolling effect of the cambium growing over to encompass the wound. You can think of it like circles increasing in size to eventually envelop the exposed wound. So perform the cut/removal directly below or adjacent to existing branching, which in turn accelerates the healing process.
Sometimes within a few weeks you will get little buds forming right around the scar. Leave these buds on to develop and thicken, which again accelerates the healing process. Then just play it accordingly so you don't allow these sacrificial branches to get too big before you also remove them.
And fertilize, fertilize, fertilize. This will aid the tree to grow and heal the scar quicker.
***[Use paint or images to show the area of a cut and how it will be sealed over time from growth]***
----
TRUNK CHOPPING (not shohin or mame):
*Only perform a trunk chop if the tree is in good health!*
For most casuarina I strongly recommended not to trunk chop or make the first cut on a seedling/young material until the diameter of the trunk is at least 15mm (1.5cm). The reason for this is: if you cut when the trunk is thinner, then the flush of new growth that results from this usually promotes significant bulging on thinner trunks, which can be very hard to fix (if you don't like it). The new flush of growth that follows a trunk chop is usually anywhere from [3 - 4] shoots to [10 - 20] shoots on thicker trunks. And this will very quickly promote the bulging effect. So if you wait until the trunk is about 15mm or thicker in diameter it is much less affected by bulging. Then you can allow about 3 or 4 STAGGERED shoots to thicken a little (by staggered I mean not all from the same point). Survival of the fittest will then ensue: So many times people only allow one leader which may soon get eaten or damaged, and then the growing process is hampered or it can result in die-back down the trunk. So once you have shoots that get to about 3mm thick, cut off the other ones you do not want to keep, sooner rather than later.
In my experience the best time to cut back the trunk is October/November. You can still do it all year round but it may sulk outside Spring/Summer. I have noticed that the most prolific new growth is produced from cutting in October/November. If you cut during this period then usually about 2 weeks after the trunk chop you should start to see new growth forming. It can be a significantly longer wait for any new growth during winter or late autumn. In some cases if you cut during late autumn/winter, the new growth can be so slow to emerge and take many months which sometimes can result in die back in the worst case scenario, especially if it is not getting a lot of sun over winter.
For torulosa especially, I recommend ensuring you have growth (foliage/branches) right below the point of where you are cutting, so that you decrease the very small chance of die-back all the way to the base and effectively you can lose the entire tree.
For cunninghamiana, glauca and littoralis, this usually isn't such a noticeable problem as it generally always shoots close to the original cut and in abundant masses. I swear torulosa has an invisible lignotuber for this reason (joke).
If you are continually cutting back growth - especially after a trunk chop - you are increasing the chances of die-back regardless of the species. Casuarina needs to grow. I don't recommend styling a casuarina by continually cutting back every few weeks to shape it. Sorry to sound like a broken record but this can promote die-back. I usually only perform a heavy cut back on Casuarina trees up to a maximum of 3 times a year (and usually not in winter) - apart from the occasional snip to discourage bulging.
The biggest mistake I made when I started with them was to continually clip them. For example : only a month after you just cut them back hard, you change your mind on the design and cut again. Make the big decisions now, decide what you want to remove, then cut it back hard. Then leave it for at least 3 months or more to grow in full sun and recover. The only exception is the occasional removal of multiple branching or pruning long branches to avoid unwanted thickening.
----
SUN:
This is the most important part of keeping a Casuarina in good health.
All Casuarina require ample amounts of sunlight and they all prefer full sun.
All branches of Casuarina need exposure to the sun. In particular with Casuarina, if a branch is continually shaded it will start to decline in health. Eventually after about 6 weeks the branches may wilt, or may even die-back or die altogether. It is a common assumption that your branch has died-back because it is growing downwards. More often it is simply because it is being heavily shaded with no exposure to sun that kills it.
For cunninghamiana and glauca which has such strong upwards growth, you should angle the ends of the downwards branches up (and allow a lot of the foliage along the downwards sloped branch to naturally grow upwards as well). This ensures the branch is not allowed to lose its vigour. It is usually not so much a problem on littoralis or torulosa if it gets a lot of sun. This is because the foliage and branching often weep a lot more on these 2.
*** INSERT picture of shaded off branch that is dying ***
*** INSERT picture of a tree with top half in great health, and the lower branches shaded and dying ***
Obviously you need to make sure the middle and top section of your tree isn't too heavy with foliage/growth which is shading the lower areas and thus causing your lower branching to die back. So also remember to rotate your tree every few weeks or so, but if it is being ground grown then make sure branches you don't want to lose down low are given a lot of sun exposure.
FULL SUN (only a guide)
1 hour of full sunlight only = Your Casuarina MAY tolerate this but may not be growing at a healthy rate.
1-2 hours of full sunlight only = Your Casuarina should tolerate this and be in reasonable health.
2-4 hours of full sunlight only = Your Casuarina should thrive and be in very good health.
4+ hours of full sunlight only = Your Casuarina should thrive and be in excellent health.
PART SHADE (only a guide)
1 hour of part shade only = Your Casuarina will most likely start to decline.
1-2 hours of part shade only = Your Casuarina may struggle for survival.
2-4 hours of part shade only = Your Casuarina should tolerate this but may not be growing at a healthy rate.
4+ hours of part shade only = Your Casuarina will tolerate this and should be in good health.
From my experience Casuarina glauca is the most tolerant in the genus for heavy shade.
I have since observed that Casuarina cunninghamiana is actually the least tolerant of continually shaded conditions.
Littoralis and torulosa both have a medium tolerance to continual shade.
Casuarina cunninghamiana is possibly the species you want to prioritize by placing it in the sunniest position, especially over winter or when there is more chance of shading.
Winter Sun:
The less foliage a Casuarina has, the less water it will require. So if your Casuarina has a good 'head of hair' going into winter, this increases the water intake and helps the roots get sufficiently aired in between waterings.
The sun travels differently across the sky in winter than in summer and is lower in the sky and usually weaker in strength because of the lower temperatures. Also the increased shade that usually results from the direction the sun travels often shades trees more. During winter if you have a spare day at home then every hour or so, take note of where the sun is shining during winter over your trees and adjust your trees accordingly. Basically the same tree will get potentially very different angles of sun than in summer, and it may need to be moved to get sufficient sun. Remember most trees should be rotated as well, especially with group plantings.
Be mindful of lower branches and allow them to get maximum sun by reducing the upper half of the foliage.
----
SOIL / DRAINAGE / CONTAINER :
This is the 2nd most important part of keeping a Casuarina in good health.
Most Casuarina love a well draining mix. Casuarina glauca is the only species I have found so far that doesn't have a big impact, but it still prefers full sun. Casuarina glauca thrives in anything! Over the years I have not seen any magical soil formula for growing Casuarina. You can use any standard soil / bonsai soil mix you prefer. Just make sure the soil drains well and they will thrive. Once you have thoroughly watered the soil there should not be any part of the pot that has water pooling. It helps to have a certain amount of large particles in the soil mix so that the roots are not staying continually wet.
If you place a Casuarina into a 'growing pot', (by a 'growing pot' I mean a pot that has a large area for the roots to grow out in) you are encouraging the tree to put on significant trunk girth. You will find that you'll get flushes of growth everywhere as well and the main trunk and primary branches will start to thicken quickly. It can be a good/bad thing depending on what you want. This is the common preferred method for putting on trunk girth. However if you don't keep an eye on your tree you will soon get so many branches forming and bar branches (branches coming out from the same point), that you may get bulging from these areas.
If you dislike bulging, you need to constantly remove bar branches that are more than say about 1/4 the diameter of the trunk/branch it is growing from. Take note, this does not just mean keep an eye on the primary branch, but the branching as well. Of course it isn't a rule of thumb as branching will often have bulging in the wild, so it is up to you how you want your tree styled. This is just to advise you on how to avoid bulging. As a side note however, if the bar branches are kept short and ramified well and not allowed to grow vigorously, it may not result in bulging and can look very beautiful.
The container that you grow your Casuarina in is very important. This primarily depends on what stage your tree is at and what you want the final tree to look like.
So, as stated above:
-If you are in the 'growing phase' use a big, well draining pot or ground-grow the tree.
-If you are happy with the trunk size, then it is time to place the tree into a bonsai pot or restrict the roots by not allowing them ample room for massive growth and thickening.
----
REPOTTING:
DO NOT bury the base of the trunk below the soil line to promote roots. With casuarina if you bury the base of the trunk below the soil line it can encourage reverse taper. Instead, use a finer medium of soil (small particles) around the base of the first 2-3cm of roots in an effort to keep that soil a bit more damp to encourage root growth. Keep cutting off the roots that are growing downwards and only allow the radial roots to remain which should also encourage new root development.
Only repot a tree if it is in very good health. The only exception to this is if the soil is not draining properly or the roots have started to develop rot. In this case, remove the rotting section of the roots and place into a well draining mix. Be mindful of how much root is left to support the foliage and do not over-water the tree going forward – only water it when the soil is beginning to dry.
If the top soil of your tree is very hard and difficult to get your finger into, then it should be repotted as soon as possible. I remove all the soil from the root ball (depending on how compact the immediate soil below the trunk is of course, as this may not always be possible on older stock). I have not had any problems removing all the soil from large, older casuarina when I have repotted.
I bare root Casuarina every time I repot (remove all the soil including directly below the trunk), which also ensures I remove any curl grubs. I have found Casuarina to be very hardy provided you don't remove more than say 60 % of roots on very old and well established Casuarina. Like most developments of bonsai it can be done over different stages. On most Casuarina that is under about 8 years old, I have happily removed up to 70-80% of the roots without any problems. I usually leave at least 20-30% of the original foliage on for better health and a faster recovery. I never defoliate a Casuarina unless I have a specific reason to (see inverse taper subject).
Repotting can be done in any weather. You don't have to worry if nights get as low as 5 degrees or days get as high as 40 degrees. However if the weather is particularly hot and windy (careful as the wind can dry the roots if you take hours to repot) just make sure you are continually spraying the roots to keep them moist. I am not in a climate where we get freezing temps so I have not had any experience repotting below 5 degrees.
If you are repotting torulosa or littoralis, do not pull the tree out of the pot by holding the trunk as you will damage the bark. Do not place a cloth around the trunk while you repot as this will damage the bark. Do not have the sprayer set on a strong jet as this will damage the bark. Protect the bark by not touching it with anything. Usually I hold the tree by the upper branching that hasn’t started to develop fissuring yet or very carefully by the root ball.
As I work the roots I usually set my sprayer to a medium-strength wide spray and take the slow and steady method of wetting and easing apart the root ball. If you have crossed roots preventing you from removing the old soil, you will probably need to cut a few. So just make sure the roots aren't deceiving and is one of the few main roots of the whole root ball you are about to cut off.
The optimal time for repotting is generally any time between Spring and Summer. I have repotted all throughout Autumn and Winter but I don't usually repot in late autumn or winter because of the slower growth rate that ensues. The slower growth rate can hinder the recovery process so I choose to perform the repot in Spring/Summer. Our weather here doesn't drop below zero, so I can't advise on other areas.
The most important aspect of repotting is to remove roots/foliage in proportion. If you have healthy roots and you remove half of them, then you should remove the foliage so that the remainder of the foliage is roughly the same in size or less as the supporting roots was previously. If you cut the roots back hard but leave on too much foliage, you WILL get die back as the roots now can't support the volume of foliage. You are less likely to get problems if you cut back more of the foliage than the roots. Generally speaking if the tree is in good health, cutting back the roots / foliage will prompt the tree to produce a huge flush of new growth to emerge everywhere.
However if you are specifically after a flush of growth everywhere and the roots aren't pot bound, then you can do a light trim of the roots (remove all the old soil) but heavily cut back the foliage. This should promote a lot of new growth. Continue to fertilize weekly.
Check for CURL GRUBS!
This is one of the benefits of removing all the soil.
When you repot, one of the main things you should be looking out for is curl grubs. When you are repotting, these pests will detect the root disturbance and the first thing they will do is crawl up closer to the base of the trunk near the root ball for safety, often directly under the trunk. While repotting I have found them only a few cm below the base of the tree and you sometimes only find them once you have removed all the soil. Curl grubs can eventually kill a tree as they eat the roots and up through the base of the tree.
----
WATERING:
If it is a hot day and the soil is allowed to become bone dry your casuarina will possibly die.
It is okay to over-water your casuarina occasionally if you are going to be away, or it continually rains etc. But if the tree is continually over-watered for a period of say 4-6 weeks it may start to develop problems like root rot or fungal problems. Mushrooms appearing can sometimes be an indicator that the soil is staying too wet for too long.
The entire soil in the pot needs to be fully soaked when you water it. If the soil is hard to touch on the surface, (ie you can't penetrate it easily with your finger), then it is usually best to repot it as soon as possible and remove all the old soil.
When to next water a tree is the most important part of watering. You only rewater the tree if the soil has little moisture left in the soil. You can think about it like sand at the beach ; the sand on a beach near the shore is completely dry and falls out of your hand like an hourglass. When the soil becomes like this it is too late for a Casuarina.
The sand near where the waves are breaking is damp and retains its shape when held. This would be too soon to rewater.
So you need to find that medium between the two, which is usually closer to the dry sand.
If you place your finger 5cm into the soil and it has minimal moisture in the soil (your finger doesn't retain many specs of soil when you pull it out), it is definitely time to rewater.
***[INSERT 2 pictures of soil showing still too wet to rewater]***
***[INSERT the 2nd picture of soil showing one that needs to be rewatered]***
On a windy day if the soil is still retaining a small amount of moisture, MAKE SURE you don't leave the tree until the next day to check the soil again. Wind can dry your bonsai out faster than the sun will. If constant winds are forecast sometimes its better to rewater and be on the safe side. And if it is a hot day and you have wind, then that is the double whammy which can kill casuarina very quickly.
The important part to remember is : if you have been adhering to watering your bonsai correctly and only watering it when the tree needs it (when the soil is almost dry), then you can afford to overwater it occasionally.
This is why it is important to try the MAJORITY of the time to water correctly, so you can afford to over water occasionally and prevent it from drying out when hot and windy weather is forecast.
Remember - if the soil is allowed to become bone dry it will probably die.
In summary:
Water your tree thoroughly and allow all the excess water to run free. Do not re-water the bonsai until the soil is just about dry. (This can vary for different casuarina as some will use the water faster than others. So you cannot have a system of watering that is the same for all your trees). If you are just re-watering all of them when you think the majority of them need more water, then chances are you have too many trees to look after.
The science of watering container potted plants - whether they are bonsai or not - is essentially not something you can learn on a forum. Go to a nursery and ask them to show you when is a good example of a potted tree that needs watering. This is the best advice you can give anyone, as you will see first hand what is required. Remember you are not meant to keep the soil constantly moist.
----
MOSS:
If the trunk of your casuarina has moss forming, this is generally not a good thing.
Firstly it is either staying damp too long, or the trunk is not being exposed to enough sun. Usually it is both.
If it has simply been a very damp winter and there has been continual rainfall for a long period of time, there is nothing to be too concerned about. Because once the trunk gets exposed to sunshine for longer periods of time and there isn't continual rain, it will dry out the moss and eventually the moss will die.
For torulosa and littoralis it is often recommended to simply expose the trunk to more sun, rather than trying to remove the moss with tweezers or a toothbrush etc, as this may work but will also damage the beautiful bark in the process. I have tried every wives tale in the book and the only sure fire treatment is full sun, which is both a cure and a prevention.
***[Moss covered trunk of Allocasuarina torulosa and how it is very hard to remove]***
***[Moss covered trunk of Casuarina cunninghamiana and how it is very easy to remove]***
The primary reason that moss is not good for the tree is that it means moisture and dampness is being associated with the trunk. This means there is a chance it will start to rot the beautiful bark over long periods of time. If the conditions continue, the moss usually spreads, covering the top soil and can become quite thick. It affects the rate which your soil dries. Thick strong moss can significantly slow the evaporation and the roots will stay wet for longer and so on and so on.
----
FERTILIZING:
Casuarina are very hardy. If your tree is in good health you can safely apply the fertilizer at the full strength recommended for a tree, which is usually written on the side of the bottle/tub.
You can safely fertilize your Casuarina weekly. You can apply just about anything to casuarina as long as you fertilize regularly for good health. However do not apply a slow release fertilizer which will dump its contents after less than a week of watering. This can and probably will have a devastating effect on your tree. "Brunnings" - with an R, is a slow release fertilizer that has been notoriously known for killing bonsai because of this problem. I lost a few in the past from trialling Brunnings. Clinton from Ray Nesci bonsai nursery advised me many years ago that members in the past have lost priceless bonsai from using this dangerous fertilizer.
Personally I use Osmocote native slow release fertilizer. I also use 'Powerfeed for Natives' once a week at full strength when I can remember. Take note that if the slow release fertilizer pellets you are using become soft when saturated with water and are easily able to be dissolved by applying soft pressure, then they are hazardous to your bonsai.
Just one important tip though : if you are using the small slow release fertilizer pellets, make sure none of them get caught at the start of the top of a young branch(es). Spray them off with the hose or remove with a twig/tweezers. Because sometimes if you don't remove it (and the branch is only a few mm thick) it sometimes might burn the start of the branch after a few days of sitting there, and in bad cases I've seen the entire branch die). But this can only happen on very young branches obviously, (usually less than 2mm thick).
***[Insert picture of a fertilizer pellet caught at the top of a branch or 2 branches]***
If you have never fertilized your tree, it might be best to apply at or less than 40-50% strength for a month. Then gradually build up to full strength with each application. But for Casuarina they are fairly hardy. Bare in mind though on older pot-bound material they can develop proteoid roots, so keep this in mind if you have never fertilized your Casuarina before.
Unless they have been repotted recently, I usually repot and root-prune any new Casuarina I acquire. Thus I haven't had experience with fertilizing old pot bound Casuarina with proteoid roots that had not previously been fertilized.
----
STYLING
I wont delve deep into styling in this thread as it is a personal decision and I prefer to keep this thread more about the process of growing them.
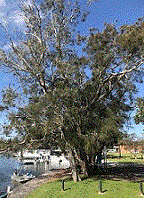
It is my preference to try and style Casuarina in a more natural element. This is completely subjective however and will depend on the look you are after. For me, if my Casuarina looks like a casuarina in the wild then I am happy. There are so many forms and styles of casuarina in the wild that nearly all styles of growth can be attained with a natural look. One of my personal favourites with casuarina is the look of growing out over a river or creek. Casuarina can also have that iconic upright gentle lean to them which can be very beautiful. Their branches can be long and wavy or sharp and angled, and often you can see this all on the same tree.
Study the species in the wild. You can often see the tree forming multiple trunks about halfway up and then all out like radial growth. The branches can grow down, then out and further down... or they can grow up and out and further up.
***[insert multiple images of different styles of Casuarina trees (out over river/leaning/upright, etc)]***
Group plantings (in particular - clumps) of casuarina look spectacular if they are done well.
----
PESTS
There are numerous pests that you need to be on the lookout for when growing Casuarina. These are the 4 most damaging types I have encountered.
1. Curl grubs
***[CURLGRUB.jpg]***
One sign is the formation of fine wood (like a powder), at the base of the tree. This is usually a bad sign as it might have progressed up into the trunk.
Another sign is the tree is slightly wobbly and no longer secure in the pot, as the grubs have been eating the roots.
When you repot, try to remove ALL the soil and check for curl grubs.
2. Bark muncher 1 (with a protective coat shaped as an almost elongated patchy diamond-shape).
***[BARK-CHEWING-GRUBS1.jpg]***
This form of pest can be very difficult to spot. It feeds on the softer bark of the tree and in just a few days it can ring bark a 7-8mm diameter branch effectively killing the branch. It can also chew around a young trunk and in a few weeks can also ring bark the trunk. It forms an outer cocoon made up of tiny pieces of bark, sticks and soil. It can be so well camoflauged that you simply think it is part of the bark. They are easily spotted on young Casuarnia branches/trunks that have not formed strong rough bark, and they appear like a piece of heterogenous (mixed together) dirt hanging from the trunk/branch.
However on old, fissured or deep, rough bark they can be very hard to find. They will hide on the rough bark but feed on soft bark / cambium all over the tree.
Be careful when you pull it off the branch/trunk. Make sure your hand is underneath it and use the other hand to pull it off. You don't want the grub to fall to the soil and escape. You can either rip the cone apart and look at the grub and kill it, or simply squash the entire cone and kill the grub inside it. However, the house that this grub creates, is very difficult to pull apart, and you have to tear it apart with a bit of force if you want to look at it inside.
3. Bark muncher 2 (with a protective coat shaped as an elongated cone)
***[BARK-CHEWING-GRUBS2.jpg]***
This form of pest is a little bit easier to spot, but to the untrained eye they can appear like a short twig. It feeds on the softer bark of the tree and in just a few days it can ring bark a 7-8mm diameter branch effectively killing the branch. It can also chew around a young trunk and in a few weeks can also ring bark the trunk. This pest forms an outer elongated cone that you can tear apart like wet paper. They are easily spotted on young Casuarnia branches/trunks that have not formed strong rough bark. They are always attached from the base of the cone, whilst they munch on the tree. It looks like a small construction witches hat, but brownish in colour and looks perfectly like a conical twig attached to the tree/branch.
On older fissured or deep, rough bark they can be harder to find but once you know what to look for you can often spot them quickly. They will feed on soft bark / cambium all over the tree.
Be careful when you pull it off the branch/trunk. Make sure your hand is underneath it and use the other hand to pull it off. You don't want the grub to fall to the soil and escape. You can either rip the cone apart and look at the grub and kill it, or simply squash the entire cone and kill the grub inside it. The house that it lives in will tear apart fairly easily if you want to inspect the grub inside.
4. Borer
***[BORER.jpg]***
The tell tale sign of a borer is usually a build up of sawdust (fine munched on wood) that collects at the base of the tree. Usually you can find the hole up above the formation of the sawdust. I have usually found them anywhere up to 10cm from the base of the tree hiding in a hole that travels down into the trunk. I have only found 2 borers in the whole time I've been growing casuarina and on both occasions I sprayed a tiny amount of WD-40 into the hole (I'm talking about holding the nozzle down for less than 1/5th of a second), and the first time I presumed it was left for dead. On the second time I have seen the borer crawl out of the hole into my hand where I instantly killed it.
There are other sprays you can use : any insecticide especially if it states borers on the list of pests should kill them. But WD-40 has that long, very thin straw that is very handy to insert deep into its home before I spray it. But don't spray for more than a fraction of a second, as its NOT the ideal liquid you want dripping into the roots. On both occasions I have used it I never had a problem with the roots being affected, but I literally only sprayed for a tiny fraction of a second.
----
The health of your Casuarina:
The most common reasons why your casuarina will fall ill are stated below:
1. Allowed to dry out
2. Overwatered and the roots are rotting
3. Not enough sun
4. Pot bound and no fertilizer
5. Curl grubs / borers / insects / fauna
Flow chart to follow for how
----
Pests:
----
----
Species: cunninghamiana / glauca / distyla / torulosa / littoralis / nana
***INSERT PICTURES FOR EACH SPECIES FOLIAGE / BARK / WHOLE TREE***
------------------------
Casuarina cunninghamiana
------------------------
SUN: Prefers full sun, and does not tolerate strong shade
SOIL: Prefers well draining mix
DROUGHT-TOLERANCE: If kept as a bonsai this species has a medium tolerance to drought. Never allow the soil to become bone dry.
BARK: Rough, hard
GROWTH: Upright
TRUNK: Straight
FOLIAGE: Thin (1-2mm)
*Ensure that all the branches receive sun, otherwise the shaded branches have a high tendancy to die back.
*Best suited to single trunks, multiple trunks, clumps and group plantings.
*Does not like to be kept constantly wet, allow to become somewhat dry then thoroughly rewater.
----------------
Casuarina glauca
----------------
SUN: Prefers full sun, and tolerates strong shade
SOIL: Grows well in all mixes
DROUGHT-TOLERANCE: If kept as a bonsai this species has a medium tolerance to drought. Never allow the soil to become bone dry.
BARK: Rough, hard
GROWTH: Upright
TRUNK: Straight, often multi-trunk
FOLIAGE: Thin (1-2mm)
*Ensure that all the branches receive sun, otherwise the shaded branches have a medium tendancy to die back.
*Best suited to single trunks, multiple trunks, clumps and group plantings.
*Will tolerate poor drainage and you can safely over-water for extended periods, but best to thoroughly rewater when the soil is on the drier side.
---------------------
Allocasuarina distyla
---------------------
SUN: Prefers full sun, and does not tolerate strong shade or lots of rain/moisture.
SOIL: Prefers a high draining mix
DROUGHT-TOLERANCE: High, this species can tolerate drought but it does not tolerate being over-watered. Try not to let the soil become bone dry.
BARK:
GROWTH: Upright
TRUNK: This is a fairly slow growing species and doesn't trunk-thicken well.
FOLIAGE: Course (2-3mm)
This species does not grow well in humid area. Doesn't like shade or regular watering.
------------------------
Allocasuarina littoralis
------------------------
SUN: Prefers full sun, will tolerate part shade
SOIL: Prefers well draining mix
DROUGHT-TOLERANCE: If kept as a bonsai, this species is highly susceptible to drought. Never allow the soil to become bone dry.
BARK: Fissured, delicate
GROWTH: Upright, sometimes weeps
TRUNK: Tendency to bulge at base
FOLIAGE: Thin (1-2mm)
*Ensure that all the branches receive sun, otherwise the shaded branches have a medium tendancy to die back.
*Best suited to single trunks and multiple trunks.
*Does not like to be kept constantly wet, allow to become somewhat dry then thoroughly rewater.
----------------------
Allocasuarina torulosa
----------------------
SUN: Prefers full sun, will tolerate part shade
SOIL: Prefers well draining mix
DROUGHT-TOLERANCE: If kept as a bonsai, this species is highly susceptible to drought. Never allow the soil to become bone dry.
BARK: Deeply Fissured, fragile
GROWTH: Upright and weeping
TRUNK: Tendency to bulge at base
FOLIAGE: Thin (1-2mm)
*Ensure that all the branches receive sun, otherwise the shaded branches have a medium tendancy to die back.
*Best suited to single trunks and multiple trunks.
*Does not like to be kept constantly wet, allow to become somewhat dry then thoroughly rewater.
------------------
Allocasuarina nana
------------------
SUN:
SOIL:
DROUGHT-TOLERANCE:
BARK:
GROWTH:
TRUNK:
FOLIAGE:
----
INVERSE TAPER / BURIED TRUNK:
If you have acquired a new casuarina for the first time, check to see where the base of the trunk is. If the start of the trunk is below the soil line then there is a strong chance it might have reverse taper as they have a tendency to bulge at the soil line. (more so with torulosa and littoralis)
To rectify this (depending on when it was lost repotted try to wait at least 6 months) immediately repot the tree and ensure that the base of the trunk is now above the soil line.
If the buried portion of the trunk is thinner than the trunk above the soil line there are a few techniques to try. Firstly, lift the tree above the soil line so that the roots now start just below the soil line and the bulge/inverse taper is above the soil.
You can attempt either of the following:
1. Make sure the tree is in excellent health and you are fertilizing EVERY week with 'Powerfeed for Natives'.
Wait until spring and if the tree is in excellent health, trunk chop low and hard. The new shoots that emerge will hopefully have shoots coming from the base. Allow all these shoots up to the point of the reverse tapered trunk to develop and grow long and strong. (However, DO NOT allow shoots at the point of the old soil line or an inch above where the trunk is thicker to develop) Over time as these new shoots thicken, it should rectify the problem.
2. Obviously lift the tree above the soil line so that the roots now start just below the soil line and the bulge/inverse taper is above the soil.
If you don't want to trunk chop low because it already has a good structure, then again wait until spring.
Make sure the tree is in excellent health and you are fertilizing EVERY week with 'Powerfeed for Natives'
Cut off all the foliage and cut back each branch fairly hard, but you need to cut back every branch! This usually triggers lower growth and all over the tree.
Now keep doing either method every spring until it presents shoots down low to thicken the problem. Remember to fertilize EVERY week with 'Powerfeed for Natives' to encourage more growth during this period.
Also allow the thin base of the trunk to get full sun. Try to continually reduce the upper structure every few months or so, which should encourage the growth and allow more light to the lower problem areas.
Once your base is thicker and the problem is rectified, you can remove the sacrifice branches from down low. (But before you remove them, take a step back and make sure that if you kept one of the newly formed trunks, that it wouldn't increase the beauty of the whole design.)
----
CONTAINER: Growing pot / Bonsai pot (trunk-thickening):
If you want to increase the overall girth (circumference) of your trees trunk, do not grow your Casuarina in a bonsai pot. Place your tree into a growing pot or the optimal preference being an orchid pot. Orchid pots are fantastic. The reason they are so good for bonsai are the numerous drainage holes and side drainage. In contrast, a regular pot has probably only a few holes for drainage across the base. So if the pot is at a slight angle you might get water pooling in the pot. In particular the side drainage slits in orchid pots substantially assist the entire medium to drain well and thus promotes healthy roots.
If you really want to maximise growth in the growing phase and keep your roots healthy, you can place the orchid pot over the ground which will ensure that the roots start to penetrate the ground. This really thickens the tree while still having the side drainage as well. You will then need to lift the pot off the ground every year or so by cutting off the roots that have grown downwards. So effectively you are trying to keep the radial roots close to the trunk growing inside the pot, while quickly allowing the tree to increase its size.
*** Insert picture of orchid pot ***
With Casuarina it is a great idea to ground grow them in orchid pots because it allows the tree to survive periods of induced 'drought' whereby you may forget to properly water or assume the soil is still damp, when in fact the majority of the soil isn't. If the roots grow deep into the ground they will usually have 'insurance' by still being able to access water and thus increase the chances it survives if you happen to not water it on time.
Take note that if you are growing the trunk to increase its girth, try not to heavily over-pot a Casuarina tree if the medium you are using is 'heavy' or doesn't dry within a normal 24-36 hour period. (over-pot means placing the roots into a significantly larger container than the roots require). Otherwise it might stay too wet in the container for too long, especially over winter and even more so if you have removed a lot of the foliage. Some people will say that overpotting doesn't matter if you have exceptional drainage. But be careful ; for instance if you heavily overpot the tree and compensate that with very fast drainage, then it might be detrimental to the tree on a really hot windy day and completely dry out and die). So when you repot a tree try to make sure the pot you are now placing the roots into doesn't get too bogged down in the soil. There should still be a reasonably proportionate ratio of the roots to the room left in the pot to maintain a healthy root system. If you are trying to increase the trunk girth I usually wouldn't go more than 2 or 2.5 times the entire root ball of extra room. In my opinion though, ground growing is still a better option.
Once you are happy enough with the size of the trunk (the girth), it is best to then stop growing the tree in a 'growing pot' and repot the tree into an actual bonsai pot - mainly because it will slow down the significant growth you get from a growing pot. If you leave it in a growing pot it can over-thicken your upper branches too quickly with vigorous growth. By reducing the room for the roots to grow in you will usually get better ramification, provided you ensure the whole tree is well exposed to full sun.
So try to place the roots into a pot that reasonably accomodates it leaving only an inch or so of room to continue growing in.
BONSAI POT:
Try to lean towards the deeper sized bonsai pots for Casuarina.
In my opinion a shallow pot with room for the roots to grow laterally may look fancy, but is far too dangerous on continually hot, sunny and windy days for a Casuarina.
In my opinion a deep pot which allows the soil at the bottom to remain wet longer than a shallow pot would, gives Casuarina insurance against continually hot, sunny and windy days.
If you have put a lot of effort and love into a great tree, try not to display it in a factory produced cheap pot. Be sure to take a look at these potters from Australia to acquire a beautiful hand made pot for your Casuarina.
----
BRANCH DEVELOPMENT:
For casuarina the most important rule when developing the branches is to not let the branching grow unchecked. By this I mean casuarina is an interesting genus because it can very quickly thicken up areas from intense growth. Then all of a sudden your beautiful tree that you have worked so hard on can thicken up too much up top in just a matter of weeks/months. It is recommended to try and learn the basics of branch development and refinement for this genus and also how to minimize bulging.
With casuarina try not to let the upper branches become too bushy and overshadow the lower branch structure. If you put more effort into pruning the upper branch structure rather than the lower - and deciding which branches you want to keep earlier on than later - it will reduce the chances of upsetting your design. Any time you let a casuarina branch extend a lot it will usually thicken significantly at the start of the branch and so forth for each tier of branching. *take note* -> On the flip side, Casuarina doesn't always thicken the base of the trunk like other trees might, so it is important to remember to try and develop a good thickness on the main trunk before you concentrate on the trees branch structure. If you allow branching to develop somewhat evenly up the trunk it usually increases the trunk thickness accordingly.
I usually focus on the lower branches first, and just cut off the upper branches altogether for the early years. This way you don't end up with a tree that has heavy set branching in the upper half. Initially I grow the lower branches long and strong, but make sure you cut them back to stumps each time, to try and get some nice ramification. Once the branch is about 1cm thick you can cut back to stumps. If you have allowed the branch to get too long and thick, just cut it back hard, and only allow a few shoots to develop each time. On the other branches you can just allow more shoots to develop which depending on the road you take will allow them to reach the same thickness eventually.
If your goal is trunk thickness down low, then obviously do not be concerned about any bulging or over-thickening anywhere above this. Grow everything long and strong.
Sacrifice Branches:
A sacrficie branch is an advantage to thickening the trunk below this point. However with casuarina there are a few quirks to be aware of:
*Try not to start a sacrifice branch until the base of the trunk is about 3cm or more, otherwise you can develop unintentional bulging.
*Remove the sacrifice branch before it is half the thickness of the trunk. Otherwise you are sure to invite bulging at this point.
*Be careful of growing a sacrifice branch on littoralis/torulosa, as these can be more prone to bulging sooner than on cunninghamiana/glauca.
Clip-and-grow:
This is my preference but I rarely wire Casuarina. I prefer the 'clip-and-grow' method. I usually cut a bit beyond the point of growth where you want the branch to ramify and/or change direction. With branches that are thicker than 5mm you will usually get new shoots forming randomly so you can choose the ones you want to encourage and rub off the others. For me it appears cleaner and can sometimes create a more natural look, but it can also be difficult at the same time. Often Casuarina have those long wavy branches which you can still create from anchoring or allowing the branching to grow unhindered. If you need to style the entire branch or angle it a different way I recommend anchoring the branch to the pot or a branch below/above. I have found that wiring young branches of torulosa (less than 5mm) can cause die-back, so I just don't do it. For others it may work
[The size of the branch cuts in the following paragraphs clearly do not apply to shohin or mame]
To maximise the benefits of the clip-and-grow method it significantly helps if the branch is exposed to strong levels of sun. The optimal time to cut is all through Spring/Summer. I usually allow the branch to grow thick enough to decrease die-back before I cut, and sometimes I wait and see if the branch forms side shoots before I cut. When the branch is anywhere from 5mm to 10mm thick (0.5cm - 1cm thick) I usually make the first cut. Otherwise sometimes if you cut the branch too short the remaining stub occasionally can die off (though not common). Once you develop tertiary (3rd level) branching you almost never lose the whole branch to die back using clip-and-grow, provided it is getting strong sun exposure. Then you can happily clip-and-grow to your hearts content from there.
*** INSERT 2 pictures showing before and after of branching that was cut for 'clip-and-grow' method.
With casuarina simply allowing 2 or more branches to develop from the same point, (or even close to each other, usually up or down of 1 cm apart) will often produce bulging if the corresponding bar branches are more than say 1/2 the thickness of the primary branch/trunk that they are growing from.
If you don't like the effects of bar branching, then you need to avoid excessive branches developing from the same point.
***[insert picture of possible bulging starting from bar branching that is just up and down from each other about 1cm]***
However this is usually more of a problem if you are allowing the bar branches to grow long, thick and unchecked. If you maintain and keep the bar branches cut short and not allowed to continually extend, it can stop the bulging effect or slow it down significantly so that it wont be noticeable. (if it concerns you).
*** INSERT picture of bar branching forming bulging ***
*** INSERT picture of bar branching not forming bulging ***
As stated above I usually allow the trunk to thicken first before I concentrate too much on branching. I recommend starting with a thicker trunk to keep the branching aesthetically pleasing to the eye and not out of proportion. Otherwise if you start the branch development whilst the trunk is too slender, it can occasionally look contrived with heavy branching out of proportion.
But do not make the mistake of quickly developing thickness in the lower branches. The common mistake is you will grow the low branches too long and this will produce very thick low branches at the start. I feel it is better to gradually increase the ramification and thickness of the lower branching by cutting it back more regularly. The reason is that Casuarina can thicken very quickly, and it is a lot easier to gradually increase a branch thickness by allowing it to develop more ramification from continual cut-backs, than to try and rectify a branch that has grown too long and too thick for the design.
This is just a guide:
For torulosa and littoralis I recommend growing the base of the trunk diameter to approx (4cm to 5cm = 40mm to 50mm) before starting branch development
For cunninghamiana & glauca I recommend growing the base of the trunk diameter to approx (3cm to 4cm = 30mm to 40mm) before starting branch development
Keep an eye out for shoots that appear near the base. If the shoot forms in the desired position and you allow it to develop into a second smaller trunk it can look lovely and natural and compliment the design. Cunninghamiana and glauca quite often develop multiple clumping trunks which is very majestic. This can look very natural combined with relatively long, swirling branches.
With the benefit of being able to produce new shoots anywhere along the tree and from old wood, Casuarina becomes a brilliant bonsai candidate for this reason. So to some degree you can completely restyle the branching if you are not happy with the current design. Often if you have allowed the upper branching to thicken too quickly (common with casuarina), you may have to remove and start building the upper structure all over again otherwise it will look too top heavy.
I first focus on branch development from the ground up. In other words I focus on the first 2, or sometimes 4 branches. I allow one or 2 leaders to thicken the overall material in the mean time. Then after about 2 years I focus on the next 3 or 4 branches and so on and so on. Just remember while you are allowing the lower branching to grow and ramify, it is important to keep the upper half of the tree quite open. This means - try to avoid developing thick foliage up top which can shade the lower branching and hinder its growth.
By encouraging the tree to put its growth focus into the lower areas first, it accelerates the branch development and ramification down low sooner. So this way you don't have to wait until the entire trunk is the thickness you want before you start concentrating on low branching. I usually don't allow the leader(s) to grow more than about 20-30cm in height above the tree before I cut back hard, otherwise it allows the growth to dominate at the apex and hinder the lower branching. Then as the tree ages, you reduce the allowed growth height a little more each year.
One of the visually unappealing traits of a poor casuarina is when the branching is the same thickness all up and down the tree. If the apex of a casuarina is allowed to thicken too quickly - or not 'kept in check' - it will start to thicken too fast in the upper branching and result in a very top heavy looking tree.
However if you have allowed multiple upright branches to form, you don't have to instantly cut off the thickened area to create a more streamline tree. Sometimes you can take a step back and contemplate if it compliments the tree. In the middle and upper half of the tree they often develop a natural multi-trunk look in the wild. So you can utilize this oversight and cut back one of the potential trunks and allow it to become a smaller 2nd leader just like you often see in the wild. Then you just continually ramify and keep the growth in check on this smaller 2nd leader that you have created. The main leader should still be allowed to grow and thicken, and if you repeat this process with staggered leaders all over the top two-thirds of the trunk, it can create a very natural upright multi-trunking casuarina.
Foliage:
When you are reducing the length of the needles, do not cut the foliage if you are about to exhibit your tree for display. This can brown the ends of the needles as they die-back at the tips. Instead, pinch off the point of the needle you want to remove by holding the needle, then twist or pull off the excess.
The needles of casuarina have the capacity to develop into branches (but they don't always), so if you are wanting a branch to develop somewhere, you can sometimes wait for it to appear, especially after a trunk chop. Alternatively once the trunk/primary branch is roughly more than say (5mm or 0.5cm) you can just cut it and it will usually put out new growth around the point of the cut.
If you are trying to get a branch to develop somewhere remember to think outside the square with casuarina. In the wild their branches can grow very erratically, so if you have trouble trying to get a shoot to grow exactly where you want it to - don't be too discouraged and don't cut back the tree constantly just because it isn't putting out a branch where you want it. Try to open your mind to other possibilities.
However if you really want a branch to form somehwere, wait until Spring and then can cut a branch back hard that is just above or near that area. This can sometimes encourage new buds to appear from that point and also below the cut, which will hopefully promote new growth where you want it to. Remember to fertilize regularly which can encourage new shoots to form. Allow the area you want the new growth to develop to be fully exposed to the sun.
I have purchased Allocasuarina torulosa stock before from Padre pio nursery which was pot bound and had not been repotted for about 6-7 years and the needles did not get longer than 4cm-5cm all over. For the next year at my place the stock still continued to push out needles of length about 5cm. (Though at a significantly slow rate) About 2 weeks after giving them a careful repot into a slightly larger container, they shot all over. I then allowed them to grow for 6 months. After this time the growth resulted in needles of normal length of around 10cm plus. It is a quandry, because you don't want to leave your tree for so long without a repot otherwise it will be in poor health. But this questions whether you can have shorter needles by not repotting as often.
Anchoring/Wiring:
I prefer to anchor young branches to create the movement I want. I use plant ties which are very thin wires covered in a flat sheath of plastic. I tie one end to the pot (or a strong nearby branch) and then around the branch and pull it down, up or sideways - whatever I am after. I then tie the other end back to the pot/branch. Sometimes you will need multiple anchor points to get the right angle.
For torulosa and littoralis you can wrap/wire around the branch firmly as the growth on these species will eventually grow over any small scars.
For cunninghamiana and glauca I only wrap/wire over the branch once, (in other words don't encircle the branch which constricts and scars the growth).
If you are going to be wiring/anchoring stronger branches, I recommend doing this just before the tree needs its next watering. This way the branching is not quite as rigid and hopefully slightly increases its flexibility. I have wired Casuarina before and wasn't too concerned about leaving the wire on too long - particularly on torulosa and littoralis - because as the bark develops quickly it easily heals over the scars.
Branches can easily be broken or snapped off. So if you happen to hear the snap - from my experience do not lose heart. I again use plant ties and anchor the branch back so that there is reasonable amount of tension on the branch holding it back in place. I don't recommend wiring the branch in place after a snap, as while you are applying the wire you increase the chances of accidentally breaking the branch clean off. Using a plant tie creates perfect tension forching the cracked area to bind together tightly. I just use a plant tie and wrap it around the snapped branch, then tied back onto the trunk / pot, which doesn't allow the cut to be exposed in any way and it minimizes the man handling on the damaged branch. It is just one simple tie-over and anchored back. However if the branch is completely broken off you will probably want to use a different method, as I've not bothered with completely broken branches. I have had great success healing cracked branches using this method.
***[INSERT picture of branch being tied down with plant tie]***
Cutting (and healing scars):
If you are going to perform a signifcant cut (anything thicker than about 2cm or 20mm), you need to be aware of how the area around this will respond and grow. Try to make large branch removal decisions early on. It is better to perform these significant cuts whilst the tree is in the growing phase of its development (whilst you are still thickening the trunk) as the healing process will be much faster in this phase.
Firstly, dead exposed wood can not heal. An exposed cut (if cut flush) will eventually be enveloped by the normal growth enclosing AROUND AND OVER the dead wood. For this reason you have to remember that the tree is still going to grow and thicken around the remaining circumference that was not cut. So this growth will continue to put on thickness on the opposite and adjacent sides, while the exposed cut side will slowly be enveloped by the rolling growth over the cut. With casuarina this can look beautiful and once it completely heals over it gives you that slight angled look from nature when branches are naturally knocked off and heal over - sometimes with a bump. If you don't make the cut flush against the trunk then it can increase the time it takes to heal the scar. It is best to use a pair of proper large bonsai branch cutters for this if you have them, but it is not vital.
The important point to remember is that the trunk will thicken faster on the opposite side of the heavy cut, so you may need to factor this into your future design if it is a significant cut.
If you wish to encourage the 'healing process' faster, you have to use the natural growth of the tree to your advantage. This is best utilized by planning ahead and NOT removing any growth or branching near the area you have cut. By leaving this growth near the cut, these branches will thicken - which in turn accelerates the rolling effect of the cambium growing over to encompass the wound. You can think of it like circles increasing in size to eventually envelop the exposed wound. So perform the cut/removal directly below or adjacent to existing branching, which in turn accelerates the healing process.
Sometimes within a few weeks you will get little buds forming right around the scar. Leave these buds on to develop and thicken, which again accelerates the healing process. Then just play it accordingly so you don't allow these sacrificial branches to get too big before you also remove them.
And fertilize, fertilize, fertilize. This will aid the tree to grow and heal the scar quicker.
***[Use paint or images to show the area of a cut and how it will be sealed over time from growth]***
----
TRUNK CHOPPING (not shohin or mame):
*Only perform a trunk chop if the tree is in good health!*
For most casuarina I strongly recommended not to trunk chop or make the first cut on a seedling/young material until the diameter of the trunk is at least 15mm (1.5cm). The reason for this is: if you cut when the trunk is thinner, then the flush of new growth that results from this usually promotes significant bulging on thinner trunks, which can be very hard to fix (if you don't like it). The new flush of growth that follows a trunk chop is usually anywhere from [3 - 4] shoots to [10 - 20] shoots on thicker trunks. And this will very quickly promote the bulging effect. So if you wait until the trunk is about 15mm or thicker in diameter it is much less affected by bulging. Then you can allow about 3 or 4 STAGGERED shoots to thicken a little (by staggered I mean not all from the same point). Survival of the fittest will then ensue: So many times people only allow one leader which may soon get eaten or damaged, and then the growing process is hampered or it can result in die-back down the trunk. So once you have shoots that get to about 3mm thick, cut off the other ones you do not want to keep, sooner rather than later.
In my experience the best time to cut back the trunk is October/November. You can still do it all year round but it may sulk outside Spring/Summer. I have noticed that the most prolific new growth is produced from cutting in October/November. If you cut during this period then usually about 2 weeks after the trunk chop you should start to see new growth forming. It can be a significantly longer wait for any new growth during winter or late autumn. In some cases if you cut during late autumn/winter, the new growth can be so slow to emerge and take many months which sometimes can result in die back in the worst case scenario, especially if it is not getting a lot of sun over winter.
For torulosa especially, I recommend ensuring you have growth (foliage/branches) right below the point of where you are cutting, so that you decrease the very small chance of die-back all the way to the base and effectively you can lose the entire tree.
For cunninghamiana, glauca and littoralis, this usually isn't such a noticeable problem as it generally always shoots close to the original cut and in abundant masses. I swear torulosa has an invisible lignotuber for this reason (joke).
If you are continually cutting back growth - especially after a trunk chop - you are increasing the chances of die-back regardless of the species. Casuarina needs to grow. I don't recommend styling a casuarina by continually cutting back every few weeks to shape it. Sorry to sound like a broken record but this can promote die-back. I usually only perform a heavy cut back on Casuarina trees up to a maximum of 3 times a year (and usually not in winter) - apart from the occasional snip to discourage bulging.
The biggest mistake I made when I started with them was to continually clip them. For example : only a month after you just cut them back hard, you change your mind on the design and cut again. Make the big decisions now, decide what you want to remove, then cut it back hard. Then leave it for at least 3 months or more to grow in full sun and recover. The only exception is the occasional removal of multiple branching or pruning long branches to avoid unwanted thickening.
----
SUN:
This is the most important part of keeping a Casuarina in good health.
All Casuarina require ample amounts of sunlight and they all prefer full sun.
All branches of Casuarina need exposure to the sun. In particular with Casuarina, if a branch is continually shaded it will start to decline in health. Eventually after about 6 weeks the branches may wilt, or may even die-back or die altogether. It is a common assumption that your branch has died-back because it is growing downwards. More often it is simply because it is being heavily shaded with no exposure to sun that kills it.
For cunninghamiana and glauca which has such strong upwards growth, you should angle the ends of the downwards branches up (and allow a lot of the foliage along the downwards sloped branch to naturally grow upwards as well). This ensures the branch is not allowed to lose its vigour. It is usually not so much a problem on littoralis or torulosa if it gets a lot of sun. This is because the foliage and branching often weep a lot more on these 2.
*** INSERT picture of shaded off branch that is dying ***
*** INSERT picture of a tree with top half in great health, and the lower branches shaded and dying ***
Obviously you need to make sure the middle and top section of your tree isn't too heavy with foliage/growth which is shading the lower areas and thus causing your lower branching to die back. So also remember to rotate your tree every few weeks or so, but if it is being ground grown then make sure branches you don't want to lose down low are given a lot of sun exposure.
FULL SUN (only a guide)
1 hour of full sunlight only = Your Casuarina MAY tolerate this but may not be growing at a healthy rate.
1-2 hours of full sunlight only = Your Casuarina should tolerate this and be in reasonable health.
2-4 hours of full sunlight only = Your Casuarina should thrive and be in very good health.
4+ hours of full sunlight only = Your Casuarina should thrive and be in excellent health.
PART SHADE (only a guide)
1 hour of part shade only = Your Casuarina will most likely start to decline.
1-2 hours of part shade only = Your Casuarina may struggle for survival.
2-4 hours of part shade only = Your Casuarina should tolerate this but may not be growing at a healthy rate.
4+ hours of part shade only = Your Casuarina will tolerate this and should be in good health.
From my experience Casuarina glauca is the most tolerant in the genus for heavy shade.
I have since observed that Casuarina cunninghamiana is actually the least tolerant of continually shaded conditions.
Littoralis and torulosa both have a medium tolerance to continual shade.
Casuarina cunninghamiana is possibly the species you want to prioritize by placing it in the sunniest position, especially over winter or when there is more chance of shading.
Winter Sun:
The less foliage a Casuarina has, the less water it will require. So if your Casuarina has a good 'head of hair' going into winter, this increases the water intake and helps the roots get sufficiently aired in between waterings.
The sun travels differently across the sky in winter than in summer and is lower in the sky and usually weaker in strength because of the lower temperatures. Also the increased shade that usually results from the direction the sun travels often shades trees more. During winter if you have a spare day at home then every hour or so, take note of where the sun is shining during winter over your trees and adjust your trees accordingly. Basically the same tree will get potentially very different angles of sun than in summer, and it may need to be moved to get sufficient sun. Remember most trees should be rotated as well, especially with group plantings.
Be mindful of lower branches and allow them to get maximum sun by reducing the upper half of the foliage.
----
SOIL / DRAINAGE / CONTAINER :
This is the 2nd most important part of keeping a Casuarina in good health.
Most Casuarina love a well draining mix. Casuarina glauca is the only species I have found so far that doesn't have a big impact, but it still prefers full sun. Casuarina glauca thrives in anything! Over the years I have not seen any magical soil formula for growing Casuarina. You can use any standard soil / bonsai soil mix you prefer. Just make sure the soil drains well and they will thrive. Once you have thoroughly watered the soil there should not be any part of the pot that has water pooling. It helps to have a certain amount of large particles in the soil mix so that the roots are not staying continually wet.
If you place a Casuarina into a 'growing pot', (by a 'growing pot' I mean a pot that has a large area for the roots to grow out in) you are encouraging the tree to put on significant trunk girth. You will find that you'll get flushes of growth everywhere as well and the main trunk and primary branches will start to thicken quickly. It can be a good/bad thing depending on what you want. This is the common preferred method for putting on trunk girth. However if you don't keep an eye on your tree you will soon get so many branches forming and bar branches (branches coming out from the same point), that you may get bulging from these areas.
If you dislike bulging, you need to constantly remove bar branches that are more than say about 1/4 the diameter of the trunk/branch it is growing from. Take note, this does not just mean keep an eye on the primary branch, but the branching as well. Of course it isn't a rule of thumb as branching will often have bulging in the wild, so it is up to you how you want your tree styled. This is just to advise you on how to avoid bulging. As a side note however, if the bar branches are kept short and ramified well and not allowed to grow vigorously, it may not result in bulging and can look very beautiful.
The container that you grow your Casuarina in is very important. This primarily depends on what stage your tree is at and what you want the final tree to look like.
So, as stated above:
-If you are in the 'growing phase' use a big, well draining pot or ground-grow the tree.
-If you are happy with the trunk size, then it is time to place the tree into a bonsai pot or restrict the roots by not allowing them ample room for massive growth and thickening.
----
REPOTTING:
DO NOT bury the base of the trunk below the soil line to promote roots. With casuarina if you bury the base of the trunk below the soil line it can encourage reverse taper. Instead, use a finer medium of soil (small particles) around the base of the first 2-3cm of roots in an effort to keep that soil a bit more damp to encourage root growth. Keep cutting off the roots that are growing downwards and only allow the radial roots to remain which should also encourage new root development.
Only repot a tree if it is in very good health. The only exception to this is if the soil is not draining properly or the roots have started to develop rot. In this case, remove the rotting section of the roots and place into a well draining mix. Be mindful of how much root is left to support the foliage and do not over-water the tree going forward – only water it when the soil is beginning to dry.
If the top soil of your tree is very hard and difficult to get your finger into, then it should be repotted as soon as possible. I remove all the soil from the root ball (depending on how compact the immediate soil below the trunk is of course, as this may not always be possible on older stock). I have not had any problems removing all the soil from large, older casuarina when I have repotted.
I bare root Casuarina every time I repot (remove all the soil including directly below the trunk), which also ensures I remove any curl grubs. I have found Casuarina to be very hardy provided you don't remove more than say 60 % of roots on very old and well established Casuarina. Like most developments of bonsai it can be done over different stages. On most Casuarina that is under about 8 years old, I have happily removed up to 70-80% of the roots without any problems. I usually leave at least 20-30% of the original foliage on for better health and a faster recovery. I never defoliate a Casuarina unless I have a specific reason to (see inverse taper subject).
Repotting can be done in any weather. You don't have to worry if nights get as low as 5 degrees or days get as high as 40 degrees. However if the weather is particularly hot and windy (careful as the wind can dry the roots if you take hours to repot) just make sure you are continually spraying the roots to keep them moist. I am not in a climate where we get freezing temps so I have not had any experience repotting below 5 degrees.
If you are repotting torulosa or littoralis, do not pull the tree out of the pot by holding the trunk as you will damage the bark. Do not place a cloth around the trunk while you repot as this will damage the bark. Do not have the sprayer set on a strong jet as this will damage the bark. Protect the bark by not touching it with anything. Usually I hold the tree by the upper branching that hasn’t started to develop fissuring yet or very carefully by the root ball.
As I work the roots I usually set my sprayer to a medium-strength wide spray and take the slow and steady method of wetting and easing apart the root ball. If you have crossed roots preventing you from removing the old soil, you will probably need to cut a few. So just make sure the roots aren't deceiving and is one of the few main roots of the whole root ball you are about to cut off.
The optimal time for repotting is generally any time between Spring and Summer. I have repotted all throughout Autumn and Winter but I don't usually repot in late autumn or winter because of the slower growth rate that ensues. The slower growth rate can hinder the recovery process so I choose to perform the repot in Spring/Summer. Our weather here doesn't drop below zero, so I can't advise on other areas.
The most important aspect of repotting is to remove roots/foliage in proportion. If you have healthy roots and you remove half of them, then you should remove the foliage so that the remainder of the foliage is roughly the same in size or less as the supporting roots was previously. If you cut the roots back hard but leave on too much foliage, you WILL get die back as the roots now can't support the volume of foliage. You are less likely to get problems if you cut back more of the foliage than the roots. Generally speaking if the tree is in good health, cutting back the roots / foliage will prompt the tree to produce a huge flush of new growth to emerge everywhere.
However if you are specifically after a flush of growth everywhere and the roots aren't pot bound, then you can do a light trim of the roots (remove all the old soil) but heavily cut back the foliage. This should promote a lot of new growth. Continue to fertilize weekly.
Check for CURL GRUBS!
This is one of the benefits of removing all the soil.
When you repot, one of the main things you should be looking out for is curl grubs. When you are repotting, these pests will detect the root disturbance and the first thing they will do is crawl up closer to the base of the trunk near the root ball for safety, often directly under the trunk. While repotting I have found them only a few cm below the base of the tree and you sometimes only find them once you have removed all the soil. Curl grubs can eventually kill a tree as they eat the roots and up through the base of the tree.
----
WATERING:
If it is a hot day and the soil is allowed to become bone dry your casuarina will possibly die.
It is okay to over-water your casuarina occasionally if you are going to be away, or it continually rains etc. But if the tree is continually over-watered for a period of say 4-6 weeks it may start to develop problems like root rot or fungal problems. Mushrooms appearing can sometimes be an indicator that the soil is staying too wet for too long.
The entire soil in the pot needs to be fully soaked when you water it. If the soil is hard to touch on the surface, (ie you can't penetrate it easily with your finger), then it is usually best to repot it as soon as possible and remove all the old soil.
When to next water a tree is the most important part of watering. You only rewater the tree if the soil has little moisture left in the soil. You can think about it like sand at the beach ; the sand on a beach near the shore is completely dry and falls out of your hand like an hourglass. When the soil becomes like this it is too late for a Casuarina.
The sand near where the waves are breaking is damp and retains its shape when held. This would be too soon to rewater.
So you need to find that medium between the two, which is usually closer to the dry sand.
If you place your finger 5cm into the soil and it has minimal moisture in the soil (your finger doesn't retain many specs of soil when you pull it out), it is definitely time to rewater.
***[INSERT 2 pictures of soil showing still too wet to rewater]***
***[INSERT the 2nd picture of soil showing one that needs to be rewatered]***
On a windy day if the soil is still retaining a small amount of moisture, MAKE SURE you don't leave the tree until the next day to check the soil again. Wind can dry your bonsai out faster than the sun will. If constant winds are forecast sometimes its better to rewater and be on the safe side. And if it is a hot day and you have wind, then that is the double whammy which can kill casuarina very quickly.
The important part to remember is : if you have been adhering to watering your bonsai correctly and only watering it when the tree needs it (when the soil is almost dry), then you can afford to overwater it occasionally.
This is why it is important to try the MAJORITY of the time to water correctly, so you can afford to over water occasionally and prevent it from drying out when hot and windy weather is forecast.
Remember - if the soil is allowed to become bone dry it will probably die.
In summary:
Water your tree thoroughly and allow all the excess water to run free. Do not re-water the bonsai until the soil is just about dry. (This can vary for different casuarina as some will use the water faster than others. So you cannot have a system of watering that is the same for all your trees). If you are just re-watering all of them when you think the majority of them need more water, then chances are you have too many trees to look after.
The science of watering container potted plants - whether they are bonsai or not - is essentially not something you can learn on a forum. Go to a nursery and ask them to show you when is a good example of a potted tree that needs watering. This is the best advice you can give anyone, as you will see first hand what is required. Remember you are not meant to keep the soil constantly moist.
----
MOSS:
If the trunk of your casuarina has moss forming, this is generally not a good thing.
Firstly it is either staying damp too long, or the trunk is not being exposed to enough sun. Usually it is both.
If it has simply been a very damp winter and there has been continual rainfall for a long period of time, there is nothing to be too concerned about. Because once the trunk gets exposed to sunshine for longer periods of time and there isn't continual rain, it will dry out the moss and eventually the moss will die.
For torulosa and littoralis it is often recommended to simply expose the trunk to more sun, rather than trying to remove the moss with tweezers or a toothbrush etc, as this may work but will also damage the beautiful bark in the process. I have tried every wives tale in the book and the only sure fire treatment is full sun, which is both a cure and a prevention.
***[Moss covered trunk of Allocasuarina torulosa and how it is very hard to remove]***
***[Moss covered trunk of Casuarina cunninghamiana and how it is very easy to remove]***
The primary reason that moss is not good for the tree is that it means moisture and dampness is being associated with the trunk. This means there is a chance it will start to rot the beautiful bark over long periods of time. If the conditions continue, the moss usually spreads, covering the top soil and can become quite thick. It affects the rate which your soil dries. Thick strong moss can significantly slow the evaporation and the roots will stay wet for longer and so on and so on.
----
FERTILIZING:
Casuarina are very hardy. If your tree is in good health you can safely apply the fertilizer at the full strength recommended for a tree, which is usually written on the side of the bottle/tub.
You can safely fertilize your Casuarina weekly. You can apply just about anything to casuarina as long as you fertilize regularly for good health. However do not apply a slow release fertilizer which will dump its contents after less than a week of watering. This can and probably will have a devastating effect on your tree. "Brunnings" - with an R, is a slow release fertilizer that has been notoriously known for killing bonsai because of this problem. I lost a few in the past from trialling Brunnings. Clinton from Ray Nesci bonsai nursery advised me many years ago that members in the past have lost priceless bonsai from using this dangerous fertilizer.
Personally I use Osmocote native slow release fertilizer. I also use 'Powerfeed for Natives' once a week at full strength when I can remember. Take note that if the slow release fertilizer pellets you are using become soft when saturated with water and are easily able to be dissolved by applying soft pressure, then they are hazardous to your bonsai.
Just one important tip though : if you are using the small slow release fertilizer pellets, make sure none of them get caught at the start of the top of a young branch(es). Spray them off with the hose or remove with a twig/tweezers. Because sometimes if you don't remove it (and the branch is only a few mm thick) it sometimes might burn the start of the branch after a few days of sitting there, and in bad cases I've seen the entire branch die). But this can only happen on very young branches obviously, (usually less than 2mm thick).
***[Insert picture of a fertilizer pellet caught at the top of a branch or 2 branches]***
If you have never fertilized your tree, it might be best to apply at or less than 40-50% strength for a month. Then gradually build up to full strength with each application. But for Casuarina they are fairly hardy. Bare in mind though on older pot-bound material they can develop proteoid roots, so keep this in mind if you have never fertilized your Casuarina before.
Unless they have been repotted recently, I usually repot and root-prune any new Casuarina I acquire. Thus I haven't had experience with fertilizing old pot bound Casuarina with proteoid roots that had not previously been fertilized.
----
STYLING
I wont delve deep into styling in this thread as it is a personal decision and I prefer to keep this thread more about the process of growing them.
It is my preference to try and style Casuarina in a more natural element. This is completely subjective however and will depend on the look you are after. For me, if my Casuarina looks like a casuarina in the wild then I am happy. There are so many forms and styles of casuarina in the wild that nearly all styles of growth can be attained with a natural look. One of my personal favourites with casuarina is the look of growing out over a river or creek. Casuarina can also have that iconic upright gentle lean to them which can be very beautiful. Their branches can be long and wavy or sharp and angled, and often you can see this all on the same tree.
Study the species in the wild. You can often see the tree forming multiple trunks about halfway up and then all out like radial growth. The branches can grow down, then out and further down... or they can grow up and out and further up.
***[insert multiple images of different styles of Casuarina trees (out over river/leaning/upright, etc)]***
Group plantings (in particular - clumps) of casuarina look spectacular if they are done well.
----
PESTS
There are numerous pests that you need to be on the lookout for when growing Casuarina. These are the 4 most damaging types I have encountered.
1. Curl grubs
***[CURLGRUB.jpg]***
One sign is the formation of fine wood (like a powder), at the base of the tree. This is usually a bad sign as it might have progressed up into the trunk.
Another sign is the tree is slightly wobbly and no longer secure in the pot, as the grubs have been eating the roots.
When you repot, try to remove ALL the soil and check for curl grubs.
2. Bark muncher 1 (with a protective coat shaped as an almost elongated patchy diamond-shape).
***[BARK-CHEWING-GRUBS1.jpg]***
This form of pest can be very difficult to spot. It feeds on the softer bark of the tree and in just a few days it can ring bark a 7-8mm diameter branch effectively killing the branch. It can also chew around a young trunk and in a few weeks can also ring bark the trunk. It forms an outer cocoon made up of tiny pieces of bark, sticks and soil. It can be so well camoflauged that you simply think it is part of the bark. They are easily spotted on young Casuarnia branches/trunks that have not formed strong rough bark, and they appear like a piece of heterogenous (mixed together) dirt hanging from the trunk/branch.
However on old, fissured or deep, rough bark they can be very hard to find. They will hide on the rough bark but feed on soft bark / cambium all over the tree.
Be careful when you pull it off the branch/trunk. Make sure your hand is underneath it and use the other hand to pull it off. You don't want the grub to fall to the soil and escape. You can either rip the cone apart and look at the grub and kill it, or simply squash the entire cone and kill the grub inside it. However, the house that this grub creates, is very difficult to pull apart, and you have to tear it apart with a bit of force if you want to look at it inside.
3. Bark muncher 2 (with a protective coat shaped as an elongated cone)
***[BARK-CHEWING-GRUBS2.jpg]***
This form of pest is a little bit easier to spot, but to the untrained eye they can appear like a short twig. It feeds on the softer bark of the tree and in just a few days it can ring bark a 7-8mm diameter branch effectively killing the branch. It can also chew around a young trunk and in a few weeks can also ring bark the trunk. This pest forms an outer elongated cone that you can tear apart like wet paper. They are easily spotted on young Casuarnia branches/trunks that have not formed strong rough bark. They are always attached from the base of the cone, whilst they munch on the tree. It looks like a small construction witches hat, but brownish in colour and looks perfectly like a conical twig attached to the tree/branch.
On older fissured or deep, rough bark they can be harder to find but once you know what to look for you can often spot them quickly. They will feed on soft bark / cambium all over the tree.
Be careful when you pull it off the branch/trunk. Make sure your hand is underneath it and use the other hand to pull it off. You don't want the grub to fall to the soil and escape. You can either rip the cone apart and look at the grub and kill it, or simply squash the entire cone and kill the grub inside it. The house that it lives in will tear apart fairly easily if you want to inspect the grub inside.
4. Borer
***[BORER.jpg]***
The tell tale sign of a borer is usually a build up of sawdust (fine munched on wood) that collects at the base of the tree. Usually you can find the hole up above the formation of the sawdust. I have usually found them anywhere up to 10cm from the base of the tree hiding in a hole that travels down into the trunk. I have only found 2 borers in the whole time I've been growing casuarina and on both occasions I sprayed a tiny amount of WD-40 into the hole (I'm talking about holding the nozzle down for less than 1/5th of a second), and the first time I presumed it was left for dead. On the second time I have seen the borer crawl out of the hole into my hand where I instantly killed it.
There are other sprays you can use : any insecticide especially if it states borers on the list of pests should kill them. But WD-40 has that long, very thin straw that is very handy to insert deep into its home before I spray it. But don't spray for more than a fraction of a second, as its NOT the ideal liquid you want dripping into the roots. On both occasions I have used it I never had a problem with the roots being affected, but I literally only sprayed for a tiny fraction of a second.
----
The health of your Casuarina:
The most common reasons why your casuarina will fall ill are stated below:
1. Allowed to dry out
2. Overwatered and the roots are rotting
3. Not enough sun
4. Pot bound and no fertilizer
5. Curl grubs / borers / insects / fauna
Flow chart to follow for how
----
Pests:
----
----
Rory
I style Bonsai naturally, just as they would appear in the wild.
Central Coast, NSW
Bonsai: Casuarina Leptospermum Banksia Phebalium Baeckea Melalueca Ficus
Growing Australian natives as Bonsai: viewtopic.php?p=289480#p289480
Buying and repotting Native nursery material: viewtopic.php?f=78&t=30724
Growing tips for Casuarina as Bonsai: viewtopic.php?p=244995#p244995
How to reduce moss from the trunk without damaging the bark: viewtopic.php?p=295227#p295227
-
Rory
- Aussie Bonsai Fan
- Posts: 2809
- Joined: January 23rd, 2013, 11:19 pm
- Favorite Species: Baeckea Phebalium Casuarina & Banksia
- Bonsai Age: 24
- Location: Central Coast, NSW
- Has thanked: 22 times
- Been thanked: 459 times
Re: Casuarina growing notes - Unformatted
==========================
FREQUENTLY ASKED QUESTIONS
==========================
----
WHY IS MY CASUARINA SICK?
----
*Dry and crunchy needles (and it has happened suddenly within a few days) = The soil has been allowed to dry out.
*Dry and crunchy needles (and it has happened gradually over a few weeks/month) = The roots may be pot bound and the rootball isn't properly getting watered. Submerge the container completely in water for each watering until you are able to repot it.
*The needles are gradually wilting = The roots are staying too wet between waterings, or the tree isn't getting sufficient sun.
*If you have repotted the tree and taken off a lot of the roots, but left on too much foliage = The tree will die-back to compensate the amount of water it can transport to the foliage. If you didn't cut an adequate amount of foliage off after the removal of the roots, then I would probably recommend leaving the tree alone now to naturally allow how far it needs to die-back and start regrowing from.
*Some of the growth is deformed and in whorls = This is probably witches broom. Just cut before the start of this deformed growth when it appears. It is nothing serious, however this type of growth is not as strong or healthy as normal growth, and thus will not be as resistent to natural problems/pests.
----
HOW OFTEN DO I WATER MY CASUARINA?
----
Water your tree thoroughly and allow all the excess water to run free. Do not re-water the bonsai until the soil is just about dry. (This can vary for different trees, as some will use the water faster than others, so you cannot have a system of watering that is the same for all your trees). If you are just re-watering all of them when you think the majority of them need more water, then chances are that you have too many trees to look after.
The science of watering container potted plants - whether they are bonsai or not - is essentially not something you can learn on a forum. Go to a nursery and ask them to show you when is a good example of a potted tree that needs watering. This is the best advice you can give anyone, as you will see first hand what is required. Remember, you are not meant to keep the soil constantly moist.
----
WHEN SHOULD I REPOT MY CASUARINA?
----
* Spring/Summer is usually the safest time, but make sure the tree is in good health.
* The most obvious answer is when the roots start to appear to be growing out of the bottom of the pot.
* When the roots have been kept damp for too long or the drainage is not allowing the soil to dry out between waterings, which can start the development of root rot.
----
WHY ARE SOME OF THE BRANCHES DYING?
----
*Make sure the branches that are dying back, or dying are not just having too much shade blocking them. Make sure they are getting full sun.
*Check you haven't underwatered for a period of time and the tree has suffered die-back.
*If the foliage has died quite suddenly and the needles are hard and crunchy, it has probably been allowed to dry out.
*If the foliage is no longer rigid (in other words it is starting to wilt), and has taken a few weeks to look this way, then you most probably have a drainage problem and the roots are staying too wet. Or the entire tree is just not getting enough sun.
*Check for grubs or pests munching on the cambium.
----
CAN I TAKE CUTTINGS?
----
Yes, this is best done in spring.
----
WHERE SHOULD I CHOP THE TRUNK?
----
This may be obvious but generally you would chop where you want the next section of trunk movement to occur from.
For torulosa I recommend ensuring you have growth (foliage/branches) immediately or close below the point of where you are cutting. This will decrease the small chance of die-back all the way to the base.
For cunninghamiana, glauca and littoralis, this usually isn't such a noticeable problem as it generally always shoots close to the original cut and in abundant masses of new shoots.
Take note that if you cut back hard into fissured bark, it will take even longer for the new shoots to push through this and appear.
Make sure the tree is in excellent health before you chop the trunk.
----
WHAT TIME OF YEAR SHOULD I CHOP THE TRUNK?
----
The optimal time to chop the trunk is half-way into Spring. Summer is the next best time.
You can chop the trunk anytime throughout the year, but it usually will bounce back fastest in Spring or Summer.
If you chop the trunk back in winter, it could take 30 days or even longer to see any resultant growth after this.
If you chop the trunk in early spring, it sometimes can take up to 2-3 weeks.
Take note that if you cut back hard into fissured bark, it will take even longer for the new shoots to push through this and appear.
Make sure the tree is in excellent health before you chop the trunk.
----
HOW MUCH OF THE ROOTS/FOLIAGE CAN I CUT OFF?
----
I have found Casuarina to be very hardy provided you don't remove more than say 60 % of roots on very old and well established Casuarina.
On most Casuarina that is under about 10 years old, I have happily removed up to 80% of the roots without any problems.
I usually leave at least 20-30% of the original foliage on for better health and a faster recovery.
The most important aspect of repotting is to remove roots/foliage in proportion. If you have healthy roots and you remove half of them, then you should remove the foliage so that the remainder of the foliage is roughly the same in size or less as the supporting roots. If you cut the roots back hard but leave on too much foliage, you WILL get die back as the roots now can't support the volume of foliage. You are less likely to get problems if you cut back more of the foliage than the roots.
I bare-root Casuarina every time I repot (remove all the soil including directly below the trunk), which also ensures I remove any curl grubs.
----
HOW DO I HEAL THE SCAR QUICKER?
----
If you wish to encourage the 'healing process' faster, you have to use the natural growth of the tree to your advantage. This is best utilized by planning ahead and not removing any growth or branching near the area you intend to cut. By leaving this growth near the intended cut, these branches will thicken, which in turn accelerates the rolling effect of the cambium growing over to encompass the wound. You can think of it like circles increasing in size to eventually envelop the exposed wound. So perform the cut/removal directly below or adjacent to existing branching, which in turn accelerates the healing process.
Sometimes, within a few weeks you will get little buds forming right around the scar. Leave these buds on to develop and thicken, which again accelerates the healing process. Then just play it accordingly so you don't allow these sacrificial branches to get too big before you also remove them.
Rory
I style Bonsai naturally, just as they would appear in the wild.
Central Coast, NSW
Bonsai: Casuarina Leptospermum Banksia Phebalium Baeckea Melalueca Ficus
Growing Australian natives as Bonsai: viewtopic.php?p=289480#p289480
Buying and repotting Native nursery material: viewtopic.php?f=78&t=30724
Growing tips for Casuarina as Bonsai: viewtopic.php?p=244995#p244995
How to reduce moss from the trunk without damaging the bark: viewtopic.php?p=295227#p295227
-
Rory
- Aussie Bonsai Fan
- Posts: 2809
- Joined: January 23rd, 2013, 11:19 pm
- Favorite Species: Baeckea Phebalium Casuarina & Banksia
- Bonsai Age: 24
- Location: Central Coast, NSW
- Has thanked: 22 times
- Been thanked: 459 times
Re: Casuarina growing notes - Unformatted
You do not have the required permissions to view the files attached to this post.
Rory
I style Bonsai naturally, just as they would appear in the wild.
Central Coast, NSW
Bonsai: Casuarina Leptospermum Banksia Phebalium Baeckea Melalueca Ficus
Growing Australian natives as Bonsai: viewtopic.php?p=289480#p289480
Buying and repotting Native nursery material: viewtopic.php?f=78&t=30724
Growing tips for Casuarina as Bonsai: viewtopic.php?p=244995#p244995
How to reduce moss from the trunk without damaging the bark: viewtopic.php?p=295227#p295227
-
kcpoole
- Perpetual Learner
- Posts: 12272
- Joined: November 12th, 2008, 4:02 pm
- Favorite Species: Maple
- Bonsai Age: 15
- Bonsai Club: the School Of Bonsai
- Location: Western Sydney, NSW, Australia
- Has thanked: 17 times
- Been thanked: 84 times
- Contact:
Re: Casuarina growing notes - Unformatted
I use Mega.nz https://mega.nz/ to store all my Docs in the cloud.
Highly secure and encrypted free service and can synch from Linux, Mac and Winders machines in the background so you never lose anything. Clients available fro Android and IOS as well.
Better than Google drive, OneDrive, Dropbox as everythign is encrypted and no one can see in the files to read them ( eg google, MS, Dropbox, NSA, CIA, ASIO, etc)
Awesome service and brain dead simple.
Ken
Check out our Wiki for awesome bonsai information www.ausbonsai.com.au/wiki
What is Bonsai? http://www.ausbonsai.com.au/wiki/index.php?title=Bonsai
What should I do now? http://www.ausbonsai.com.au/wiki/index.php?title=Newbie
How do I grow a Bonsai? http://www.ausbonsai.com.au/wiki/index. ... _a_Bonsai?
Visit a Bonsai nursery to see some real nice trees http://www.ausbonsai.com.au/wiki/index. ... _Nurseries
-
robb63
- Aussie Bonsai Fan

- Posts: 295
- Joined: May 19th, 2016, 12:11 am
- Favorite Species: figs & junipers
- Bonsai Age: 4
- Location: sydney
- Been thanked: 11 times
Re: Casuarina growing notes - Unformatted
Wow Rory you have done a huge job. Thankyou 
I have spotted a good casuarina for future collecting, very recently.
Your information will be a huge help
cheers
I have spotted a good casuarina for future collecting, very recently.
Your information will be a huge help
cheers
-
dansai

- Aussie Bonsai Fan
- Posts: 1258
- Joined: May 17th, 2010, 5:33 pm
- Favorite Species: Aussie Natives
- Bonsai Age: 5
- Bonsai Club: Coffs Harbour
- Location: Mid North Coast, NSW, Australia
- Has thanked: 4 times
- Been thanked: 128 times
Re: Casuarina growing notes - Unformatted
Awesome job Rory. Thanks for sharing
Travelling the Mid North Coast of NSW and beyond to attend Markets and other events
www.bonsaibus.com.au - www.facebook.com/TheBonsaiBus - www.instagram.com/thebonsaibus
www.bonsaibus.com.au - www.facebook.com/TheBonsaiBus - www.instagram.com/thebonsaibus
-
Ray M
- Aussie Bonsai Fan
- Posts: 1403
- Joined: November 5th, 2009, 3:36 pm
- Favorite Species: Figs, Junipers, Maples, Elms, Pines, Banksias
- Bonsai Age: 31
- Bonsai Club: The School of Bonsai
- Location: Winston Hills NSW
- Been thanked: 15 times
Re: Casuarina growing notes - Unformatted
Hi Rory,
Thanks for sharing this info. I'm sure there will be some great info here. I look forward to working my way through all the information. Thanks again for sharing.
Regards Ray
Thanks for sharing this info. I'm sure there will be some great info here. I look forward to working my way through all the information. Thanks again for sharing.
Regards Ray
-
terryb
- Aussie Bonsai Fan
- Posts: 559
- Joined: April 29th, 2016, 3:44 pm
- Bonsai Age: 4
- Bonsai Club: SA Bonsai Society; VNBC
- Location: Adelaide
- Has thanked: 521 times
- Been thanked: 199 times
Re: Casuarina growing notes - Unformatted
Hi Rory,
All I can say is WOW and thanks! Have some seedlings to fatten up and now have a plan.
terryb
All I can say is WOW and thanks! Have some seedlings to fatten up and now have a plan.
terryb
-
Rory
- Aussie Bonsai Fan
- Posts: 2809
- Joined: January 23rd, 2013, 11:19 pm
- Favorite Species: Baeckea Phebalium Casuarina & Banksia
- Bonsai Age: 24
- Location: Central Coast, NSW
- Has thanked: 22 times
- Been thanked: 459 times
Re: Casuarina growing notes - Unformatted
This is just a post to add some of the pictures which will be included in the final update.
This is an example of a Casuarina that has died within a few days from not being watered. Notice the needles are still rigid.
If it had died from over-watering or not getting enough sun, then the foliage slowly begins to wilt over many weeks/months and eventually looks sickly and drooping.
This is an example of a Casuarina that has died within a few days from not being watered. Notice the needles are still rigid.
If it had died from over-watering or not getting enough sun, then the foliage slowly begins to wilt over many weeks/months and eventually looks sickly and drooping.
This is an example of using a plant-tie to anchor down a branch and create natural movement.
This tree was repotted and shows you that it had bulged at the soil line. It was raised above the soil line when it was repotted to show you that you need to be careful not to bury the trunk of a casuarina for fear of allowing it to bulge. It is best to deal with this earlier than later. However, often when you are purchasing a Casuarina from a nursery you wont know if it has this until you get it home and look at the roots. There are methods to fix this detailed in the notes above on growing them.
This development of the base is also very common in the wild and you don't necessarily have to correct it, but you can leave it buried if you prefer, but it just may take a long time to get radial roots from the base naturally, if at all.
This is a BEFORE photo to show you the healing process timeline from a large cut and allowing the new shoots to grow from near the cut.
This is a BEFORE photo to show you the healing process timeline from a large cut.
The exterior home of a dangerous cone-shaped cambium-munching pest 1. The pest is encased inside this very durable cone. This creature can completely ring bark the tree and kill it from the ring up. Squeeze the pest very hard between your fingers to kill it, or cut it in half. Take note: they will eat the cambium of many other genus.
The exterior home of a dangerous cone-shaped cambium-munching pest 1, and the pest that lives inside it. This creature can completely ring bark the tree and kill it from the ring up. Squeeze the pest very hard between your fingers to kill it, or cut it in half. Take note: they will eat the cambium of many other genus.
The amazingly well camoflauged cone-shaped cambium-munching pest 1 attached to the tree.
The amazingly well camoflauged cone-shaped cambium-munching pest 1 attached to the tree.
Curl grubs. They will eat the roots of your bonsai. Always remove all the soil from the roots to make sure you eradicate any curl grubs when you repot your casuarina.
Curl grubs. They will eat the roots of your bonsai. Always remove all the soil from the roots to make sure you eradicate any curl grubs when you repot your casuarina.
A somewhat diamond-shaped cambium-munching pest 2. It creates its home from specs of dirt into a somewhat diamond-shaped casing. It too can devastate your tree by eating large sections of the cambium in a short period of time, (a few days). However, this creature tends to eat the cambium more randomly but in large patches than the cone-shaped pest. Squeeze the pest very hard between your fingers to kill it, or cut it in half. They can be very difficult to notice, especially on fissured bark. Unless you have keen eyes and routinely inspect your trees, you usually only find them when you notice the massive damage they've done. Take note: they will eat the cambium of many other genus.
The amazingly well camoflauged diamond-shaped cambium-munching pest 2 attached to the tree. It creates its home from specs of dirt into a somewhat diamond-shaped casing. It can devastate your tree by eating large sections of the cambium in a short period of time, (a few days). It is pictured just below the centre of the picture and is often very, very hard to notice, especially on fissured bark.
The exterior home of a dangerous diamond-shaped cambium-munching pest 2, and the pest that lives inside it. Squeeze the pest very hard between your fingers to kill it, or cut it in half.
This is an example of a Casuarina that has died within a few days from not being watered. Notice the needles are still rigid.
If it had died from over-watering or not getting enough sun, then the foliage slowly begins to wilt over many weeks/months and eventually looks sickly and drooping.
This is an example of a Casuarina that has died within a few days from not being watered. Notice the needles are still rigid.
If it had died from over-watering or not getting enough sun, then the foliage slowly begins to wilt over many weeks/months and eventually looks sickly and drooping.
This is an example of using a plant-tie to anchor down a branch and create natural movement.
This tree was repotted and shows you that it had bulged at the soil line. It was raised above the soil line when it was repotted to show you that you need to be careful not to bury the trunk of a casuarina for fear of allowing it to bulge. It is best to deal with this earlier than later. However, often when you are purchasing a Casuarina from a nursery you wont know if it has this until you get it home and look at the roots. There are methods to fix this detailed in the notes above on growing them.
This development of the base is also very common in the wild and you don't necessarily have to correct it, but you can leave it buried if you prefer, but it just may take a long time to get radial roots from the base naturally, if at all.
This is a BEFORE photo to show you the healing process timeline from a large cut and allowing the new shoots to grow from near the cut.
This is a BEFORE photo to show you the healing process timeline from a large cut.
The exterior home of a dangerous cone-shaped cambium-munching pest 1. The pest is encased inside this very durable cone. This creature can completely ring bark the tree and kill it from the ring up. Squeeze the pest very hard between your fingers to kill it, or cut it in half. Take note: they will eat the cambium of many other genus.
The exterior home of a dangerous cone-shaped cambium-munching pest 1, and the pest that lives inside it. This creature can completely ring bark the tree and kill it from the ring up. Squeeze the pest very hard between your fingers to kill it, or cut it in half. Take note: they will eat the cambium of many other genus.
The amazingly well camoflauged cone-shaped cambium-munching pest 1 attached to the tree.
The amazingly well camoflauged cone-shaped cambium-munching pest 1 attached to the tree.
Curl grubs. They will eat the roots of your bonsai. Always remove all the soil from the roots to make sure you eradicate any curl grubs when you repot your casuarina.
Curl grubs. They will eat the roots of your bonsai. Always remove all the soil from the roots to make sure you eradicate any curl grubs when you repot your casuarina.
A somewhat diamond-shaped cambium-munching pest 2. It creates its home from specs of dirt into a somewhat diamond-shaped casing. It too can devastate your tree by eating large sections of the cambium in a short period of time, (a few days). However, this creature tends to eat the cambium more randomly but in large patches than the cone-shaped pest. Squeeze the pest very hard between your fingers to kill it, or cut it in half. They can be very difficult to notice, especially on fissured bark. Unless you have keen eyes and routinely inspect your trees, you usually only find them when you notice the massive damage they've done. Take note: they will eat the cambium of many other genus.
The amazingly well camoflauged diamond-shaped cambium-munching pest 2 attached to the tree. It creates its home from specs of dirt into a somewhat diamond-shaped casing. It can devastate your tree by eating large sections of the cambium in a short period of time, (a few days). It is pictured just below the centre of the picture and is often very, very hard to notice, especially on fissured bark.
The exterior home of a dangerous diamond-shaped cambium-munching pest 2, and the pest that lives inside it. Squeeze the pest very hard between your fingers to kill it, or cut it in half.
You do not have the required permissions to view the files attached to this post.
Rory
I style Bonsai naturally, just as they would appear in the wild.
Central Coast, NSW
Bonsai: Casuarina Leptospermum Banksia Phebalium Baeckea Melalueca Ficus
Growing Australian natives as Bonsai: viewtopic.php?p=289480#p289480
Buying and repotting Native nursery material: viewtopic.php?f=78&t=30724
Growing tips for Casuarina as Bonsai: viewtopic.php?p=244995#p244995
How to reduce moss from the trunk without damaging the bark: viewtopic.php?p=295227#p295227
I style Bonsai naturally, just as they would appear in the wild.
Central Coast, NSW
Bonsai: Casuarina Leptospermum Banksia Phebalium Baeckea Melalueca Ficus
Growing Australian natives as Bonsai: viewtopic.php?p=289480#p289480
Buying and repotting Native nursery material: viewtopic.php?f=78&t=30724
Growing tips for Casuarina as Bonsai: viewtopic.php?p=244995#p244995
How to reduce moss from the trunk without damaging the bark: viewtopic.php?p=295227#p295227
-
viniv
- Aussie Bonsai Fan

- Posts: 19
- Joined: July 19th, 2017, 8:55 pm
- Favorite Species: Ficus
- Bonsai Age: 12
- Location: Maroochydore
- Been thanked: 2 times
Re: Casuarina growing notes - Unformatted
Hi Rory,
Thank you for the extensive information. It is evident you have a lot of experience with Casuarina's. Yes, pest insects are a problem. I guess it is a matter of being very observant of your plants/trees and noticing what are pests and what are beneficial bugs.
What a great Australian Native to style. I like the contrast of the bark from rough to smooth.
viniv
-
peterb

- Aussie Bonsai Fan
- Posts: 731
- Joined: October 4th, 2011, 5:09 pm
- Favorite Species: olive
- Bonsai Age: 5
- Location: adelaide
- Been thanked: 1 time
Re: Casuarina growing notes - Unformatted
Hi Rory
Thank you for sharing this wealth of info with the rest of us, it's very generous of you to share , what has obviously taken you years of trial and error and experience to gather
Cheers
Peterb
Thank you for sharing this wealth of info with the rest of us, it's very generous of you to share , what has obviously taken you years of trial and error and experience to gather
Cheers
Peterb
-
Redsonic

- Aussie Bonsai Fan

- Posts: 443
- Joined: June 18th, 2015, 12:49 pm
- Favorite Species: Ficus, Casuarina
- Bonsai Age: 5
- Bonsai Club: Redlands
- Location: Brisbane
- Has thanked: 86 times
- Been thanked: 61 times
Re: Casuarina growing notes - Unformatted
Thanks for the information, Rory, and a big thanks for taking time to add the pictures. I was wondering what these pests looked like!
