
I tweaked the sketch above and made it a bit more complex. I added some buds at the base of some areas and along the trunk.
I made some of the lighter branches obviously stronger looking as well.
In this sketch I have made my choices of which branches I kept and removed; mostly by just following a routine.
Grant
How to create randomness by following a strict routine.
-
Grant Bowie
- Aussie Bonsai Fan

- Posts: 3809
- Joined: February 18th, 2009, 3:22 pm
- Favorite Species: Banksia
- Bonsai Age: 52
- Bonsai Club: Canberra
- Location: Canberra
- Been thanked: 347 times
Re: How to create randomness by following a strict routine.
You do not have the required permissions to view the files attached to this post.
Last edited by Grant Bowie on July 26th, 2013, 7:47 pm, edited 1 time in total.
-
Grant Bowie
- Aussie Bonsai Fan
- Posts: 3809
- Joined: February 18th, 2009, 3:22 pm
- Favorite Species: Banksia
- Bonsai Age: 52
- Bonsai Club: Canberra
- Location: Canberra
- Been thanked: 347 times
Re: How to create randomness by following a strict routine.
The choices were,
Remove branchlets clusters 1, 2 and 3. Too close to trunk
Chose the strongest branchlet in cluster 4. Some would choose what looks more logical (the 2nd strongest branchlet) but it waould atke away the character and randomness. Chose to keep the on top portion and then chose the strongest alternating branchlets.
Chose the strongest in cluster 5 even though it seems to be going backwards; but only slightly and wiring will fix this.
Kept the strongest branchlet in cluster 6 which is also on top of the branch.
Removed the strongest branch in cluster 7 as it was going backwards quite severely and wiring couldn't fix that. Kept the next strongest.
Removed cluster 8 to allow alternating branching now to the tip.
Removed all buds so as to concentrate the energy in the vigorous remaining branchlets.
All branches have only one branchlet coming from each point if possible; this will reinforce taper and avoid swellings etc.
Also shows side profile.
This is just one branch out of the many branches on the tree of course.
You do not have the required permissions to view the files attached to this post.
-
kanesham
- Aussie Bonsai Fan

- Posts: 32
- Joined: January 22nd, 2012, 10:58 am
- Favorite Species: JBP, Shimpaku , Zelkova
- Bonsai Age: 6
- Location: Yeppoon
Re: How to create randomness by following a strict routine.
We're is the strict routine in this method?
-
Grant Bowie
- Aussie Bonsai Fan
- Posts: 3809
- Joined: February 18th, 2009, 3:22 pm
- Favorite Species: Banksia
- Bonsai Age: 52
- Bonsai Club: Canberra
- Location: Canberra
- Been thanked: 347 times
Re: How to create randomness by following a strict routine.
OK,
In between painting carport area, preparing my forthcoming studio (Bonsai Studio Canberra(more about that later)) for occupation, teaching and some sales; and preparing my yard for better bonsai display etc I will do a step by step photo essay with explanation about doing a tree from scratch using the routine I have badly tried to explain. It is easy to do in the flesh but harder on paper so it will be good practice for me.
Pics to start this afternoon.
Grant
-
Slothman
- Aussie Bonsai Fan

- Posts: 76
- Joined: September 9th, 2013, 2:11 pm
- Bonsai Age: 0
- Location: Albany
Re: How to create randomness by following a strict routine.
As a relative newcomer really keen to see this in action. Thanks in advance.
-
Grant Bowie
- Aussie Bonsai Fan
- Posts: 3809
- Joined: February 18th, 2009, 3:22 pm
- Favorite Species: Banksia
- Bonsai Age: 52
- Bonsai Club: Canberra
- Location: Canberra
- Been thanked: 347 times
Re: How to create randomness by following a strict routine.
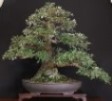
Here is a pretty standard Shimpaku juniper; it has been trimmed back lightly just once from what I can see but as they are very slow to grow in pots it is probably at least 15 years old.
You do not have the required permissions to view the files attached to this post.
-
Grant Bowie
- Aussie Bonsai Fan
- Posts: 3809
- Joined: February 18th, 2009, 3:22 pm
- Favorite Species: Banksia
- Bonsai Age: 52
- Bonsai Club: Canberra
- Location: Canberra
- Been thanked: 347 times
Re: How to create randomness by following a strict routine.
The first step was to look at the base; there were three trunks.
To follow a pattern here, as expressed earlier in the thread, I would need to remove one of the trunks as it was giving me a 3 way junction, not a 2 way junction.(This suited me as a triple trunk didn't look good, however you could always choose to exercise your artistic inclination and make a triple trunker). To follow the pattern I removed what I thought was the thinnest of the three trunks. The two thinner trunks were actually fairly close in thickness so I just looked at the calliper of the secondary trunks close to the main trunk and cut short the thinnest.(In reality the trunk that I cut off was not only the thinnest but came at an awkward angle caused by its natural position under the main trunk. In this position it would have probably over time lost vigour anyhow so we are just reinforcing the natural inclination of the tree.)
Do not cut Junipers back to the trunk in one go; leave a jin or reduce it back to the trunk over a couple of years. The trunk that was cut back has a very heavy root supporting it and if I were to cut it off in one go the root would die as well and cause die back into the trunk and ground.
You do not have the required permissions to view the files attached to this post.
-
Grant Bowie
- Aussie Bonsai Fan
- Posts: 3809
- Joined: February 18th, 2009, 3:22 pm
- Favorite Species: Banksia
- Bonsai Age: 52
- Bonsai Club: Canberra
- Location: Canberra
- Been thanked: 347 times
Re: How to create randomness by following a strict routine.
So, first major step done.
As per pattern I then went to the second trunk and had a look. There was a heavy low branch on this and it had to go; so off it came. There were also two smaller branches just above the one removed and they were also way too low so they also came off automatically.
I then just tidied up the lowest area around the trunks, and made jins.
You do not have the required permissions to view the files attached to this post.
-
Grant Bowie
- Aussie Bonsai Fan
- Posts: 3809
- Joined: February 18th, 2009, 3:22 pm
- Favorite Species: Banksia
- Bonsai Age: 52
- Bonsai Club: Canberra
- Location: Canberra
- Been thanked: 347 times
Re: How to create randomness by following a strict routine.
OK, now we have the base cleared up and jins done to protect the tree from dieing back where the trunk and branches have been cut off.
More tomorrow.
Grant
More tomorrow.
Grant
You do not have the required permissions to view the files attached to this post.
-
Grant Bowie
- Aussie Bonsai Fan
- Posts: 3809
- Joined: February 18th, 2009, 3:22 pm
- Favorite Species: Banksia
- Bonsai Age: 52
- Bonsai Club: Canberra
- Location: Canberra
- Been thanked: 347 times
Re: How to create randomness by following a strict routine.
OK, Back to the routine.
Take a look at the 2nd trunk and go up to the first junction. The trunk splits into 2, not a trunk and a branch but just 2 equal trunks. I had to cut one off as it would never look natural, a trunk and a branch the same thickness is no good! The bent down trunk would never look like a branch or it would take a long time for the new trunk a long time to thicken up.I went up the 2 trunks and inspected them and I simply kept the one that had more branches.
Final pic shows the extra trunk cut off and the remaining branchlets cleaned up, small growth at the base of small branches plucked off and weak opposite branches removed to leave 2 x 2.
To strictly follow the routine I should cut off the weakest branches till I get to the first strong branch. (I will do this but have temporarily left the lower 4 on for illustrative purposes. Back to this in a little while)
You do not have the required permissions to view the files attached to this post.
-
Grant Bowie
- Aussie Bonsai Fan
- Posts: 3809
- Joined: February 18th, 2009, 3:22 pm
- Favorite Species: Banksia
- Bonsai Age: 52
- Bonsai Club: Canberra
- Location: Canberra
- Been thanked: 347 times
Re: How to create randomness by following a strict routine.
I have cleaned up lightly the entire 2nd trunk and its remaining branches.
Now back to the main trunk. The 1st trunk rises fairly boringly to 2 major and opposite branches. The one on the right, slightly inside all the foliage, is marginally thinner (just) and so I remove it. Once again it would have naturally over time become the weaker branch so we are just following both nature but it also fits with our routine.
Now back to the main trunk. The 1st trunk rises fairly boringly to 2 major and opposite branches. The one on the right, slightly inside all the foliage, is marginally thinner (just) and so I remove it. Once again it would have naturally over time become the weaker branch so we are just following both nature but it also fits with our routine.
You do not have the required permissions to view the files attached to this post.
-
Grant Bowie
- Aussie Bonsai Fan
- Posts: 3809
- Joined: February 18th, 2009, 3:22 pm
- Favorite Species: Banksia
- Bonsai Age: 52
- Bonsai Club: Canberra
- Location: Canberra
- Been thanked: 347 times
Re: How to create randomness by following a strict routine.
Here is how it now looks.
I have cleaned up the trunks with a tooth brush and taken out all the really obvious dead portions and weak opposites as per routine. I have left a few thinner branches that are unnecessary for styling but will be for illustrative purooses.
The tree and trunks and branches are nothing special so it is now up to me to use the remaining branches left after the removals and the trunk movements.
I will raffia and wire the trunks to show why the thin branches should be removed.
Grant.
You do not have the required permissions to view the files attached to this post.
-
Grant Bowie
- Aussie Bonsai Fan
- Posts: 3809
- Joined: February 18th, 2009, 3:22 pm
- Favorite Species: Banksia
- Bonsai Age: 52
- Bonsai Club: Canberra
- Location: Canberra
- Been thanked: 347 times
Re: How to create randomness by following a strict routine.
Trunks raffiaed and wired.
Explanation and more pics soon.
Grant
Explanation and more pics soon.
Grant
You do not have the required permissions to view the files attached to this post.
-
Slothman
- Aussie Bonsai Fan
- Posts: 76
- Joined: September 9th, 2013, 2:11 pm
- Bonsai Age: 0
- Location: Albany
Re: How to create randomness by following a strict routine.
Great stuff Grant. Really appreciate this.
I have already picked up/remembered things I had forgotten after my 15+ year absence from the hobby.
I have already picked up/remembered things I had forgotten after my 15+ year absence from the hobby.
-
Newbie.mia

- Aussie Bonsai Fan
- Posts: 85
- Joined: July 17th, 2013, 11:34 am
- Favorite Species: Pines
- Bonsai Age: 1
- Bonsai Club: Bonsai society of qld, toowoomba bonsai group
- Location: Upper Lockyer
- Contact:
Re: How to create randomness by following a strict routine.
This is a huge help to a newbie like me thanks so much grant.
