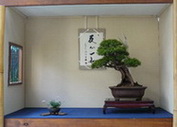


The above two pictures were taken on 05/April/2008.
I bought this black pine sometimes in June, 2006. It was a field grown tree, for general landscaping, not bonsai. I was
told it was about 10 years old at the time. It had just been dugged up and potted into a plastic bag in 2005.
I paid $125.00 for this pine. I think it was a real bargain. Although I must say I bought a few of these from the dealer.
It was generally in good health. But I was not satisfield with its vigour, so in August 2006, I potted it into this big
wooden box to regain its vitality. During the growing season of 2006-2007 I did trim bit and pieces off.
The measurements:
- Tree height: 122 cm.
Trunk diameter: 10 cm. Measured right above the first root.
Diameter at the layering point: 4.5 cm.
Box length: 72 cm.
Pot width: 49 cm.
Pot height: 18 cm.
*
* *
I have always used the ring-bark method. Over the years, I have done about 20 air layerings, mostly on the various
species of Japanese maples. My success rate with the Japanese maples have been around 80% or thereabout.
Before this pine, I had never done any conifers. So this pine has been a very beneficial learning process for me. I
have always obeyed the following rules of the ring-bark method:
- The layering point is always below a node (where above it is a branch or branches.)
The length of the ring is the length perimeter of the trunk/branch being layered.
The thickness of ball is approximately the diameter of the trunk/branch being layered.
The cover used is clear plastic.
Striking Hormone -- a Western Australian product. For this pine, I used a hard wood one.
*
* *
At the time when I prepared this pine, I did not have a camera, so I could not document it at the ring-bark stage. I will
use pictures from another tree to illustrate this process. Please do not be confused. I am still writing about the pine:
The picture below illustrates a trunk being air layered, just after the ring-bark was completed:

And this is how I put on the plastic cover:

And just after filled in the layering medium:

(For this tree, I mixed sphagnum moss with Nu-Earth, a general purpose potting mix.)
*
* *
Timing -- with Japanese maples, I am very liberal with the time-span: from the beginning of August to middle of October.
When I mentioned that I was going to layer this pine, the dealer advised me to do it toward the end of October. He has
previously succeeded with his first two attempts on two black pines. He did cautioned me that his experiences with
air layering black pine are limitted: just two.
Acting on his advice, I carried it out on 20/October/2007. The first time I ever saw roots was on 04/April/2008. The following
two pictures were taken on 05/April/2008. The circles mark where the roots can be seen:


The following three pictures were taken on 13/July/2008. More roots have developed, and some others have matured:


(The roots had actually developed during Victorian autumn. I find that a bit hard to explain.)
Back in June, 2008, I have started to feed the root ball with diluted SUPERthrive --
this is an American product.
*
* *
With Japanese maples, I usually cut them down in a one go. But I took a different approach with this pine.
I started to prepare cutting it down on the 07/September/2008; I cut away about 2/6 of bark. A week later, I cut away
another 2/6. On 21/September/2008, I cut it off.
I do not have any logical explanation for doing what I did. But I feel that, chip away the barks like that would likely
to trigger the layered part of the tree to adjust with loss of supply -- and possibly its own young roots will work a bit
harder? Therefore it would have a better chance of surviving once separated from the parent?
*
* *
The "soil" mix I use to plant the layered tree has high drainage. At the bottom, I has a single layer of scoria -- around
8 to 10 mm in size. The next layer consists of 50% scoria, 50% pine bark, both types are of around 3 mm. The last
layer of soil consists of around 45% scoria, 45% pine, also of around 3 mm; and 10% Nu-Earth general potting mix,
I also mixed seasol (Australian product) directly into this mix.
After cutting it down, take off the wires at the two ends, carefully remove the plastic cover to not damage any roots.
The entire sphagnum ball must be covered in soil. When filling the pot, slowly pour the soil in, the hard particles
in the soil can potentially damage the roots if they are comming in with high velocity.
The tree must be secured in the pot. The pot must also be secured where it stands. Shelter the pot in the shade,
and also from constant wind, but there must be enough natural light.
From thence on, I feed it diluted SUPERthrive every Sunday, for five weeks in a
row.
On the sixth week, I gave it a light feed of dynamic lifter. And also another light feeds on the seventh and eighth
weeks -- and nothing else since then.
*
* *
The two trees seven weeks after cutting, these pictures were taken on 21/November/2008.
The parent tree:


Looking from above:

The two big scars:

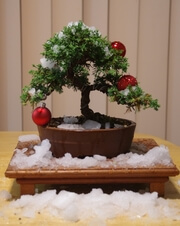
The layered tree:


The measurements:
- Pot diameter: 32 cm. This is the top part.
Pot height: 28 cm.
Trunk diameter: 4.5 cm.
Tree height: 66 cm.
developed into candles; some small new buds are also visible.
(If later on, I found any mis-spellings or grammar errors I would edit this post directly. I will not change the content.)