
I liked the direction we went on through the workshop, very happy with the overall vibe of the tree, I just had one thing that was bugging me - and today I decided to give it a tweak.
The two images below are just to show how the raw stock presented at the workshop and the result after the work done on the day.
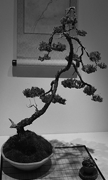
And here it is today (a few different views) before I did anything to it ... I include the left and right views because from these you can really see how the branch/trunk extends out and pretty much straight back, away from the viewer which made me uneasy - I think it needed some resolution. I have pondered what to do (if anything) but today I decided to do something with it because I just couldn't leave it as it was. I had tried to get a bend with wire but I really needed to close the junction at the crotch in order to improve the angle and wire alone wasn't going to do it. I'd come to the conclusion I would rather lose it trying to rectify it rather than live with it so here is what I did ... a wedge cut.
As a bit of a "safety measure" I secured a bit of rebar to the base of the trunk and along the main branch line in order to give myself something to pull to if the existing wire that had been applied wasn't going to be enough to get closure. And then I got out the saw ... And here is how it looks once all was complete : I'm much happier with these angles.
And now the waiting game begins ... what are my plans you ask?
Most likely only somebody with moronic tendencies would contemplate possible decandling this summer, so naturally (for me) I am considering it. I'll see how it recovers and pushes growth over the next few months, but if it doesn't skip a beat that would definitely be an option. Otherwise I'll let it go and reassess where it is at in Autumn. In the meantime I'll be watching it like a hawk!