
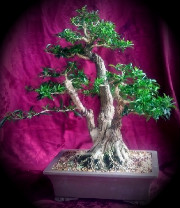
I have been growing these three small leafed privet on this slab for a few years now, and this will be their second re-pot. These are not the best bonsai going around, but I made a few slabs some time ago and these are being use to "test the water", a trial in others language.
The slab is made of chicken wire, concrete mix, oxide (for colouring) and fibre glass resin. It has four small holes to assist with drainage but need for the holes is dependent on the shape of the slab.
First job was to detach the trees from the slab, and that is a bit of a task as the roots get into everything and go everywhere. First I cut the old "muck off (I used the knife with the curved blade), then I used a sharp scrapper, with a bit of encouragement from the rubber mallet cut under the root ball. The setting then lifted right off. I then cleaned the slab for re-use, and did the normal root trimming of the trees. I then used a commercial "muck" that I purchased a few months ago for this specific purpose. I cut and moulded the muck around the slab as a wall and gave it some shape and contours. New screens were put over the holes, potting mix put into the hole, trees placed in there new locations and more potting mix put in. The muck was covered with some moss, and a moss mix was used as a covering for the potting mix.
Some water and it will be left to develope over the next few months.
Not sure about the future of those lower branches but some growth and trimming will allow some decisions to be made in the spring.
Repotting Privet on a Slab
-
Watto
- Aussie Bonsai Fan

- Posts: 3945
- Joined: July 6th, 2009, 8:17 am
- Favorite Species: Plum
- Bonsai Age: 0
- Bonsai Club: Goulburn Bonsai Society
- Location: Goulburn
- Has thanked: 517 times
- Been thanked: 1097 times
Repotting Privet on a Slab
You do not have the required permissions to view the files attached to this post.
Check out my blog at http://www.ausbonsai.com.au/blog/Watto" onclick="window.open(this.href);return false;
-
Jamie
- Bonsai passionardo
- Posts: 6829
- Joined: August 21st, 2009, 8:08 pm
- Favorite Species: CLERO!!!,ficus, celtis, juniper, elms
- Bonsai Age: 9
- Bonsai Club: AUSBONSAI.COM
- Location: queensland, Hervey Bay
- Been thanked: 2 times
- Contact:
Re: Repotting Privet on a Slab
nice slab watto 
i think this could be improved by changing the levels of the plantings, they all seem to be on a flat plane and think if you raised a couple of them it might make it a bit more interesting, also the size of the trees are all similar too, is there a way you could make one or two smaller in size as to ad perspective to the planting??
the other thing i was gonig to ask was is there any chance you could show us how you have gone about making your slab? i have been thinking about making a small slab for a small group planting and i think this would be a good way to go about it.
cheers
jamie
SHOHIN YAKUZA!!!
 taking the top half of trees of since 2005!
and growing trees for the future generations! 50+ year plans
and growing trees for the future generations! 50+ year plans
-
Watto
- Aussie Bonsai Fan
- Posts: 3945
- Joined: July 6th, 2009, 8:17 am
- Favorite Species: Plum
- Bonsai Age: 0
- Bonsai Club: Goulburn Bonsai Society
- Location: Goulburn
- Has thanked: 517 times
- Been thanked: 1097 times
Re: Repotting Privet on a Slab
Jamie - I was working on creating a park like scene with this particular bonsai. I can just see you and the darling sitting under those trees watching the kids playing - anyway thats what it is supposed to represent. Some wire and some prunning over the coming months should give the main tree (the middle one) some additional height and put the scene in more perspective.
The slab is made by shaping some old chicken wire and then adding a coating of fibre glass. Once that is dry a "sandwich filling" of a very thin layer of concrete (more a mortor mix really) is added to give it strength and some weight, and when that is dry a top coat of fibre glass is put on over the concrete. That is let dry and then another coat of fibre glass is "coloured" (with the oxide) and put around the whole structure. Depending on your satisfaction level, another two to five fibre glass coats can be applied, allowing drying time in between coats. All up, it took about three weeks to make but it is only about 20 minutes work each day.
The slab is made by shaping some old chicken wire and then adding a coating of fibre glass. Once that is dry a "sandwich filling" of a very thin layer of concrete (more a mortor mix really) is added to give it strength and some weight, and when that is dry a top coat of fibre glass is put on over the concrete. That is let dry and then another coat of fibre glass is "coloured" (with the oxide) and put around the whole structure. Depending on your satisfaction level, another two to five fibre glass coats can be applied, allowing drying time in between coats. All up, it took about three weeks to make but it is only about 20 minutes work each day.
Check out my blog at http://www.ausbonsai.com.au/blog/Watto" onclick="window.open(this.href);return false;
