
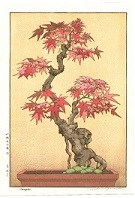
Since i first started bonsai about 5 years ago, i was always drawn to maples and, in particular, group plantings.
At first i put it on the back burner, and got some cheap trees that i could get familiar with growing and make the mistakes on. Boy did i make the mistakes, but as the years passed and my horticultural knowledge increased, i no longer was killing trees and the idea of a group/ forest came back to me again.
It would be that my first real attempted would end in disaster, using Japanese Larch which just do not seem to work for me in Melbourne summers when grown in pots. Again it went on the back burner and focused on my single trees. I finally determined myself to start a forest, and grew seedlings by the hundred, but again it was not what really was trying to do. I scoured bonsai nurseries for months for 3/5/10 year old stock that was not twisted a dozen ways that i could use, but no dice.
Finally, i decided that the best way forward was to start with an established group, and then take cuttings from it and keep adding more trees to it over the years. In that way i would have the mature trees to enjoy developing the core structure of the group around, and also the young material i could enjoy growing on and add my own touches to the forest with down the track.
I made a trip down to view this group that i had appreciated on a previous visit to one of the nurseries, and searched the innermost recesses of my wallet, and finally this group now brings me to where i initially fell in love with bonsai; the deciduous forest. It is 15 trees, but has enough gaps to allow and encourage me to keep planting out more little groups of trees in to fill it out further, and thus make it more of 'my own' that simply something i purchased.
I look at this as being the helicopter flight to base camp of Mt.Everest; it skips out the weeks of arduous hiking to get to the start point, but it still leaves the mountain to be climbed.
When got it, roughly the dimensions of a subaru outback boot.
Today after a trim back and bud selection for spring. I have intentionally left a number of long shoots on it to supply cutting material come spring.
Current Front:
Current front 1/4 angle:
Current side view:
Current rear:
Thoughts for future direction are welcomed.
Japanese Maple Established Group
-
TimS
- Aussie Bonsai Fan

- Posts: 1943
- Joined: March 17th, 2017, 2:46 pm
- Favorite Species: Japanese Maple
- Bonsai Age: 9
- Bonsai Club: Waverly Bonsai Group
- Location: Melbourne
- Has thanked: 428 times
- Been thanked: 538 times
Japanese Maple Established Group
You do not have the required permissions to view the files attached to this post.
In the blue darkening sky, the moon paints a pine tree.
-
MJL

- Aussie Bonsai Fan
- Posts: 2840
- Joined: October 26th, 2014, 8:47 pm
- Favorite Species: Maples, Elms, Cedars and Pines
- Bonsai Age: 7
- Bonsai Club: Waverley Bonsai Group & Yarra Valley Bonsai Society
- Location: Melbourne
- Has thanked: 424 times
- Been thanked: 643 times
Re: Japanese Maple Established Group
Welcome to base camp Tim; hope you enjoyed your flight. Money well spent.
Beautiful pot. Lovely trees. Initial thoughts on styling:
- Think about the existing rear being the front; squint and you can see how it has more depth with the bigger trees close to the front and the smaller trees funnelling back
- Reduce the gap between the two groups
- Slightly angle the gap between the two groups at the time you are reducing the gap so that a subtle 'path' is created.
- Hard to see from photo but could you swap these trees and turn turn them 180 degrees so that the shape matches the new side? - The existing photo of the front qtr angle is attractive; which after above would rear - but attractive where ever it sits. This angle make me think that when the trees are potted - change the their orientation in the pot such that this angle in more the rear (not qtr rear) and the gap between the groups trails off in an angle....
Confused yet? Sorry if so.
Take inspiration from a recent post by Treeman of his Japanese Greybark Elms.
Of course, very difficult to tell from photos but I love what you've purchased and the above ideas may not work when the forest is viewed in the flesh.
Cheers,
Mark
You do not have the required permissions to view the files attached to this post.
Tending bonsai teaches me patience.
-
shibui
- Aussie Bonsai Fan
- Posts: 7669
- Joined: August 22nd, 2009, 8:41 pm
- Favorite Species: trident maple
- Bonsai Age: 41
- Bonsai Club: Albury/Wodonga; BSV; Canberra; VNBC
- Location: Yackandandah
- Has thanked: 66 times
- Been thanked: 1415 times
- Contact:
Re: Japanese Maple Established Group
My preference is also for the front to have the larger trees. This is the 'close view' of a forest where distant trees seem smaller while those close to the viewer appear larger - perspective.
My eye was also drawn to the gap instead of the forest and keeps going back there while viewing. Paths through a forest are great but seem to be more interesting and less intrusive when they meander through so there is no large gap between the subgroups.
I'm not certain I follow all of MJL's ideas but some are worth exploring. I won't start proposing specific changes as I cannot evaluate all the subtle bends and branch directions that I would like to assess before moving individual trees.
One of my early trident groups had a similar highway through the centre which I rectified quite simply by cutting the group down the gap and rotating one half slightly behind the other part so that the path was more diagonal through the group.
If you do go for our proposed front I think some extra smaller trees around the sides closer to that front would help so definitely go ahead with some cuttings if you can get them to survive.
http://shibuibonsai.com.au/" onclick="window.open(this.href);return false;
-
TimS
- Aussie Bonsai Fan
- Posts: 1943
- Joined: March 17th, 2017, 2:46 pm
- Favorite Species: Japanese Maple
- Bonsai Age: 9
- Bonsai Club: Waverly Bonsai Group
- Location: Melbourne
- Has thanked: 428 times
- Been thanked: 538 times
Re: Japanese Maple Established Group
Thanks both Mark and Neil, very useful impressions for me to think about. Especially the front change, that makes a hell of a lot of sense, and I will certainly flip the rear to the front.
I really like the idea of doing a 45 degree rotation on the planting positions of the two halves to lessen the central gap. If I can work more towards the front quarter view that would be great. It should be easy to separate the sides, and possibly even the individual clumps, and relocate them to a better situation. I think it’s a little too 2 dimensional as it currently sits, especially the primary tree with its almost two apexes, so I will either remove the lower apex, or spin the whole clump about 30-45 degrees so it’s not so 2 dimensional.
I agree also that more clumps of smaller trees is in order, so I will take a bunch of cuttings late spring and hopefully root enough to start that process.
Thanks for your input and time guys
In the blue darkening sky, the moon paints a pine tree.
-
KIRKY
- Aussie Bonsai Fan
- Posts: 1969
- Joined: May 21st, 2009, 3:42 pm
- Favorite Species: Flowering
- Bonsai Age: 12
- Bonsai Club: BSV
- Location: Melbourne
- Has thanked: 1167 times
- Been thanked: 246 times
Re: Japanese Maple Established Group
To my eye the 1/4 front photo has the more natural front. Larger trees in the middle / front smaller trees radiating from the centre. Also looks less contrived as a natural forest without the gap in the middle. 
Still a great purchase and lovely pot
Having said that most of my early forest plantings also have the gapping middle which I hope to rectify/remove with this seasons repot.
Cheers
Kirky
Still a great purchase and lovely pot
Having said that most of my early forest plantings also have the gapping middle which I hope to rectify/remove with this seasons repot.
Cheers
Kirky
Great oaks from little acorns grow.
-
treeman
- Aussie Bonsai Fan
- Posts: 2838
- Joined: August 15th, 2011, 4:47 pm
- Favorite Species: any
- Bonsai Age: 25
- Location: melbourne
- Has thanked: 28 times
- Been thanked: 574 times
Re: Japanese Maple Established Group
The ''rear'' looks like the better front to me but besides tree placement the most pressing job is to clean the trees properly. there's a huge amount of congestion that needs to be removed. Bring each tree back to it's first or second ramification and then select the main important branches for the future. Reduce all the bumps and swellings and seal them and then wire each branch and twig which you have decided to keep to a smooth elegant movement. Much work to do!
No need to worry about placement this year. The trouble with these trees as with 95% of JMs out there is too much laziness and not enough conviction in the early stages leading to a jagged appearance. If you do not rectify it now, it will get worse not better.
No need to worry about placement this year. The trouble with these trees as with 95% of JMs out there is too much laziness and not enough conviction in the early stages leading to a jagged appearance. If you do not rectify it now, it will get worse not better.
Last edited by treeman on June 16th, 2019, 1:50 pm, edited 1 time in total.
Mike
-
TimS
- Aussie Bonsai Fan
- Posts: 1943
- Joined: March 17th, 2017, 2:46 pm
- Favorite Species: Japanese Maple
- Bonsai Age: 9
- Bonsai Club: Waverly Bonsai Group
- Location: Melbourne
- Has thanked: 428 times
- Been thanked: 538 times
Re: Japanese Maple Established Group
Thanks Treeman,
There is a hell of a lot of work to do on it, that's part of what attracted me to it. It's no simple 'buy and display' type tree, it needs a full make over to get it back on track. In doing so i can feel a little more involved in it. The first trim i did after i got it was just a clear out so i could actually assess the trees somewhere near to where their actual proportions should be. There is a tonne of excessive growth on there still that isn't just what i have left for cuttings.
I have noticed many areas that need to be cut back and sealed over, even old cut points that were just really average jobs that have healed poorly. Not to mention all the cutting back of shoots there is to do there. I'm holding off a little longer before i do that, as i took a insignificant branch off another JM i have, and it has leaked water out of the wound, and I've had to make a massive wad of cut paste over the top to stem the flow. I had wrongly assumed that with all the leaves dropped, it was far enough into dormancy for me to cut back this small shoot, but clearly not.
Anyway, this year is the year to go back hard on them all, so that i can properly direct the growth from here on out.
In the blue darkening sky, the moon paints a pine tree.
-
MJL
- Aussie Bonsai Fan
- Posts: 2840
- Joined: October 26th, 2014, 8:47 pm
- Favorite Species: Maples, Elms, Cedars and Pines
- Bonsai Age: 7
- Bonsai Club: Waverley Bonsai Group & Yarra Valley Bonsai Society
- Location: Melbourne
- Has thanked: 424 times
- Been thanked: 643 times
Re: Japanese Maple Established Group
Hey Tim and Mike, self-interest in this question for my own maples younger maples. If, through my historical lack of knowledge/poor technique, my old cuts have ugly calluses- is it best to cut the callus off back flush (or concave) to the trunk and apply cut paste - to start the healing over again?
Bonsai teaches me patience.
Sent from my iPhone using Tapatalk
Bonsai teaches me patience.
Sent from my iPhone using Tapatalk
Tending bonsai teaches me patience.
-
TimS
- Aussie Bonsai Fan
- Posts: 1943
- Joined: March 17th, 2017, 2:46 pm
- Favorite Species: Japanese Maple
- Bonsai Age: 9
- Bonsai Club: Waverly Bonsai Group
- Location: Melbourne
- Has thanked: 428 times
- Been thanked: 538 times
Re: Japanese Maple Established Group
Hi Mark,
I am trying this on a tree with a scar that healed over in a very uneven and unsightly manner. I cut it back again slightly concave, and with a thin layer of cut paste, and re-scarred the area surrounding the wound so as to stimulate the area to re-initiate the healing process. It's a long process, but i would rather do it in 2018 than look back in the years to come and wish i had done so.
Maples are not thick barked trees, but have found if the cut is flush, the scar sits a little proud. Now I cut back slightly concave and find better results for a more flush sitting heal.
Last edited by TimS on June 16th, 2019, 8:30 pm, edited 1 time in total.
In the blue darkening sky, the moon paints a pine tree.
-
treeman
- Aussie Bonsai Fan
- Posts: 2838
- Joined: August 15th, 2011, 4:47 pm
- Favorite Species: any
- Bonsai Age: 25
- Location: melbourne
- Has thanked: 28 times
- Been thanked: 574 times
Re: Japanese Maple Established Group
Tim, the time to prune JMs is just after or slightly before leaf drop. If you wait even 2 weeks after leaf fall, they will belled. Cutting when full dormant will lead to bleeding. I don't know why but that's just the way it is. Possibly just before leaf fall the tree is withdrawing sap or stopping the flow, but shortly after that roots must begin grow and draw water and it starts to flow again. The other point is that if you cut roots right after branch pruning, there will be no bleeding from the wounds.TimS wrote: took a insignificant branch off another JM i have, and it has leaked water out of the wound, and I've had to make a massive wad of cut paste over the top to stem the flow. I had wrongly assumed that with all the leaves dropped, it was far enough into dormancy for me to cut back this small shoot, but clearly not.
Mike
-
treeman
- Aussie Bonsai Fan
- Posts: 2838
- Joined: August 15th, 2011, 4:47 pm
- Favorite Species: any
- Bonsai Age: 25
- Location: melbourne
- Has thanked: 28 times
- Been thanked: 574 times
Re: Japanese Maple Established Group
In Japan they generally cut off with branch pruners and the smooth the edges with a sharp knife leaving it flat. (JMs have very thin bark) I hardly ever bother and just cut with the flat branch pruners. if you need to go back and reduce a large scar a couple of times there's no problem. You can also cut the branch leaving a rather long stump (if you can live with it the mean time) then come back and snap it of the following year. This leaves no ''bump''.MJL wrote:Hey Tim and Mike, self-interest in this question for my own maples younger maples. If, through my historical lack of knowledge/poor technique, my old cuts have ugly calluses- is it best to cut the callus off back flush (or concave) to the trunk and apply cut paste - to start the healing over again?
Bonsai teaches me patience.
Sent from my iPhone using Tapatalk
Last edited by treeman on June 17th, 2019, 9:58 am, edited 1 time in total.
Mike
-
treeman
- Aussie Bonsai Fan
- Posts: 2838
- Joined: August 15th, 2011, 4:47 pm
- Favorite Species: any
- Bonsai Age: 25
- Location: melbourne
- Has thanked: 28 times
- Been thanked: 574 times
Re: Japanese Maple Established Group
Belled?....Yes that's right they will ring the bell and tell you they're bLEEding.treeman wrote:
, they will belled. .
Mike
-
MJL
- Aussie Bonsai Fan
- Posts: 2840
- Joined: October 26th, 2014, 8:47 pm
- Favorite Species: Maples, Elms, Cedars and Pines
- Bonsai Age: 7
- Bonsai Club: Waverley Bonsai Group & Yarra Valley Bonsai Society
- Location: Melbourne
- Has thanked: 424 times
- Been thanked: 643 times
Re: Japanese Maple Established Group
Cheers Tim and Treeman. Very interesting and insightful. Will take advice accordingly. Thank you. [THUMBS UP SIGN]
Bonsai teaches me patience.
Sent from my iPhone using Tapatalk
Bonsai teaches me patience.
Sent from my iPhone using Tapatalk
Tending bonsai teaches me patience.
-
TimS
- Aussie Bonsai Fan
- Posts: 1943
- Joined: March 17th, 2017, 2:46 pm
- Favorite Species: Japanese Maple
- Bonsai Age: 9
- Bonsai Club: Waverly Bonsai Group
- Location: Melbourne
- Has thanked: 428 times
- Been thanked: 538 times
Re: Japanese Maple Established Group
So all my Japanese Maples seem to be shooting early this year. The seed grown weepers are starting, one of the air layered ones is already leafing out and noticed the buds swelling seriously on this group. It was time for action!
Forewarning about the crappy angles of the photos i took while working, the background of garden is not conducive to good photos at the best of times, so i went slightly elevated to capture a little bit of the branch structures. The last two photos are a little more suitable.
I started with the repotting. I had notions about separating the groups of trees and replanting them at different angles to remove the big gap through the middle. The group had other ideas, and was forced to abandon that plan and settle for leaving it as an entirety. They had been wired together as well as grown together over a significant amount of time, so their roots are difficult to really separate to any meaningful degree.
Out of the pot. Probably could have gone another year before repotting, but since i wanted to change the angle it's neither here nor there. Just meant not much root pruning needed to be done.
As you can see there was plenty of space in there for roots to continue growing. I cleared out a few pockets here and there so i can plant more trees in as i take and strike cuttings. In fact i put more attention into removing the deep layer of soil and roots on top to reveal the flare of the trunks into the soil, more than i did on getting too involved with root separation once it became clear they were not going to appreciate being pulled apart.
At first i just put the group back in the pot at the same angle it was to get a feel for how it looked before, so i could play around with it a little it. Despite my crap photo angle, this is back in the pot at the same position it was.
I settled on about a 30 degree rotation counterclockwise. This shut the majority of the gap causing the straight through view, while vaguely respecting the limitations of having some trunks, and subsequently their roots, so close to the pot edges. Also, importantly, it allowed a little group of trees at the back to come into play, and reduce the sparse feeling that middle area had.
Finally got stuck in with a clean up prune to get rid of some of the heavy branches, cutting back to thinner areas. It looks very sparse now as a result, but at least having taken the medicine this year, i can work on the ramification from here onward. Yes there are some heavy or excessively long areas still, they are just left to give me some cutting material this year, and will also be removed in time.
You do not have the required permissions to view the files attached to this post.
In the blue darkening sky, the moon paints a pine tree.
-
MJL
- Aussie Bonsai Fan
- Posts: 2840
- Joined: October 26th, 2014, 8:47 pm
- Favorite Species: Maples, Elms, Cedars and Pines
- Bonsai Age: 7
- Bonsai Club: Waverley Bonsai Group & Yarra Valley Bonsai Society
- Location: Melbourne
- Has thanked: 424 times
- Been thanked: 643 times
Re: Japanese Maple Established Group
Hi Tim,
I think your changes are an improvement for sure. I really like the rotation for all the reasons you mention. It immediately closes the gap; it is a more natural composition and it creates more interest. The tight clump on the left of the picture contrasts well with the looser set on the right. There seems to be a subtle path that leads off to the left back - my mind wants to explore that path. So, to my eye, there's more interest in this forest now and I look forward to watching it progress under your care.
Cheers,
Mark
Tending bonsai teaches me patience.
