
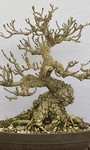
A few years ago I posted about this Desert Ash (Fraxinus angustifolia) that I planted in a stone wall that I built. The idea was to convey the old farmhouse ruins we have in the hills that have been taken over by local trees, either native or feral. My wife grew up in Strathalbyn on a farm and the area is full of ruins made from the local sandstone, the colours of which have always made an impression on me.
I liked the result but I built the wall before I had chosen a tree, and although the Ash I eventually chose worked well it was moving in the wrong direction so when it was put together the wall was taller in the front than the back. I always thought I should build another wall that was better for this tree, so here we go.
As before I created a frame with split bamboo and wire, then built up the wall with liquid nails and gravel from the driveway. I kept the same dimensions and if the bamboo eventually rots away the wall will be strong enough without the base.
I then made a mixture of mortar and water, then added some oxide colouring I picked up that matched the colours of the local sandstone. It was then plastered all over the stones, then washed off the outside of the wall. The inside was brushed over with a toothbrush and the whole thing was left to dry.
Next step will be to leave it for a week or two then go over the whole structure with a brush to remove any loose bits. It should be ready for the next repot in late July.
Hopefully it all comes together. I'm happier with both the structure and colour of the new wall, it matches the image of ruins in my head much better.
Matt.
New wall for Ash
-
terryb
- Aussie Bonsai Fan

- Posts: 559
- Joined: April 29th, 2016, 3:44 pm
- Bonsai Age: 4
- Bonsai Club: SA Bonsai Society; VNBC
- Location: Adelaide
- Has thanked: 521 times
- Been thanked: 199 times
Re: New wall for Ash
Awesome Matt! I think you have captured the ruins both in form and colour. Look forward to seeing it in real life, if we ever get back to normality.
-
greg27
- Aussie Bonsai Fan
- Posts: 821
- Joined: August 28th, 2019, 7:52 am
- Favorite Species: Olive & Eucalypts
- Bonsai Age: 2
- Bonsai Club: SA Bonsai Society; VNBC
- Location: Adelaide
- Has thanked: 608 times
- Been thanked: 452 times
- Contact:
Re: New wall for Ash
Looking good, you've nailed the inside vs outside texture of the wall. The oxide colouring is a nice tip, I have a project in mind that I might borrow that idea for.
-
Keep Calm and Ramify

- Aussie Bonsai Fan
- Posts: 955
- Joined: April 1st, 2017, 11:50 am
- Bonsai Age: 0
- Location: Newcastle NSW
- Has thanked: 403 times
- Been thanked: 451 times
Re: New wall for Ash
Nicely documented post Matt.
Well done & I will look forward to seeing the progression updates!
Well done & I will look forward to seeing the progression updates!
-
Watto
- Aussie Bonsai Fan
- Posts: 3940
- Joined: July 6th, 2009, 8:17 am
- Favorite Species: Plum
- Bonsai Age: 0
- Bonsai Club: Goulburn Bonsai Society
- Location: Goulburn
- Has thanked: 513 times
- Been thanked: 1096 times
Re: New wall for Ash
Well done and good info for the rest of us who might like to give this idea a go. Thanks.
Check out my blog at http://www.ausbonsai.com.au/blog/Watto" onclick="window.open(this.href);return false;
-
Ryceman3

- Aussie Bonsai Fan
- Posts: 2617
- Joined: October 19th, 2014, 10:39 am
- Favorite Species: Pines & Mels
- Bonsai Age: 7
- Location: Melbourne
- Has thanked: 1067 times
- Been thanked: 1599 times
Re: New wall for Ash
Sweet ....! I like this.

"NO CUTS, NO GLORY"
https://www.instagram.com/r3_bonsai/
https://www.instagram.com/r3_bonsai/
-
matlea
- Aussie Bonsai Fan
- Posts: 563
- Joined: July 24th, 2011, 4:15 pm
- Bonsai Age: 0
- Location: sydney
- Been thanked: 32 times
Re: New wall for Ash
Cool.. Looks good. Are you going to plant into a pot or are you going to place on a slab?
-
MJL

- Aussie Bonsai Fan
- Posts: 2840
- Joined: October 26th, 2014, 8:47 pm
- Favorite Species: Maples, Elms, Cedars and Pines
- Bonsai Age: 7
- Bonsai Club: Waverley Bonsai Group & Yarra Valley Bonsai Society
- Location: Melbourne
- Has thanked: 424 times
- Been thanked: 643 times
Re: New wall for Ash
Excellent.  I find this melding of local inspiration, memory, craft and bonsai technique really exciting. Thank you for trying different stuff Matt and for detailing your efforts via this forum.
Tending bonsai teaches me patience.

-
PWC
- Aussie Bonsai Fan

- Posts: 306
- Joined: December 10th, 2018, 1:18 pm
- Favorite Species: crepe myrtle/juniper
- Bonsai Age: 2
- Location: Gympie
- Has thanked: 109 times
- Been thanked: 51 times
Re: New wall for Ash
I like the original, looking forward to the new combination, the tree looks good, how long did it take to get to that level?
Peter.
-
Boics
- Aussie Bonsai Fan
- Posts: 2189
- Joined: September 27th, 2012, 6:16 pm
- Favorite Species: Banksia, Syzygium, Cotoneaster. Leptospermum
- Bonsai Age: 7
- Location: Victoria Inner City Fringe
- Has thanked: 28 times
- Been thanked: 16 times
Re: New wall for Ash
Nice work, look forward to seeing this pot up!
One of the fabulous things about growing bonsai is as you get old and decrepit your trees get old and beautiful
-
Matt S
- Aussie Bonsai Fan
- Posts: 755
- Joined: February 21st, 2015, 8:57 am
- Favorite Species: Olive
- Bonsai Age: 30
- Bonsai Club: S.A. Bonsai Society, Victorian Native Bonsai Club
- Location: Adelaide
- Has thanked: 538 times
- Been thanked: 435 times
Re: New wall for Ash
Thanks for the encouragement everyone.
Matt.
I don't have much luck with slabs in our harsh summers so I'll stick with a pot, probably the same one I'm using now, although you've got me thinking.Are you going to plant into a pot or are you going to place on a slab?
I bought the tree about 15 years ago and I've since completely restyled it. But collected Ash trees with basic branching can start to look good after 5 years.how long did it take to get to that level?
Matt.
-
Matt S
- Aussie Bonsai Fan
- Posts: 755
- Joined: February 21st, 2015, 8:57 am
- Favorite Species: Olive
- Bonsai Age: 30
- Bonsai Club: S.A. Bonsai Society, Victorian Native Bonsai Club
- Location: Adelaide
- Has thanked: 538 times
- Been thanked: 435 times
Re: New wall for Ash
The new wall finally went in today. Right now it doesn't stand out much because I used a sphagnum moss mix over the top and the colours are pretty similar, but once the moss grows and looks nice and green the wall will stand out more.
My photo doesn't show it very well but in the flesh the wall looks much better, sitting a little lower and looking more run down. I'll post an update when it looks more settled.
Matt.
My photo doesn't show it very well but in the flesh the wall looks much better, sitting a little lower and looking more run down. I'll post an update when it looks more settled.
Matt.
You do not have the required permissions to view the files attached to this post.
