
Japanese Black Pine Field Growing Project
-
Keels
- Aussie Bonsai Fan

- Posts: 722
- Joined: December 11th, 2012, 12:13 pm
- Favorite Species: Pines, Eucalyptus and Callistemon
- Bonsai Age: 11
- Bonsai Club: CBS, Goulburn & VNBC
- Location: Canberra
- Has thanked: 227 times
- Been thanked: 293 times
Re: Japanese Black Pine Field Growing Project
I'm in the same boat. I have stocked up on 20 seedlings or 1 year old jbps ready to start field growing. My plan is to start with low down twists to create the movement early. Planted in colanders But instead of growing in the field straight away I'm starting with a bed of pumice. Hoping to develop the roots correctly before they go into the ground full time. Then wack them in the ground to put on size fast.
-
tgooboon
- Aussie Bonsai Fan

- Posts: 109
- Joined: February 9th, 2019, 9:07 am
- Favorite Species: Japanese Black Pine & Ficus
- Bonsai Age: 7
- Location: Mackay Queensland
- Has thanked: 84 times
- Been thanked: 48 times
Re: Japanese Black Pine Field Growing Project
Great to hear other like minded people doing the same.
I have been lucky enough to score a dozen one year old seedlings, which should be a good size batch for me to tend to.
When I say putting them in the ground, I will still have them in a grow bag which is very similar to a colander, so if they start growing too quickly i can lift them off the ground easily - root work and low movement are my main priority in first few years.
I have a slight raised bed to improve drainage. I also have been considering if i add some pumice, perlite, scoria or sand on top of the soil for extra drainage.
-
Ryceman3

- Aussie Bonsai Fan
- Posts: 2844
- Joined: October 19th, 2014, 10:39 am
- Favorite Species: Pines & Mels
- Bonsai Age: 10
- Location: Melbourne
- Has thanked: 1198 times
- Been thanked: 2086 times
Re: Japanese Black Pine Field Growing Project
Great project!
Look forward to watching the progression. Pines are a fun thing to watch develop, particularly JBP. Good luck with it all, hopefully you can show that sub-tropical climates are just as conducive to JBP development as other more temperate areas ... I have faith!


Look forward to watching the progression. Pines are a fun thing to watch develop, particularly JBP. Good luck with it all, hopefully you can show that sub-tropical climates are just as conducive to JBP development as other more temperate areas ... I have faith!
"NO CUTS, NO GLORY"
https://www.instagram.com/r3_bonsai/
https://www.instagram.com/r3_bonsai/
-
dmattar
- Aussie Bonsai Fan

- Posts: 20
- Joined: July 18th, 2020, 9:26 pm
- Bonsai Age: 1
- Location: Brisbane
- Has thanked: 2 times
- Been thanked: 13 times
Re: Japanese Black Pine Field Growing Project
Hello,
I’m doing something similar in brisbane but I am moving houses so I have to dig out the grow bag in a little bit. Subtropical climate is actually really good for growing jbp because the winter is so mild and short, you actually end up with an extra flush of growth per year.
I did the Telperion method. Grow bag on twisted seedling, sink into the ground with pumice/manure/decomposed pine bark mix. Preserve low growth. Needle pluck up to the terminal buds on sacrificial growth in late summer, remove extra whorls in autumn to keep pushing the sacrifice and balance energy with the bottom.
I’m up to my third year on two seedlings and they’re sitting at about 3cm thickness with a lot of low growth to cut back to. They have been in the ground for a little over a year.
Good luck with your trees! I wish I had someone who could send me some seedlings to experiment with.
-
tgooboon
- Aussie Bonsai Fan
- Posts: 109
- Joined: February 9th, 2019, 9:07 am
- Favorite Species: Japanese Black Pine & Ficus
- Bonsai Age: 7
- Location: Mackay Queensland
- Has thanked: 84 times
- Been thanked: 48 times
Re: Japanese Black Pine Field Growing Project
Let hope we are right about the climate being good for Pines, it has been so far. The wet summer is probably even more of a challenge for me and the main lessons learnt in my area with needing a raise bed. Good luck dmater with your endeavours for more Trees, and glad to have other like minded people on the journey.
I am interested to find out more about the timing for getting an extra flush each year in warm climates, I have heard that it is a thing in Brisbane and I’m sure with Mackay being mild winters it should work here too, but I am cautions about decandaling out of the widely acceptable window until I see the results. If you have experience you could start a thread showing timing of decandling to get a third flush warm climates.
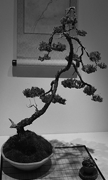
Below are some examples of one JBP which has been a mix of pot and ground grown; I am hoping to recreate and improve on the results. The seedling originally came from Ryceman3 as an overflow from his entry in the “The Bonsai Nut 2018 Six Year Japanese Black Pine Contest” Original Bending work from December 2019 – tree was grown from seed in Mid 2018.
Rootwork in July 2023 – it had been in a bonsai pot for 12 months in an akadama mix, which had lead to slow growth, but extremely good root base development.
Repot in July 2023 – it is in a grow bag with majority of perlite and coir mix, but sitting in an akadama/pumice/lava mix in the top 75mm.
Decandling in December 2023 - I did a fairly severe foliage cut back behind the node to get more fine branches close to the trunk, leaving only the sacrifice branches and new leader untouched. The new leader was a fine bud, selected to assist with taper and change in direction.
A major benefit of using the grow bags is that I was able to lift the tree from the ground to do detailed work, with limited fine roots escaping from the bag in year 1 – this will be more difficult after another year in the ground. It did not upset the tree, however growth over Summer has been limited vigour; but it is responding as it should after decandling. Fingers crossed it is now setup for strong inground growth over the next few years.
I am interested to find out more about the timing for getting an extra flush each year in warm climates, I have heard that it is a thing in Brisbane and I’m sure with Mackay being mild winters it should work here too, but I am cautions about decandaling out of the widely acceptable window until I see the results. If you have experience you could start a thread showing timing of decandling to get a third flush warm climates.
Below are some examples of one JBP which has been a mix of pot and ground grown; I am hoping to recreate and improve on the results. The seedling originally came from Ryceman3 as an overflow from his entry in the “The Bonsai Nut 2018 Six Year Japanese Black Pine Contest” Original Bending work from December 2019 – tree was grown from seed in Mid 2018.
Rootwork in July 2023 – it had been in a bonsai pot for 12 months in an akadama mix, which had lead to slow growth, but extremely good root base development.
Repot in July 2023 – it is in a grow bag with majority of perlite and coir mix, but sitting in an akadama/pumice/lava mix in the top 75mm.
Decandling in December 2023 - I did a fairly severe foliage cut back behind the node to get more fine branches close to the trunk, leaving only the sacrifice branches and new leader untouched. The new leader was a fine bud, selected to assist with taper and change in direction.
A major benefit of using the grow bags is that I was able to lift the tree from the ground to do detailed work, with limited fine roots escaping from the bag in year 1 – this will be more difficult after another year in the ground. It did not upset the tree, however growth over Summer has been limited vigour; but it is responding as it should after decandling. Fingers crossed it is now setup for strong inground growth over the next few years.
You do not have the required permissions to view the files attached to this post.
-
dmattar
- Aussie Bonsai Fan
- Posts: 20
- Joined: July 18th, 2020, 9:26 pm
- Bonsai Age: 1
- Location: Brisbane
- Has thanked: 2 times
- Been thanked: 13 times
Re: Japanese Black Pine Field Growing Project
I don’t know about the third flush timing for decandling as that’s mainly in refinement and I definitely have no black pines in that stage yet.
However, I know that Tony Bebb does teach this in his workshop. Also re the wet weather, I leave about 2 plus inches of the bag above ground. They survived the flooding in past couple of years.
From my experience in the ground, if they are growing strong they can push out another whorl in the growing season with a shorter internode if the autumn is mild and long. I haven’t decandled yet or cut off the sacrifice leader. I can take a photo of a 3 year old sometime this week when I have more time.
-
tgooboon
- Aussie Bonsai Fan
- Posts: 109
- Joined: February 9th, 2019, 9:07 am
- Favorite Species: Japanese Black Pine & Ficus
- Bonsai Age: 7
- Location: Mackay Queensland
- Has thanked: 84 times
- Been thanked: 48 times
Re: Japanese Black Pine Field Growing Project
Seedlings have just arrived, the project is now real with 12 little Japanese Black Pine trees.
The seedlings are less than 1 year old, started in 2023, and have already had stem cutting technique applied in October 23. I want to focus on developing small to medium trees so early root work is a must and this technique in particular should be a great headstart to develop a radial root spread and for low branching which contribute to taper. The seedlings came from Ryceman3 - it is great to have his help to kick start the project off.
The seedlings are all quite strong: height 40-90mm, trunks thickness: 3-4 mm across, it is interesting how much variability there is: some with buds low, some with dominant buds on the main leader, lots of variation in needles (colour, length, strength). The variability will be a positive as each tree’s to take on its own character.
First 6
Second 6
The seedlings were packed well with cling wrap and cardboard packers over the the soil to hold the soil in the pots; this keeps their roots being shaken loose from the soil while they are shaking their way across the country. AusPost delivered in 3 days & 2 nights, which is good from Melbourne to Mackay. Unfortunately half of the pots rolled onto their side, but the clingwrap did its job and held most of the soil in, saving those 6 from an emergency repot. The 6 trunks that rolled over took a little beating are the second photo - nothing snapped, so should be fine and might even add character, we will see down the track. I have put them in a 2 trays spaced out to give access to sunlight, and have topped up soil where needed. Will have to wait a few weeks and see if they all make it . They will spend a day in the shade after being in the dark for 3 days, then I will be putting them out into full sun and wait a few months for a good time to repot.
The seedlings are less than 1 year old, started in 2023, and have already had stem cutting technique applied in October 23. I want to focus on developing small to medium trees so early root work is a must and this technique in particular should be a great headstart to develop a radial root spread and for low branching which contribute to taper. The seedlings came from Ryceman3 - it is great to have his help to kick start the project off.
The seedlings are all quite strong: height 40-90mm, trunks thickness: 3-4 mm across, it is interesting how much variability there is: some with buds low, some with dominant buds on the main leader, lots of variation in needles (colour, length, strength). The variability will be a positive as each tree’s to take on its own character.
First 6
Second 6
The seedlings were packed well with cling wrap and cardboard packers over the the soil to hold the soil in the pots; this keeps their roots being shaken loose from the soil while they are shaking their way across the country. AusPost delivered in 3 days & 2 nights, which is good from Melbourne to Mackay. Unfortunately half of the pots rolled onto their side, but the clingwrap did its job and held most of the soil in, saving those 6 from an emergency repot. The 6 trunks that rolled over took a little beating are the second photo - nothing snapped, so should be fine and might even add character, we will see down the track. I have put them in a 2 trays spaced out to give access to sunlight, and have topped up soil where needed. Will have to wait a few weeks and see if they all make it
You do not have the required permissions to view the files attached to this post.
-
Ryceman3
- Aussie Bonsai Fan
- Posts: 2844
- Joined: October 19th, 2014, 10:39 am
- Favorite Species: Pines & Mels
- Bonsai Age: 10
- Location: Melbourne
- Has thanked: 1198 times
- Been thanked: 2086 times
Re: Japanese Black Pine Field Growing Project
Hopefully they come through OK. Still nice and green looking if somewhat battered, you never know, it might be a blessing and result in authentic angles and twists where they took a bit of a hammering!?!
Good luck with them, it’s a good project, happy to help with a few seedlings.
Good luck with them, it’s a good project, happy to help with a few seedlings.
"NO CUTS, NO GLORY"
https://www.instagram.com/r3_bonsai/
https://www.instagram.com/r3_bonsai/
-
TimIAm
- Aussie Bonsai Fan

- Posts: 249
- Joined: April 6th, 2019, 10:46 am
- Favorite Species: Ficus, Elm, Juniper
- Bonsai Age: 0
- Location: Sydney
- Has thanked: 284 times
- Been thanked: 105 times
Re: Japanese Black Pine Field Growing Project
That really threw me off when my trees started putting on some growth. The amount of variability and how different developing buds can look on individual treesit is interesting how much variability there is: some with buds low, some with dominant buds on the main leader, lots of variation in needles (colour, length, strength).
Very interested to know what makes a good wiring job for putting in initial bends. I watched the bonsaify videos and he goes over a few different styles. I guess it is still going to be a lot of trial and error to what turns out well. I'm keen to see how you (and maybe Keels if updates are posted) go about with the initial styling on your trees.
-
tgooboon
- Aussie Bonsai Fan
- Posts: 109
- Joined: February 9th, 2019, 9:07 am
- Favorite Species: Japanese Black Pine & Ficus
- Bonsai Age: 7
- Location: Mackay Queensland
- Has thanked: 84 times
- Been thanked: 48 times
Re: Japanese Black Pine Field Growing Project
Update on the 12 JBP seedlings, 10 are strong and healthy. The largest 3 pines are 150mm tall with a 10mm trunk, 4 slightly smaller and 3 smallest are 90mm with a 7mm trunk. The last 2 I expect will not make it as they are noticeably weak with faded needle colour at 70mm tall with 3mm trunk.
The weekend before last, we had just finished a couple weeks of North Queensland winter (9° overnight temps), then the weather got a bit warmer (15° overnight temps) and buds were starting to pop on my older pines, so I decided it is a good time to repot.
First I took them out of their pots and found the root flare just below the surface is off to a good start, the best have 6 + roots coming off in a radial spread, and the worst have minimum 2 roots. I removed a few needles to make it possible to get a 3mm wire around the trunk and now have at least 3 changes in direction in the trunk. Roots were rearranged minimally and very minimal roots cut off. The seedlings which had only two strong had them shortened to encourage a more even roots. Photos are of the most developed 4.
For the 2 weak seedlings roots were untouched, but some old soil dropped off when potting up.
I repotted them into 200mm grow bags (2 gallon), I filled the bags up to about 90 mm below the top of the bag, then i added a small disk cut from the grow bag just to encourage roots to go out horizontally.
Watered and kept in the shade for 2 nights, then into the raised garden bed. The raised garden bed is finished from my previous posts, it now has some edging, it is filled with surplus soil from any low spots in my yard and mulched with pine bark mulch on top for ongoing weed control. The plan now is to put them on the ground for a year.
You do not have the required permissions to view the files attached to this post.
-
ErnestGreen
- Aussie Bonsai Fan

- Posts: 3
- Joined: September 18th, 2024, 5:29 am
- Favorite Species: AusBonsai
- Bonsai Age: 2
- Bonsai Club: AusBonsai
- Been thanked: 1 time
Re: Japanese Black Pine Field Growing Project
That sounds like a great plan! Starting with low twists early will definitely help you establish good movement in the trunks. Growing them in colanders with pumice first is a smart move to promote healthy root growth, especially before planting them in the field. Once they’ve developed a strong root system, putting them into the ground will allow them to bulk up quickly and continue developing that structure. You’re setting up your JBPs for success with this approach!
-
tgooboon
- Aussie Bonsai Fan
- Posts: 109
- Joined: February 9th, 2019, 9:07 am
- Favorite Species: Japanese Black Pine & Ficus
- Bonsai Age: 7
- Location: Mackay Queensland
- Has thanked: 84 times
- Been thanked: 48 times
Re: Japanese Black Pine Field Growing Project
Here is an update on the growth after half a year in the ground.
The biggest one has a 22mm trunk at the base and 30cm tall. The rest of the trunks trunk 10-13mm trunk
I am planning on cutting off all the side branches, but leave the lower buds. Not sure if i should do it now or wait until just before i do some root work in winter.
The biggest one has a 22mm trunk at the base and 30cm tall. The rest of the trunks trunk 10-13mm trunk
I am planning on cutting off all the side branches, but leave the lower buds. Not sure if i should do it now or wait until just before i do some root work in winter.
You do not have the required permissions to view the files attached to this post.
-
Ryceman3
- Aussie Bonsai Fan
- Posts: 2844
- Joined: October 19th, 2014, 10:39 am
- Favorite Species: Pines & Mels
- Bonsai Age: 10
- Location: Melbourne
- Has thanked: 1198 times
- Been thanked: 2086 times
Re: Japanese Black Pine Field Growing Project
You can thin out needles on the sacrifice and cut back side branching now if you want. I did my ground growing pines a couple of weeks ago, it's a pretty good time for this kind of work.
Looking good!
"NO CUTS, NO GLORY"
https://www.instagram.com/r3_bonsai/
https://www.instagram.com/r3_bonsai/
-
tgooboon
- Aussie Bonsai Fan
- Posts: 109
- Joined: February 9th, 2019, 9:07 am
- Favorite Species: Japanese Black Pine & Ficus
- Bonsai Age: 7
- Location: Mackay Queensland
- Has thanked: 84 times
- Been thanked: 48 times
Re: Japanese Black Pine Field Growing Project
Here is some photos of the pruning I did today. Nothing too exciting, jest setting them up for future low buds, while keeping to top sacrafice branch.
I am still planning to repot in a couple months time.
#1 Before and After #2 Before and After #3 Before and After #4 Before and After
I am still planning to repot in a couple months time.
#1 Before and After #2 Before and After #3 Before and After #4 Before and After
You do not have the required permissions to view the files attached to this post.
-
tgooboon
- Aussie Bonsai Fan
- Posts: 109
- Joined: February 9th, 2019, 9:07 am
- Favorite Species: Japanese Black Pine & Ficus
- Bonsai Age: 7
- Location: Mackay Queensland
- Has thanked: 84 times
- Been thanked: 48 times
Re: Japanese Black Pine Field Growing Project
I repotted my field grown pines the weekend before last. I considered not doing it so they would keep growing as fast as possible. But I ended up deciding to do the rootwork and I'm glad I did because at least half had to have fairly considerable work to spread out the crossing roots, that would have had to been removed if i left for a few years. I am not sure how long i will leave them again before doing rootwork, sometime between 1-5 years. they were all growing reasonably consistently except for number 6 which seems slower than the rest.
Here is a photo of the the first one before, during and after; then i only took photos of the rootwork after that:
#2 Rootwork #3 Rootwork #5 Rootwork #6 Rootwork #8 Rootwork
Here is a photo of the the first one before, during and after; then i only took photos of the rootwork after that:
#2 Rootwork #3 Rootwork #5 Rootwork #6 Rootwork #8 Rootwork
You do not have the required permissions to view the files attached to this post.
