
By Grant Bowie
February 2008
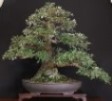
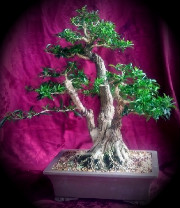
In December 2007 I acquired an old Mugo Pine that had been grown from seed in 1951. (Fig 1, 2, 3, 4, 5, 6)
Its size was 90cm x 90cm x 70cm.
It was an interesting bonsai and had many good points:-
• Interesting base
• Lots of movement and curves
• Lots of branching and foliage
• Compact growth and reasonably good health
• Aged bark
It however did have some problems:-
• Lowest branch on left hid the interesting lower trunk
• Uninteresting straight portion of trunk after great lower bends
• Lack of front branches
• Excessive weight and length of branches on left hand side
• Awkward conjunction of branches on lowest right side.
• Poor surface root structure
It was quite good material but it was in need of a serious overhaul. The lower trunk was lying almost horizontally and some good low curves meant the overall movement of the bonsai was quite good. However, after the first two curves the trunk straightened and went on for too long without any more major curves. The front of the tree was also too flat, with no branches coming forward anywhere, and some front branches had been removed further up the trunk as well, leaving it looking a bit like a fish skeleton.
I wanted to emphasize the lovely movement of the lower trunk and so the first thing I did was remove the heavy low 1st branch on the left. (Fig 7) This allowed the lower trunk to be seen clearly and for the sinuous movement of the rest of the trunk to be appreciated. (Fig 8) The stub of this branch will be jinned to echo a remnant of another Jin under the trunk, where a large portion of former trunk has died or been removed. There is a cavity under the base of the trunk.
All carving or jinning should be completed before moving on to the shaping of the branches with wire.
The bonsai as a whole was too tall and the final third of the trunk was relatively straight and uninteresting. There was a branch about two thirds the ways up the trunk on the right hand side and slightly to the front(Fig 6) that could be turned into an apex and continue the interesting movement seen down lower in the trunk.
I removed the top third of the bonsai and considered leaving a Jin at the apex. (Fig 9) There were two distinct portions of foliage on what was to become the new apex and so the back branch portion of this new apex was covered with raffia and wired and tied into position. The branch was very flexible and posed no problem for this severe bending. The Jin at the top was eventually removed as it would have clashed with the final position of the new apex.
The two branches remaining on the left hand side were too long and they were carefully reduced by about one third. The back branches are very elongated and they were lightly reduced as well. The branches on the right hand side were effectively not reduced at all as I wanted that side of the bonsai to become the dominant side. (Fig 10)
All the needles from last year or older were cut off with scissors. This allows wiring to be carried out much more easily and more precisely. It also doesn’t damage the potential buds that may have formed or are able to form where there are existing needles. It also allows the sun to penetrate into the interior of the bonsai and encourages new buds to form. We should do everything we can to encourage new buds to form and to keep in good health all those that we can keep, because pines are very slow to mature.
The rest of the tree was now wired and where necessary more raffia was applied. (Fig 11) This was simple but time consuming. A stainless steel screw was drilled into the trunk at the back of the tree to act as an anchor point to pull down the lowest back branch. Once the entire tree was wired right to the tips of every branch it was then tightened up. That is each branch was compacted as much as possible and set into a coherent and artistic pattern. (Fig 12, 13, 14, 15)
Restyle of a Mugo Pine from 1951
-
Grant Bowie
- Aussie Bonsai Fan

- Posts: 3810
- Joined: February 18th, 2009, 3:22 pm
- Favorite Species: Banksia
- Bonsai Age: 52
- Bonsai Club: Canberra
- Location: Canberra
- Been thanked: 351 times
Restyle of a Mugo Pine from 1951
You do not have the required permissions to view the files attached to this post.
-
Grant Bowie
- Aussie Bonsai Fan
- Posts: 3810
- Joined: February 18th, 2009, 3:22 pm
- Favorite Species: Banksia
- Bonsai Age: 52
- Bonsai Club: Canberra
- Location: Canberra
- Been thanked: 351 times
Re: Restyle of a Mugo Pine from 1951
Extra photos for easy comparison.
You do not have the required permissions to view the files attached to this post.
-
daiviet_nguyen

- Aussie Bonsai Fan
- Posts: 959
- Joined: November 19th, 2008, 8:41 pm
- Favorite Species: Pines, Ficuses, Maples, Azaleas
- Bonsai Age: 15
- Bonsai Club: None
- Location: Melbourne
- Been thanked: 3 times
- Contact:
Re: Restyle of a Mugo Pine from 1951
Hi Grant,
Thank you for posting the progression of this tree. For me, just from the photos, it is certainly
a challenge.
I feel that the transformation has given it a look of continuous and harmonious manner. I especially
like the view in photo 11.
I am not sure if you have any plans to work on re-arranging the surface?
Thank you and best regards.
PS: I really admire your works with the National Collection.
-
LLK
- Aussie Bonsai Fan
- Posts: 1025
- Joined: February 4th, 2009, 10:03 pm
- Favorite Species: Acacia howittii
- Bonsai Age: 25
- Bonsai Club: CBS, WCBG
- Location: Canberra
- Has thanked: 1 time
- Been thanked: 35 times
Re: Restyle of a Mugo Pine from 1951
Hi Grant,
Super job! I particularly like the way in which you gave this rugged and fantastically shaped tree a disciplined, yet quite natural bonsai stature.
I have a question: on the photos (e.g. "the final tightening"), we look into the tree at the underside of the branches, which allows us to appreciate their shape and distribution. Though I guess that this is for demonstration purposes, I appreciate it a lot. What will happen, though, once the foliage regrows and covers them all? Do you intend to keep a fairly open structure?
Lisa
-
Grant Bowie
- Aussie Bonsai Fan
- Posts: 3810
- Joined: February 18th, 2009, 3:22 pm
- Favorite Species: Banksia
- Bonsai Age: 52
- Bonsai Club: Canberra
- Location: Canberra
- Been thanked: 351 times
Re: Restyle of a Mugo Pine from 1951
daiviet_nguyen wrote:Hi Grant,
Thank you for posting the progression of this tree. For me, just from the photos, it is certainly
a challenge.
I feel that the transformation has given it a look of continuous and harmonious manner. I especially
like the view in photo 11.
I am not sure if you have any plans to work on re-arranging the surface?
Hi Daiviet,
Yes the surface will be reworked this year when the tree is repotted. With Mugo pine it is best just to do one thing at a time; ie restyle or doing heavy trimming one year and then repot the following year.
I will attempt to put it into a shallower pot as well but the root system will dictate whether this is possible or not.
Grant
Last edited by Steven on March 9th, 2009, 12:53 pm, edited 1 time in total.
-
Grant Bowie
- Aussie Bonsai Fan
- Posts: 3810
- Joined: February 18th, 2009, 3:22 pm
- Favorite Species: Banksia
- Bonsai Age: 52
- Bonsai Club: Canberra
- Location: Canberra
- Been thanked: 351 times
Re: Restyle of a Mugo Pine from 1951
LLK wrote:Hi Grant,
Super job! I particularly like the way in which you gave this rugged and fantastically shaped tree a disciplined, yet quite natural bonsai stature.
I have a question: on the photos (e.g. "the final tightening"), we look into the tree at the underside of the branches, which allows us to appreciate their shape and distribution. Though I guess that this is for demonstration purposes, I appreciate it a lot. What will happen, though, once the foliage regrows and covers them all? Do you intend to keep a fairly open structure?
Lisa
Hi Lisa,
The angle that the tree is photographed from is fairly consistent throught out the photos and so I am not purposely showing the underside of the branches. Since the work was done the tree has grown well and put out lots of healthy growth which was trimmed back in mid summer and has now shot two or three buds from each branch tip.
I intend to keep a fairly tight foliage structure all around the tree which will need to be thinned out every four or five years I would guess. You will have the advantage of being able to see the tree at a club show instead of just in photos as well.
Grant
-
Asus101

- Just a product
- Posts: 1493
- Joined: November 12th, 2008, 5:38 pm
- Bonsai Age: 0
- Bonsai Club: SA Bonsai Soc.
- Location: Renmark South Australia
Re: Restyle of a Mugo Pine from 1951
I love the way you worked with the previous ugly curve, it looks great.
Young and hostile but not stupid.
-
Grant Bowie
- Aussie Bonsai Fan
- Posts: 3810
- Joined: February 18th, 2009, 3:22 pm
- Favorite Species: Banksia
- Bonsai Age: 52
- Bonsai Club: Canberra
- Location: Canberra
- Been thanked: 351 times
Re: Restyle of a Mugo Pine from 1951
But most of all do you like the Jin?Asus101 wrote:I love the way you worked with the previous ugly curve, it looks great.
Grant
-
Asus101
- Just a product
- Posts: 1493
- Joined: November 12th, 2008, 5:38 pm
- Bonsai Age: 0
- Bonsai Club: SA Bonsai Soc.
- Location: Renmark South Australia
Re: Restyle of a Mugo Pine from 1951
hehehe How bout I comment on that when I'm up there and can see it in person?Grant Bowie wrote:But most of all do you like the Jin?Asus101 wrote:I love the way you worked with the previous ugly curve, it looks great.
Grant
Young and hostile but not stupid.
-
Bretts
- Bonsai Philosopher
- Posts: 6671
- Joined: November 14th, 2008, 11:04 pm
- Favorite Species: carpinus jbp
- Bonsai Age: 12
- Location: Jervis Bay NSW
- Has thanked: 1 time
- Contact:
Re: Restyle of a Mugo Pine from 1951
Comparing Pic 11 and pic 1832 is very intresting. It is like two different styles the first is a style that I saw explained somewere of a sparse wild fiolage that suits a certain juniper and 1832 is something like I have never seen before. I am not sure if it is meant to be that way but the perfect botton line is like you see in the paddocks when the farm animals have eaten all they can reach. Something I have thought could be intresting in Bonsai. I am looking forward to seeing were you take it.
Got any deciduous there for me Grant

Got any deciduous there for me Grant
It's too bad your in such a hurry cause the stories I could tell you, Bushels and baskets of stories, hole crates full of stories. But if you can spare a moment I will tell you one story.
-
Grant Bowie
- Aussie Bonsai Fan
- Posts: 3810
- Joined: February 18th, 2009, 3:22 pm
- Favorite Species: Banksia
- Bonsai Age: 52
- Bonsai Club: Canberra
- Location: Canberra
- Been thanked: 351 times
Re: Restyle of a Mugo Pine from 1951
I do have the occasional deciduous tree but nothing in a real progression series. I will see what I can do for you.
Re pic 11 that is where all the branches had been wired, placed tentatively in position to allow for any necessary further shortening of foliage or bending of branches and then to start the final positioning. I was trying to get as much foliage as possible remaining to be on the outer perimeter of the tree rather than in pads of foliage. The foliage I had to work with was sparse and to give a full effect overall that is what I decided to do.
Grant
-
Jamie
- Bonsai passionardo
- Posts: 6829
- Joined: August 21st, 2009, 8:08 pm
- Favorite Species: CLERO!!!,ficus, celtis, juniper, elms
- Bonsai Age: 9
- Bonsai Club: AUSBONSAI.COM
- Location: queensland, Hervey Bay
- Been thanked: 2 times
- Contact:
Re: Restyle of a Mugo Pine from 1951
this is a great tree grant, it has inspired me to try pines again, i think my extra knowledge that i have now as to when i first tried them i have more confidence now.
being a year on exactly (that was by sheer fluke ) is there a chance we could get an update on how the tree has progressed. i love what you have done and have made a better tree from what was there
jamie
being a year on exactly (that was by sheer fluke
jamie
SHOHIN YAKUZA!!!
 taking the top half of trees of since 2005!
and growing trees for the future generations! 50+ year plans
and growing trees for the future generations! 50+ year plans
-
Grant Bowie
- Aussie Bonsai Fan
- Posts: 3810
- Joined: February 18th, 2009, 3:22 pm
- Favorite Species: Banksia
- Bonsai Age: 52
- Bonsai Club: Canberra
- Location: Canberra
- Been thanked: 351 times
Re: Restyle of a Mugo Pine from 1951
Hi Jamie,Jamie wrote:this is a great tree grant, it has inspired me to try pines again, i think my extra knowledge that i have now as to when i first tried them i have more confidence now.
being a year on exactly (that was by sheer fluke
jamie
The tree is doing fine. It is unwired and has largely stayed in place.
I will be tidying it up and using it as part of my talk at the AABC convention in a few months.
I will post photos after that. (So late May or early June)
Thanks for your interest
Grant
-
Jamie
- Bonsai passionardo
- Posts: 6829
- Joined: August 21st, 2009, 8:08 pm
- Favorite Species: CLERO!!!,ficus, celtis, juniper, elms
- Bonsai Age: 9
- Bonsai Club: AUSBONSAI.COM
- Location: queensland, Hervey Bay
- Been thanked: 2 times
- Contact:
Re: Restyle of a Mugo Pine from 1951
thanks Grant
i look forward to seeing it soon
i look forward to seeing it soon
SHOHIN YAKUZA!!!
taking the top half of trees of since 2005!
and growing trees for the future generations! 50+ year plans
and growing trees for the future generations! 50+ year plans
-
Grant Bowie
- Aussie Bonsai Fan
- Posts: 3810
- Joined: February 18th, 2009, 3:22 pm
- Favorite Species: Banksia
- Bonsai Age: 52
- Bonsai Club: Canberra
- Location: Canberra
- Been thanked: 351 times
Re: Restyle of a Mugo Pine from 1951
Hi all,
This is the Mugo pine that we were discussing on another post. I will rephotograph this tree soon and have a good look at it this weekend.
After seeing the work of Salvatore last weekend I am emboldened to go further with the shaping.
It was repotted last year and is doing fine. The central trunk line would give a most interesting jin.
Grant
