Page 3 of 3
Re: Air layering process (WARNING: many photos)
Posted: February 11th, 2011, 12:26 pm
by Kyushu Danji
kcpoole wrote:Nice thread
when doing my layers with the bag method as show here I do not use string to tie them but wrap with electrical tape
Nice to see how these all go and will add some picks of a few I have done recently
Ken
That would be great Ken, I think it would be helpful to hear more about your methods and results. I intend to do many more of these next spring so all ideas are welcome

Re: Air layering process (WARNING: many photos)
Posted: February 12th, 2011, 2:34 pm
by kcpoole
as Promised here ar some pics of some layers I put on recently
I have used the usual Ringbark method, but instead of wrapping with plastic and sealing, I have used the split pot method. In my case these are OK as the trees ar on my benches and get watered every time i do the rest so will no dry out and I can monitor them
I take an old pot or in this case, plastic bottle, and split the side and make a hole in the bottom large enough for the trunk to fit. Make a method to sotp the pot from sliding down the tree ( wire it on).
Prepare the layer as normal, put the pot on and cover the bottom with a layer of Spag moss to fill the holes and cracks. Fill up with your normal propagating mix ( chopped spag moss, Propagating sand and Diatomite).
Keep well watered and moist and wait a few months

Ken
Re: Air layering process (WARNING: many photos)
Posted: February 12th, 2011, 4:34 pm
by andy hodges
Can you air layer banksia?
about 40mm thick?
Re: Air layering process (WARNING: many photos)
Posted: February 12th, 2011, 4:48 pm
by kcpoole
andy hodges wrote:Can you air layer banksia?
about 40mm thick?
I would think so. Banksia layer easily
Re: Air layering process (WARNING: many photos)
Posted: February 12th, 2011, 6:35 pm
by MattA
I started a new layer on my Cedrus deodara today and thought I would share the pics & progress here.
R0015075.JPG
Soil mix is a handful of garden loam, a handful of gravel & about half that of sphagnum. I want to try & avoid the rotting of roots that happened with the last one so am using a split pot instead of bag, it will require more attention but has less risk of staying too wet.
R0015074.JPG
I have used a piece of 5mm wire under where I want the new root system. This should have 2 effects, help stop the tree from healing the cut and also start the new roots going sideways instead of down.
R0015078.JPG
Potted up & ready to go, I applied a layer of sphagnum over the top to help slow drying a little.
R0015079.JPG
Timing & method are all experiments so we will see what happens.
Matt
Re: Air layering process (WARNING: many photos)
Posted: February 12th, 2011, 7:02 pm
by Kyushu Danji
Hey Matt, interesting method with the soil medium! I hope it works out for you. I guess this species lends itself well to such a method since root rot can be a problem. Maybe next spring I will try it out myself. Don't forget to let us know how it all turns out for you
How is the first layer you did going now?
Re: Air layering process (WARNING: many photos)
Posted: February 12th, 2011, 8:59 pm
by RuthMcL
Peter Chan's book "Bonsai Masterclass" has a table indicating best times, recommended methods and time taken to root for a variety of common bonsai species. I suspect best timing and time to root is very variable with locations and weather. Techniques are also well illustrated. I have only used the ring bark technique but have found it very satisfactory on a range of plants, including a callistemon.
Re: Air layering process (WARNING: many photos)
Posted: February 12th, 2011, 10:15 pm
by BirchMan
Matt how long do you reckon the Cedar layer will take?
Re: Air layering process (WARNING: many photos)
Posted: February 13th, 2011, 5:18 am
by MattA
I have no idea how long this one will take, the last one was done at the opposite end of the year (ie winter) so I cannot use that as a guide (it had rooted & rotted in 6mths), nor any other, as the usual method recommended for Cedrus is wire tourniquet.
The first layer is still holding its own in ICU, no needle drop or even discolouration so i am hopeful but not going to call it until I see it start pushing new growth.
I will update as & when things happen with either of them. Besides giving me layering opportunities, the donor tree has started on its journey, currently with 3 chunks of concrete sitting on the large lowest branch

Matt
Re: Air layering process (WARNING: many photos)
Posted: February 13th, 2011, 2:18 pm
by Kyushu Danji
I checked the ash and cherry that I layered today, and there is a build of a thick white substance all around the top of where I sliced the branch. Will this in time form the roots?
Re: Air layering process (WARNING: many photos)
Posted: February 13th, 2011, 7:19 pm
by Kyushu Danji
Re: Air layering process (WARNING: many photos)
Posted: March 14th, 2011, 9:07 am
by Kyushu Danji
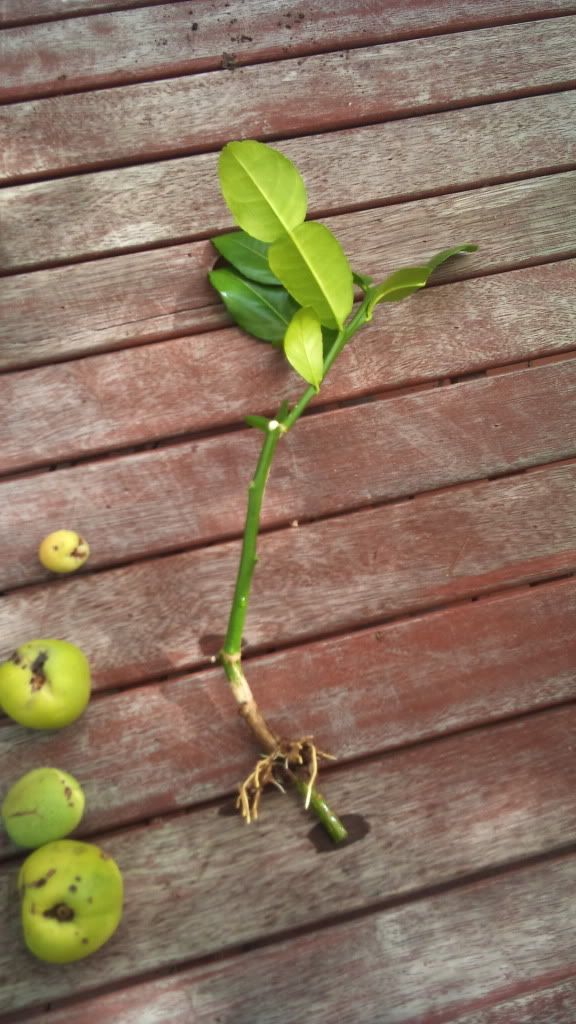
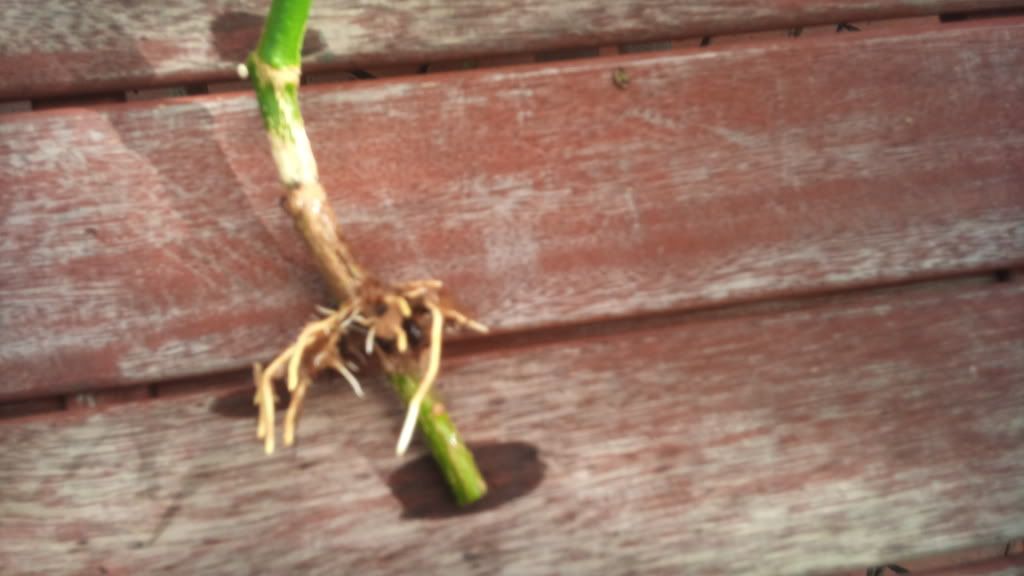
The Kaffir lime layers have been severed and potted up. I was worried at first that there weren't enough roots, but they seem to be doing okay for now.
Re: Air layering process (WARNING: many photos)
Posted: March 14th, 2011, 12:00 pm
by kcpoole
kcpoole wrote:as Promised here ar some pics of some layers I put on recently
Ken
I forgot I posted these here

as i took of fthe Fig layer yesterday, but forgot to take photos.
Had quite a few roots and wanted to get it off and growing before winter sets is
The callistimons all have roots in the pots and will check them later this week to see if they have enough to support life on their own
Ken
Re: Air layering process (WARNING: many photos)
Posted: March 14th, 2011, 12:43 pm
by Kyushu Danji
Sounds good Ken

I only remembered just before potting these up as well..at least if they fail people will know how not to approach layering!