
the other day in another thread Alpine art was talking about the use of paint programs to do virtuals with and how he couldnt wrap his head around them but wanted to learn, so I thought what I might do which could help others is do a basic virtual tutorial on how I create virtuals. hopefully by the end of it people will be more enlightened to the secrets of virtual art and we will see a lot more of peoples visions in the virtual sense
so lets get started!!
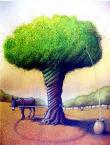
ok here is the donor picture, it is a shimpaku I found on google search that just seemed like a good pic to choose from.
ok lets have a quick look at design of this tree, obviously its of a semi cascade shimpaku, I beleive it is of shohin size or close to it. (I beleive this tree is actually one done by harry harrington and sorry I dont have the pics of how it turned out in real life, If I had the stock and the camera I would of used one of my own).
basically when I start a virtual I like to have a blank canvas. (I presume people do know how to start a new image on paint, if not that can be shown later as it is a simple process that I beleive most know how to do).
I like to use a neutral colour to give a clean picture, this colour can depend on what your background colour to your donor parts etc. but isnt overly important right now.
99% of the way I create virtuals is through the use of the lassoo tool, it is a great little tool that with a little practice can become very, very powerful and using paint.net can be found here highlighted by the red circle. choosing this tool then hold and left click and trace around the main part of the trunk in which you want to use. this takes a little practice, I have a laptop and find the synaptics mouse pad to be a lot easier than a mouse but this is just my preference, a mouse will do the same thing.
(please ignore the fact the traced trunk section is already pasted in here)
once you have traced around the main part of the trunk which you want to use, once you let go of left click you will find that part you traced to be highlighted as you can see in the pic. to do this press and hold the control key and press "c". this shortcut action will have copied the main section of trunk you have traced and "copied" it. mvoing back to the blank canvas which can be selected from the top right corner, this is the section of paint which shows what pictures you have open and can work on them.
here is where you will locate all your open images in which you can choose what picture you need at the time.
moving back to the blank canvas, if you press and hold the control key and the "V" key this will paste the section of trunk you have just traced and copied into the blank canvas picture in which we are starting to build the virtual.
this is what you should have now.
so to go over what we have just done - 1. opened the picture of the tree we wish to virtualise. 2. opened a new image to create our blank canvas and given it a nuetral background. 3. traced and copied the main part of the trunk from the tree we wish to virtualise using the lassoo tool. 4. pasted the traced section of trunk onto our blank canvas.
ok this is where things can get a tad confusing so I try and keep things as simple as possible. when we start tracing, copying and pasting images what we are doing is creating what is called layers. this is where most people get stuck with as layers are like what animators use when creating cartoons. which is important as you will see shortly.
so far we have what looks like a stick in the picture, so how do we make it look like a tree? well the way I do this is in the use of layers but in a more primitive way, I have files in which I like to call "spare parts" basically it is just a picture file with "pieces" of tree in which we can use for our virtual, these spare part pictures look a little like this, they have several different pictures of the likes of branches, deadwood etc.
these spare part pictures make things very easy, other wise we need to find pictures with the "spare parts" needed to create the virtual.
using the lassoo tool once again lets trace a branch piece and add it to our blank canvas with the main trunk part on it.
I have used a blue line to highlight how I trace my parts with the lassoo tool, I find that if you can get as close to the part as possible that is going to be hitting any part of the other picture you dont get any over fill like when you colour in a picture you try and stay in the lines, this makes for a much cleaner virt, other wise you could end up with patches of the main trunk getting covvered etc. this is to do with the layering of pictures we talked about earlier.
so we have traced and copied this branch section from our spare parts picture and have copied it using our hot key control and "c".
now selecting the picture we are creating from the top right section I showed previously, we can paste tha branch into our picture, you will find that you may have to resize it some what which can be done by left clicking any of the circles on the box that highlights our part and moving the mouse, this will make it larger or smaller. also while we are here we can also change the angle, by clicking and holding the right mouse key, and moving the mouse, it will rotate that specific part clock wise or anti clock wise depending on which way you move the mouse.
after you have the right size, and angle you can left click and hold the button on the "spare part" and place the "spare part" where it needs to be, we will use this part as the tail of the tree.
and we should have something looking along the lines of this.
now here I recommend that you save the picture by selecting the "save as" option from the "file" drop down menu. then, what you want to do is re open the saved file so we have that picture but as a "new" saved picture as such, doing this takes out the hassles of the layers we talked about as if you were to continue to work with this picture it now has 3 layers, the blank back ground, the main trunk section and the tail. in saving and opening the picture up these layers are now obselete and we have a picture that is just one layer, which saves a lot of hassle, say if you wanted to use the paint brush tool to paint over a part to "delete" it you wouldnt be able to as you would be working on layer 3 and the only part you could work on is that section (layer 3).
so lets do a quick revue. so far we have done these steps - 1. opened the picture of the tree we wish to virtualise. 2. opened a new image to create our blank canvas and given it a nuetral background. 3. traced and copied the main part of the trunk from the tree we wish to virtualise using the lassoo tool. 4. pasted the traced section of trunk onto our blank canvas.
and have now done - 4. traced, copied and pasted the tail section in. 5. saved and re-opened our picture to eliminate the layers.
ok, next step, lets give this tree some more branching and an apex. once again using my "spare parts" picture (this picture is one I have created for this tutorial, you can get your "spare parts" pictures by using the same trace, copy and paste techniques described. I just find pictures of trees through google searches and put these spare part pics together, when you have done as many virts as I have these can save a lot of time as they have a blank back ground, and are a lot easier to use than finding te pics with the parts you need, trace and copy as this can be a time consuming thing).
the apex I have chosen is the one on the right under the top "spare part" but as you can see it is facing to the right, we need to face it to the left, so what we do just like before is to use the lassoo tool, trace and copy it using control "c" and then selecting the picture on which we are working, the new one we have opened that we previously saved. pasting this section into our picture using control "v". we then resize it by clicking the circle on the highlighted box in the corner or middle sections of our spare part, and moving the mouse to make it bigger or larger, while holding the left mouse button drag the mouse to the left and the picture will basically fold over itself and become a mirror image of what it was (simple huh
then on the picture left click and hold to move the spare part and place it where you want the apex. and we should end up with something a little like this.
hopefully you have all been able to keep up with all this, as I said I will be happy to answer any questions once you have read it through and given it a try
so now I think we can add a little deadwood. using the same process we have been using this whole time we can go to our deadwood "spare parts". deadwood in virtuals is pretty simple and is only limited my your imagination and ofcourse if it is possible to be done with what the actual tree has. the good thing about dead wood spare parts is that they can be resized, rotated and played with, generally what I do is start with a couple of larger bits of deadwood on the picture, using the same trace, copy paste methods and then using that same "spare part" I just make it smaller (using the circles in the highlight box and just resizing rather than trying to resize the actual picture, thats to much hassle) and rotate the picture using the right click button on the mouse and place them in, in the deadwood I have added to this virtual I have copied and pasted about 7 pieces in. one thing about the copy/paste tool is that you do not need to keep "copying" the part, just by pressing the control "v" key will keep on pasting a new piece of what has been copied. generally after I have added a few "spare parts" any where from 3 or more I like to "save as" and re open the picture again to get rid of the "layer" issue that can happen, when adding more layers as previously explained it can get a little frustrating if you try and use the paint brush tool like I said earlier.
here you can see the dead wood that has been pasted in, the highlight box of the part we are working on and the circles for resizing and rotation etc.
lets revue where we are at now -
so far we have done - 1. opened the picture of the tree we wish to virtualise. 2. opened a new image to create our blank canvas and given it a nuetral background. 3. traced and copied the main part of the trunk from the tree we wish to virtualise using the lassoo tool. 4. pasted the traced section of trunk onto our blank canvas. 4. traced, copied and pasted the tail section in. 5. saved and re-opened our picture to eliminate the layers.
and now - 6. added the apex using the techniques explained (trace, copy and paste). 7. added dead wood. 8. saved and re opened again to eliminate the layers.
we should now have a virtual that is starting to look like a virtual too!!
alright, lets look at putting this badboy into a pot, adding a bit of moss to neaten things and and finishing off the virtual, we are nearly there!!
I found a pot that I liked the look of, you can practically use whichever one you like, remember it can be resized and reshaped (within reason), when I say reshaped we can make the pot taller, shorter, fatter etc using the highlight box once it is selected.
in this pic you can see I have highlighted the pot and also the stand which was just an added bonus in the pic. for this I have used the "rectangle select" lassoo tool which is the button just above the lassoo tool button that we love, this one is good when you want to high light things just like this pot and stand. as you can see the back ground colour has a texture in it where as the back ground colour in our virtual is solid. what can be done is just select the "fill" tool which is just above the paint brush tool in our tool box window, sometime this tool can fill in over the stuff we want, all that needs doing to stop this is to lower the tolerance which can be found up the top in the menu there is a bar that has 50% filled in, to lower it just click lower down to around 20-30% this is generally pretty good, if it doesnt fill to all the edges a little lick with the paint brush tool can fix this. (this is where the layers of the vort can cause issues, but if you have followed what I have said and save every now and again you shouldnt have a prob with the layers).
ok, now this may seem a little backward but trust me. what you want to do is start a "new" image to start a new blank canvas. then what we will do is go back to the picture of the pot and stand. highlight it like explained previously. copy and paste it into our "new" blank canvas and we should end up with a picture like this.
ok so now we have these two pictures, which can be selected from the pictures up in the top right hand corner. when lassooing the virtualised tree try and be as precise as possible like in the picture above, if your not when you go to paste it onto the pot and stand you will have possibly pasted a lot of black over the pot section. using the same techniques of trace, copy and paste as previously discussed we can now paste our copied virtualised tree onto the pot. if you dont use the picture that has been saved and opened you will not be able to get the whole pic ( those pesky layers again) so I recommend that saving and opening the pictures now is a good idea.
lets revue again - we have done -
1. opened the picture of the tree we wish to virtualise. 2. opened a new image to create our blank canvas and given it a nuetral background. 3. traced and copied the main part of the trunk from the tree we wish to virtualise using the lassoo tool. 4. pasted the traced section of trunk onto our blank canvas. 4. traced, copied and pasted the tail section in. 5. saved and re-opened our picture to eliminate the layers. 6. added the apex using the techniques explained (trace, copy and paste). 7. added dead wood. 8. saved and re opened again to eliminate the layers. 9. sorted out a pot. 10. opened a new canvas, added the pot and stand to this canvas. 11. saved and re opened again to eliminate layer issues.
and we should end up with this.
now all that needs to be done is to find a picture with some moss in it, using the process of trace, copy and paste to add some bits of moss in which I tend to do on the nicer virts as this neatens up the marriage between the pot and the tree which can look a tad messy if this isnt done. the moss is a simple task and is the same process as adding a branch or an apex, so I might just let you try and figure that one out for yourselfs now that you should know how to do a virtual!
so guys, in wrapping things up like I said at the start 99% of virtualising trees in the method I use is of cutting and pasting. very simple and once you wrap your head around the techniques you can start playing with other things, maybe try a tokonoma setting, one thing I can say once I learnt how to do this which by the way is all self taught, I was very proud of being able to work it out. Hopefully this little tutorial has helped some of you out that have been trying to nut out stuff but couldnt quite figure it out. I am always happy to help out
so if anyone has any questions or doesnt quite understand what I have said definately feel free to ask any questions and I will try and answer them to the best of my abilities. If I have missed anything than please speak up and I will try and amend it asap.
hope this has helped
Jamie