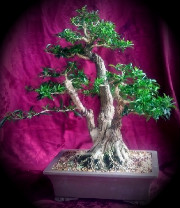

It has a wonderful root spread however it is not easy to see in the pictures as it blends with the medium. The trunk is completely hollow as can just be seen from the front.
Daisy's back shoots incredibly well even from very old wood and flower for about 9 months of the year. I am not aware of seeing any bonsai Daisy before however this stock has potential despite all its shortcomings.
It now stands 900mm tall and the root flare at the base (in the first picture) is 180mm wide.
I have been contemplating different styles and designs but wasn't able to make up my mind so I forwarded some pictures to a great inspiration of mine - Harry Harrington from Bonsai4me.com. Following is Harry's reply and his virtual progression.
Harry Harrington wrote:Fantastic looking tree already! I loved 'working on' this tree; a great find!
OK, I find it better to show the step-by-step build up of the virtual as this should help explain how I feel you should approach its actual styling. I will not try to advise horticulturally given the species, your location and the high likelihood that you will know what to do anyway!
My preferred front is your first image (and I assume your preferred front)
Harry Harrington wrote:Cut back the branches hard; your priorities in this styling/development are to remove the straight untapered appearance of a lot of the branches and recreate them so that they have taper, movement and scale.
I would describe this bonsai as an INformal broom. It is NOT a formal broom and perfect symmetry etc wouldn't look good with the gnarled, hollow trunk you have here!
Harry Harrington wrote:There are 3 problematic branches to deal with at this stage;
1) the 2 overly thick and heavy branches on the right. My personal solution would be to literally thin out the branches by splitting/carving them vertically. They will be left with long vertical scars (that you can hide from the front view) however I do not think that the resulting scars will be out of place on this tree.
For aesthetic reasons I would try and remove the top half of each branch if possible as this then leaves light in between the adjoining branches when seen from the front. But horticulturally you will obviously need to ensure that live veins remain out to the tips of the branch
I realise that both of these lower right hand branches are awkwardly positioned when seen from the side. I think it is something you will need to live with though you can compensate for this awkwardness in the future by carefully placing any secondary branches that appear. I feel that when the tree has filled out in a few years, the awkwardness of these two branches will be very minor.
2) the branch on the left that I have marked in red. I have removed it in this virtual as that area looks slightly congested at present. However you may wish to keep this instead of/or in addition to the branch directly behind it. If you decide to keep it, I would suggest using guy wires to pull it down a few degrees so it fans out in the same way that its neighbouring branches do.
Harry Harrington wrote:Left branch removed
Harry Harrington wrote:I think from here on it is a straightforward case of allowing 2 new shoots at the end of each branch to extend, thicken and then be cut back hard each year. I would suggest wiring each new shoot to give it some subtle movement.
Now comes the challenge of making Harry's virt a reality. Has anyone had any experience working with Daisy?Harry Harrington wrote:I have drawn out the tree with three sets of new growth (this may equate to 3 years as it does over here or much less for this species in Australia, I don't know).
Note that I have drawn the foliage mass so that it has a very subtle lean towards the right.
I hope this all makes sense Steven!!
regards
Harry
Regards,
Steven