
There's a bargin at every auction for the eagle eyed - even on ebay
Crepe Myrtle
-
EdwardH
- Aussie Bonsai Fan

- Posts: 596
- Joined: January 12th, 2009, 6:05 pm
- Favorite Species: Those that survive
- Bonsai Age: 0
- Location: Sydney
- Been thanked: 11 times
Re: Crepe Myrtle – more like the start of a progression....
Hi Steve,
There's a bargin at every auction for the eagle eyed - even on ebay I actually like the angle at which you have planted your crepe as it reminds me of a tree that has almost been blown out of the ground in a storm. The virt that Flybri did is a pretty cool as well.
There's a bargin at every auction for the eagle eyed - even on ebay
-
Petra

- Aussie Bonsai Fan
- Posts: 703
- Joined: July 13th, 2009, 11:46 pm
- Favorite Species: Australian Natives
- Bonsai Age: 7
- Bonsai Club: NIL
- Location: Western Plains N.S.W
- Contact:
Re: Crepe Myrtle – more like the start of a progression....
sorry what is air layering,and how do you do that!kcpoole wrote:Nice tree Steve
Brett, Crepe is very easy to Airlayer and at the start of spring they will take less than 6 weeks to root.
I have down several, just wrap the branch in damp moss, Wrap with Glad wrap and come back in 6 weeks to cut it off.
Ken
Learn from yesterday,live for today,hope for tomorrow.The important thing is, to not stop questioning. Albert Einstein...
-
sreeve
- Aussie Bonsai Fan

- Posts: 421
- Joined: November 14th, 2008, 11:28 pm
- Favorite Species: Figs & Azaleas
- Bonsai Age: 25
- Bonsai Club: Central Coast Bonsai Club
- Location: NSW
- Has thanked: 20 times
- Been thanked: 25 times
Re: Crepe Myrtle – more like the start of a progression....
Hi Petra,
Unfortunately I am overseas at the moment and the internet is running really slow so I cant do a search and paste some links for you to look at.
Perhaps you can type in "layering" here in Ausbonsai search or google and I am sure you will find a wealth of info pictures etc on how to go about it.
(The only caution being...be prepared as I am sure you will get a heap of "educational sites" come up after you type this description into google )
There are a few different types of layering (air layering and ground layering being a couple, but within each of these types, there are a heap of different ways of going about it)
I only do air layers and the method I use is to cut a ring right through the cambium layer (about as wide as the trunk or branch is thick). You will find heaps of other alternatives - everyone has their own preference
I either place a plastic pot of soil or spagnum moss around the cut area.
Often I dont bother wrapping it in glad wrap, but that is because I am lazy. If you dont wrap with gladwrap then you need to water the pot as you normally would - perhaps even more often.
The safest and probably the best way is to gladwrap around the pot (sides top and bottom) giving you a better solution. If you wrap it tightly enough you dont need to water.
Incidentally, if you dont have a cheap plastic pot lying around, dont worry, you can simply wrap spagnum moss in gladwrap around the tree and it will work really well also)
The trick is to make sure you cut well past the cambium layer depth otherwise the tree simply heals over and your air layer is non existent
The end result is that a layer of roots develop on the top part of the cut and when you can see roots growing through the pot or spgnum moss, soil etc, then you simply cut beneath the pot and whammy - instant tree.
The advantages being that you can air layer at an interesting part of the tree and also get a nice nebari going as teh roots tend to be uniform around the cut.
Again, sorry I cant be more helpful at teh moment, hope I havent confused you
Steve
Unfortunately I am overseas at the moment and the internet is running really slow so I cant do a search and paste some links for you to look at.
Perhaps you can type in "layering" here in Ausbonsai search or google and I am sure you will find a wealth of info pictures etc on how to go about it.
(The only caution being...be prepared as I am sure you will get a heap of "educational sites" come up after you type this description into google
There are a few different types of layering (air layering and ground layering being a couple, but within each of these types, there are a heap of different ways of going about it)
I only do air layers and the method I use is to cut a ring right through the cambium layer (about as wide as the trunk or branch is thick). You will find heaps of other alternatives - everyone has their own preference
I either place a plastic pot of soil or spagnum moss around the cut area.
Often I dont bother wrapping it in glad wrap, but that is because I am lazy. If you dont wrap with gladwrap then you need to water the pot as you normally would - perhaps even more often.
The safest and probably the best way is to gladwrap around the pot (sides top and bottom) giving you a better solution. If you wrap it tightly enough you dont need to water.
Incidentally, if you dont have a cheap plastic pot lying around, dont worry, you can simply wrap spagnum moss in gladwrap around the tree and it will work really well also)
The trick is to make sure you cut well past the cambium layer depth otherwise the tree simply heals over and your air layer is non existent
The end result is that a layer of roots develop on the top part of the cut and when you can see roots growing through the pot or spgnum moss, soil etc, then you simply cut beneath the pot and whammy - instant tree.
The advantages being that you can air layer at an interesting part of the tree and also get a nice nebari going as teh roots tend to be uniform around the cut.
Again, sorry I cant be more helpful at teh moment, hope I havent confused you
Steve
-
Petra
- Aussie Bonsai Fan
- Posts: 703
- Joined: July 13th, 2009, 11:46 pm
- Favorite Species: Australian Natives
- Bonsai Age: 7
- Bonsai Club: NIL
- Location: Western Plains N.S.W
- Contact:
Re: Crepe Myrtle – more like the start of a progression....
Thanks screeve,
Really good advice, i did google and floods of info there, overloads of info, will try some of it through the week.
cheers Petra!
Really good advice, i did google and floods of info there, overloads of info, will try some of it through the week.
cheers Petra!
-
kvan64

- Aussie Bonsai Fan
- Posts: 1627
- Joined: September 10th, 2009, 9:46 pm
- Favorite Species: black pine
- Bonsai Age: 16
- Location: brisbane
- Has thanked: 6 times
- Been thanked: 36 times
Re: Crepe Myrtle – more like the start of a progression....
Plz post some update for this tree.
Thanks.
DK
Thanks.
DK
Always we hope someone else has the answer.
Bonsai is an art of shrinking.
Bonsai is an art of shrinking.
-
MattA

- Banned

- Posts: 3112
- Joined: February 13th, 2010, 2:37 pm
- Favorite Species: Lichen
- Bonsai Age: 26
- Bonsai Club: Killing Trees Inc..
- Location: Lower Hunter Valley
- Been thanked: 2 times
- Contact:
Re: Crepe Myrtle – more like the start of a progression....
Dk thanks for bumping this thread.
I love crepe's but have had mixed results with them, dug 5 last year. The first was dug in July and it never reshot, pity becuase it would have been a stomper. The next 4 were dug in November just as flower buds where starting to form, all were cut down to stumps, 3 survived & thrived the 4th died because I forgot it was still soaking in the pond until too late (about 2mths later ).
).
Brett, I noticed noone had any additional comments for you regarding cuttings, I have had success with material up to 2" in diameter taking them early spring before bud break, shove em in a pot of soil, sand or even just in the ground with almost all the bigger pieces taking but young wood IE last seasons growth I find dont take so well. I dont use hormone powder or g el or anything special.
Given my results last year i am going to wait until they are about to break bud before digging one of last years collected pieces to start carving & cutting back to get some direction happening, then back in the ground for another season or 3.
Matt
I love crepe's but have had mixed results with them, dug 5 last year. The first was dug in July and it never reshot, pity becuase it would have been a stomper. The next 4 were dug in November just as flower buds where starting to form, all were cut down to stumps, 3 survived & thrived the 4th died because I forgot it was still soaking in the pond until too late (about 2mths later
Brett, I noticed noone had any additional comments for you regarding cuttings, I have had success with material up to 2" in diameter taking them early spring before bud break, shove em in a pot of soil, sand or even just in the ground with almost all the bigger pieces taking but young wood IE last seasons growth I find dont take so well. I dont use hormone powder or g el or anything special.
Given my results last year i am going to wait until they are about to break bud before digging one of last years collected pieces to start carving & cutting back to get some direction happening, then back in the ground for another season or 3.
Matt
42 Mice ~Imperfection
"Experience is a hard teacher because she gives the test first, the lesson afterwards." ~ Vernon Sanders Law
"All the knowledge I possess everyone else can acquire, but my heart is all my own." ~ Johann Wolfgang Von Goeth
"Bonsai becomes great when growers start trees they know they will never see in a pot"
-
Jamie
- Bonsai passionardo
- Posts: 6829
- Joined: August 21st, 2009, 8:08 pm
- Favorite Species: CLERO!!!,ficus, celtis, juniper, elms
- Bonsai Age: 9
- Bonsai Club: AUSBONSAI.COM
- Location: queensland, Hervey Bay
- Been thanked: 2 times
- Contact:
Re: Crepe Myrtle – more like the start of a progression....
gday steve 
heres my take on what i see for this tree
this is great stock mate, i have always wanted something like this to recreate something similar to harry harringtons privet
jamie
heres my take on what i see for this tree
this is great stock mate, i have always wanted something like this to recreate something similar to harry harringtons privet
jamie
You do not have the required permissions to view the files attached to this post.
SHOHIN YAKUZA!!!
 taking the top half of trees of since 2005!
and growing trees for the future generations! 50+ year plans
and growing trees for the future generations! 50+ year plans
-
craigw60
- Aussie Bonsai Fan
- Posts: 1904
- Joined: January 12th, 2010, 12:02 pm
- Favorite Species: many
- Bonsai Age: 25
- Bonsai Club: yarra valley
- Location: vic
- Been thanked: 1 time
Re: Crepe Myrtle – more like the start of a progression....
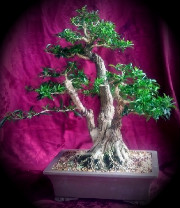
Hi Steve, I just noticed this thread. You have a great tree there but I have to say I am with Ant on the roots, it looks like your tree has the potential to have great nebari which is concealed by those big strong air roots.
Craig
Craig
