
Hey folks,
I thought with my next bit of work I would put together a step by step, I am in no way an expert, but I thought it might be good for people who are a little hesitant when it comes to styling raw material to see one way to go about it. I will point out all the bits step by step and what I use to help make decisions and hopefully it will help others when it comes to making decisions
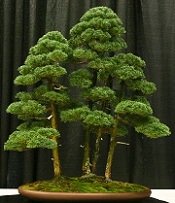
Here is what I am working on (not the easiest material by stretch, but it is amazing stock and it might help others to be brave when it comes to picking large, intimidating trees)
So far I have removed the tree from the pot and scraped away the top level of soil, it is impossible to determine the best trunk line with part of the trunk and base hidden so before an decisions are made this needs to be done.
I have also removed some weak and unusable branches to clear things up and enable me to see the trunk lines a little more clearly. Initially it may be hard to decide on what is unusable, but here it is important to be decisive. It should be clear what will not end up usable in the final design, anything weaker than a significant branch that will be used higher up the trunk, anything coming out of the trunk at the wrong angle, anything inferior to another branch that is in much the same location (less rammification, weaker etc.)
Once this has been done the final front can be chosen, and further branch removal can be undertaken. Don't fall into the trap of only looking at the tree as it sits in the pot currently, angles can be changed, and trunks can most certainly be moved on some stock. The aid of guy wires can help in moving things that seem otherwise impossible so go over all options before making your choice
I will post more once I have done the next lot of work
step by step from raw stock
-
kez
- Aussie Bonsai Fan

- Posts: 694
- Joined: November 4th, 2013, 6:47 pm
- Favorite Species: Pines, Junipers
- Bonsai Age: 0
- Location: Wollongong
- Been thanked: 27 times
step by step from raw stock
You do not have the required permissions to view the files attached to this post.
-
kez
- Aussie Bonsai Fan
- Posts: 694
- Joined: November 4th, 2013, 6:47 pm
- Favorite Species: Pines, Junipers
- Bonsai Age: 0
- Location: Wollongong
- Been thanked: 27 times
Re: step by step from raw stock
ok next steps.
I have decided on this for the front of the tree, this I believe has the best balance of trunk line and desirable features, all trunks have a harmony with each other and they most importantly are all visible. This step is often about compromise as it is rare that you will get the best line base to tip whilst also showing the best features and basal flare etc.
Once I decided this was to be the front, I wanted to reposition 2 of the trunks, this was one by using guy wires and for one of the trunk a bit of rebar hammered into the soil.
From here I was able to remove more of the branching, My process of determining which ones to remove was based around the position of the branches, how heavy/strong/weak they were and where on the tree they were located. On the back trunk for instance I focused on removing the strong heavy branches high up on the trunk that occurred anywhere I had other, softer options. I also thinned any areas where multiple similar branches occurred. Use your judgement in these cases, think about what you need to have branching wise in that particular area and choose the most suitable candidates, remove anything else, it will just get in the way.
One thing I have learnt is that often very full looking bonsai are created from quite few, but well organised branches. Excess branches often lead to disorder and confusion of design.
I have still left excess branching in areas where I am not 100% sure of the final layout, this will unfold as the tree is wired and it is better to realise that you don't need a particular branch and cut it off than to realise that you did in fact need a branch you have already removed.
The next step will be to wire out the defining branch or branches on the tree. Most trees will only have 1 defining branch, this is the branch that sets the structure and "tone" of the design. It doesn't have to be the first branch to occur on the tree, but it is the branch that all other branches are built around. Being that this is a triple trunk, each trunk will have significant branches, but there may still be 1 that takes the main focus.
stay tuned
Kerrin
You do not have the required permissions to view the files attached to this post.
Last edited by kez on December 23rd, 2015, 10:44 am, edited 1 time in total.
-
Reece
- Aussie Bonsai Fan
- Posts: 519
- Joined: August 8th, 2012, 9:26 am
- Favorite Species: Conifers.
- Bonsai Age: 2
- Location: Sydney
Re: step by step from raw stock
You bought that triple trunk! Ive had my eye on that for a while  Glad someone that knows what they are doing bought it....
Great post. Ill be checking for updates....
Great post. Ill be checking for updates....
-
NAHamilton
- Aussie Bonsai Fan

- Posts: 207
- Joined: March 24th, 2013, 7:24 pm
- Favorite Species: Backea
- Bonsai Age: 3
- Bonsai Club: Ausbonsai
- Location: Ocean Shores
Re: step by step from raw stock
Thanks for taking the time to do this Kez. I'm looking forward to the next installments.
Cheers,
Nigel
Cheers,
Nigel
-
kez
- Aussie Bonsai Fan
- Posts: 694
- Joined: November 4th, 2013, 6:47 pm
- Favorite Species: Pines, Junipers
- Bonsai Age: 0
- Location: Wollongong
- Been thanked: 27 times
Re: step by step from raw stock
cheers guys,
Next bit of work, at this point the lowest branches on the left and the right trunk have been wired out, as well as a branch higher up on the right and a smaller branchlet close to the trunk on the left. As mentioned above the defining branch doesn't have to be the lowest branch, but on this tree I think it will be, and it will most likely be the left side that dictates the flow of the tree
At this stage nothing at the back of the tree or on the middle trunk has been wired as im out of time for today, and at the moment you can see that this is confusing the design. This is an important part of getting the tree structurally wired, it allows you to balance the tree and detail wire from there.
You do not have the required permissions to view the files attached to this post.
-
kcpoole
- Perpetual Learner
- Posts: 12292
- Joined: November 12th, 2008, 4:02 pm
- Favorite Species: Maple
- Bonsai Age: 15
- Bonsai Club: the School Of Bonsai
- Location: Western Sydney, NSW, Australia
- Has thanked: 19 times
- Been thanked: 96 times
- Contact:
Re: step by step from raw stock
What an excellent thread and thanks for taking the time to do a detailed post on the process you go thru.
I have linked this thread to the Wiki here to make sure it is easily found in future https://www.ausbonsai.com.au/wiki/index. ... e_a_bonsai
Ken
I have linked this thread to the Wiki here to make sure it is easily found in future https://www.ausbonsai.com.au/wiki/index. ... e_a_bonsai
Ken
Check out our Wiki for awesome bonsai information www.ausbonsai.com.au/wiki
What is Bonsai? http://www.ausbonsai.com.au/wiki/index.php?title=Bonsai
What should I do now? http://www.ausbonsai.com.au/wiki/index.php?title=Newbie
How do I grow a Bonsai? http://www.ausbonsai.com.au/wiki/index. ... _a_Bonsai?
Visit a Bonsai nursery to see some real nice trees http://www.ausbonsai.com.au/wiki/index. ... _Nurseries

-
dansai

- Aussie Bonsai Fan
- Posts: 1291
- Joined: May 17th, 2010, 5:33 pm
- Favorite Species: Aussie Natives
- Bonsai Age: 5
- Bonsai Club: Coffs Harbour
- Location: Mid North Coast, NSW, Australia
- Has thanked: 4 times
- Been thanked: 141 times
Re: step by step from raw stock
Awesome post kerrin. 
Look forward to the updates. I'm sure this will help a lot of people. Especially those like myself that don't get to club meetings, demos or workshops often, or at all.
Again
Look forward to the updates. I'm sure this will help a lot of people. Especially those like myself that don't get to club meetings, demos or workshops often, or at all.
Again
Travelling the Mid North Coast of NSW and beyond to attend Markets and other events
www.facebook.com/TheBonsaiBus - www.instagram.com/thebonsaibus
www.facebook.com/TheBonsaiBus - www.instagram.com/thebonsaibus

-
kez
- Aussie Bonsai Fan
- Posts: 694
- Joined: November 4th, 2013, 6:47 pm
- Favorite Species: Pines, Junipers
- Bonsai Age: 0
- Location: Wollongong
- Been thanked: 27 times
Re: step by step from raw stock
Thanks for the kind words folks, I'm happy to do it, and it's a good challenge for me. Nothing tests your knowledge like having to explain what/why/how you do something so it's great for me as well
My next step before the light left me tonight was to get started on cleaning up the back and removing areas of congestion/confusion. This is an important part in setting up the design, but it can be a challenge as with so much going it it is like not being able to see the forest for the trees if you will excuse the pun
Here's a good example of what I mean I'm sure you will all agree that this is a dead set mess, but everything I need is here, the problem is that there also a lot that I don't need. how do I pick the right branches?
The important thing is to use the branches that have already been laid out as a guide when choosing what to keep, and then keeping with the flow of the area you are working on. How heavy are the branches you have already used? if there a many branches that are possible options which one provides the best rammification? sometimes it is about keeping a branch that is strong enough to maintain health and vigour, sometimes it is about removing a branch that is obviously much stronger than othesr in the area that you will also use. Also remember that often areas are built up of less branches than most people initially think they need to fill a space.
Once you have determined what you are keeping, get rid of the rest, this opens up space for the branches to be set into place, and provides a nice breath of fresh air as the tree becomes more orderly, and there is all of a sudden space to be filled, rather than a space that is much too full.
My process involved determining where I wanted the pads to be situated, and then looking at the branching I had and finding which ones fit best. I removed some quite heavy stuff, as well as some weak, and leggy branches. When faced with a number of options, I find it is always best to take it back to a fork. finding the best multiple of 2 often solves a lot of the problems by itself, providing that the above criteria is observed. I always also try to look above on the tree and before I make any decisions that I can't take back, I have my next step already planned out. It is much like wiring in this regard, always know where you are going to go next and be a couple of steps ahead.
I will get some more work done tomorrow as it is my first day of holidays
Cheers folks,
Kerrin
You do not have the required permissions to view the files attached to this post.
-
kez
- Aussie Bonsai Fan
- Posts: 694
- Joined: November 4th, 2013, 6:47 pm
- Favorite Species: Pines, Junipers
- Bonsai Age: 0
- Location: Wollongong
- Been thanked: 27 times
Re: step by step from raw stock
Next bit of work,
Now that the back trunk has been cleared of all excess/unwanted branching it is much clearer and much easier to build the shape you are after. Following on from a reference point elsewhere on the tree (defining branch, or a branch that links directly to the area you are working on, think the idea of working a step ahead from the last post) I can begin to wire and place the branches, first starting with the lowest branch in the area I am working on, and then moving up the tree.
The challenge faced with this tree is that I will need an apex on every trunk, or something that flows up into the section that follows on another trunk. The plus side is that generally this also means that you are only building 1 side of the trunk you are working on, ie. left, back, or right etc, however it all still needs to fit in with the rest of the tree.
Here is the back of the tree after it has been wired, it is difficult in a photo to get a clear picture of the layout as the rest of the tree still clutters the picture, but in person it is much easier as the eye can remove what it doesn't want to focus on when looking at areas.
From the back and from the left side of the tree, this shows the outline of the rear of the tree and the beginnings of the overall silhouette This process can be followed for the left and right trunks, taking into account the same decision making process as far as selecting the most appropriate branches. As more of the tree is layed out, it gets easier to make these decisions and it all hopefully starts to fall into place
More work to come,
Cheers,
Kerrin
You do not have the required permissions to view the files attached to this post.
-
Craigg
- Aussie Bonsai Fan

- Posts: 56
- Joined: January 3rd, 2015, 6:15 am
- Bonsai Age: 3
- Location: Clifton QLD
Re: step by step from raw stock
Thanks for this Kez. While I am not working on anything as challenging at the moment, your step by step process is making me think about the normal process I would follow. I particularly like the notion of the defining branch and it not needing to be the first branch.
I will keep watching with great interest.
I will keep watching with great interest.
-
kez
- Aussie Bonsai Fan
- Posts: 694
- Joined: November 4th, 2013, 6:47 pm
- Favorite Species: Pines, Junipers
- Bonsai Age: 0
- Location: Wollongong
- Been thanked: 27 times
Re: step by step from raw stock
Hi daluke,
I try to avoid this, but I found that when I first started styling trees it would often be how things turned out. The thing about your design changing as you work through the tree is that it tends to indicate a lack of intent when beginning the styling process. It has to start with picking the best of all features and deciding on a front, and this shouldn't change. To change the front means you are moving away from what you have decided is your best option.
I found that when I was changing as I went along, i ended up with a lot of pieces that didn't quite fit together in the end, and was often looking through rose coloured glasses when admiring my finished work, when in reality I knew I had lost my way. Obviously tweeks will be made as branches are placed ets. but the bones should be very much what you set out to achieve from the start.
Now to the tree,
It's 90% done but not quite yet and once again I'm out of light, I did however get a photo series earlier on to highlight what I have been talking about regarding branch selection and also building pads/areas of the tree
Here's an area very typical of field grown juniper Too many branches, but all similar to each other, this is a good example of what I found hard to deal with, which do i pick?
After selction from 5 to 3, I took the strong one from the very end, too strong, growth to far away from the start of the branch and where I wanted to place it, and I took the weakest one, the least desirable branch of the group, no point keeping it for the sake of it. Now the space is free to fill and I have the best of whats there to work with.
Branches wired and placed, this formed the section just below what was to become the apex of this trunk, and that was also part of what guided my decision, I knew what I wanted to achieve with the next step
Cheers, more tomorrow
Kerrin
You do not have the required permissions to view the files attached to this post.
-
kez
- Aussie Bonsai Fan
- Posts: 694
- Joined: November 4th, 2013, 6:47 pm
- Favorite Species: Pines, Junipers
- Bonsai Age: 0
- Location: Wollongong
- Been thanked: 27 times
Re: step by step from raw stock
Final bits of work now, and final tweaking
One of the hardest parts of styling a tree is setting the apex, often when working with raw stock there isn't as much up the top to work with as you would like, and the styling of an apex doesn't conform to any of the rules of styling branch pads. It is more about contorting what you have at the top into something like the top of a tree
here's what I had to work with at the top of the largest trunk, ominously the main apex of the tree as it were and here is what can be made out of the mess Unless you are blessed with more than you need to do the job it will often look a little rough, but in time as the area strengthens you will be able able to remove less desirable parts and re set the best branches and refine the apex along with the rest of the tree.
Cheers,
Kerrin
You do not have the required permissions to view the files attached to this post.
