Step 1
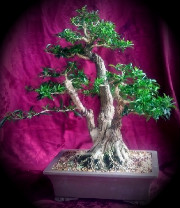
The following photos show the plant in the beginning.
Two lines are drawn on the front and the rear of the plant to form a "V-Shape".
Positioning of the lines is made with care to take advantage of root structure, side branching (if existent) and also to get similar surface shapes / dimensions in both the LHS (Left Hand Side) and RHS (Right hand Side) – which is important as you will see later.
When making the lines, keep in mind that a single saw cut will join both front and rear lines in future steps. Step 2
Now remove the top so that a saw cut can be started at the top of the marked lines.
A sharp saw (ideally with minimal teeth offset) is used to cut down each marked line.
It is important that a single saw cut joins the front and back marked lines.
For each of the “V-lines” try and cut from only one side ie only front or back.
Again - It is important to get a clean single face to each cut.
Assuming you are cutting from the front and notice that you are moving significantly away from the rear line, then restart the cut. It is important that a single flat face exists from front to back of the tree.
You are trying to get two flat faces so that the LHS and RHS can be offered up to each other with no gaps between them. This is impossible to achieve if the saw cuts are multi facetted and literally look like someone chewed the two halves
Quite simply, If a single face is not produced, then you will not be able to get good contact between the two halves.
Step 3
Each of the two cuts are continued until a wedge is removed. You can see the removed wedge to the RHS of the plant.
Step 4
Now that the wedge has been removed it is time to remove the balance of redundant base roots. You should perform all root pruning in preparation for transplanting.
It is much easier to do this work now – before the next step. Step 5
The next step is pretty easy….the cuts have been made, the roots prepared, it is now simply a matter of making a single vertical cut down to separate the LHS and RHS of the tree.
(Note: contrary to what was said above about root pruning….we elected to remove the large rear “tubular root” after this stage.
Step 6
Now offer LHS and RHS to each other.
Look for protrusions on the cut face which prevent the two halves meeting perfectly – you want to get them as close as possible.
(It is now that you appreciate having used a double cut saw with little offset in teeth as the cut faces will be really neat and the subsequent healing will be much quicker and more successful.)
Clean up any protrusions so that the majority of the two faces join as near to perfect as possible.
Don’t be too worried about the bottom (near the roots) as when you tighten the top part of the tree, the base will tend to open up slightly.
Step 7
Now that you are satisfied with the mating faces and the relative position of each half, you should drill a small pilot hole completely through the first half and partially through the second half in preparation for a screw which will be used later in this step to tightly secure both halves at the bottom.
Now drill a slight clearance hole through the first half and also a countersink in preparation for the screw head.
It is a bit late to mention now……….., but prior to even starting you should have selected a stainless steel screw of appropriate length and diameter……
For a tree of size used in this example a single screw is adequate. For a really large tree, you may need to use additional screws.
Now screw the two halves together to ensure that the thread etc take, the screw is the correct length and more particularly that you are satisfied with the positioning of the two halves.
Step 8
In preparation for the joining phase, ensure you have appropriate clamps on hand and wire (if required) ready to twist and tighten.
If necessary, re-screw the two halves together and apply your clamps etc…….It is important to know what clamps you are going to use and where they will be placed BEFORE you start the gluing process……
Glue is now applied to ensure that all parts of one surface are covered uniformly and there are no parts not covered. For good measure Dad also covered the second face, but this was not as important – more a “belt and braces” approach.
Dad uses “Gorilla Glue” which Peter Adams demonstrated when he visited Australia recently. Dad imported a full carton of this glue and I, like a few other members here was lucky enough to get some.
[As an aside, Bretts and a few other members here also found a similar Australian glue of a different brand, but similar composition – see separate thread for details)
Be careful that you don’t take too long in applying the glue as it will start to foam up a little and this can be quite an encouragement to get a wriggle on…..
Step 9
Now offer the two halves together, insert and tighten the screw, apply the clamps and if desired / necessary use wire to tighten the uppermost sections together.
The glue will now start to foam more and will be oozing out of the join. You can wipe up some excess – it will save you a little time tomorrow.
Don’t be too worried about excess glue being present as this brand of glue is quite easy to remove the next day.
Don’t be deceived by the excess glue….if the procedure is applied correctly, the two halves are very closely mated together.
Step 10
The next day, remove the clamps, leaving the stainless steel screw in situ.
Remove the balance of excess glue.
The two halves will not be identical and now is the time to trim them flat.
Apply a wound sealant to the trimmed edge.
Depending on the plant and the time of year, sit back and wait….It could be as little as 4 – 6 weeks before the join line is only known by you and anyone you care to tell…..
The success rate of this is fantastic…..
It’s a great way to get some taper in each plane.
Sure, there isn’t much movement and it is quite symmetrical, but then again, there wouldn’t be much movement in a broom style either.
Hope the above is of assistance and interest to some.
As far as I am concerned, I am glad that Dad showed me how he has been performing his magic on some really thick and serious trees – more so it was a great way to spend a couple of hours with him…..until next time…….
Regards
Steve