
G'day bonsai people of Australia!
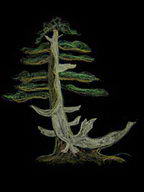
I've been corresponding recently with one of your number, Adam, who sent me this photograph and asked for my comments. I suggested that this plant could make an excellent vehicle for an online seminar on urban yamadori.
I can hear you all ask, "What the heck is that no-good skinny legged Pom doing here, he must have an ulterior motive!" And you'd be right, but more about that [here in THIS THREAD]. Let's get on with the first part of the seminar.
Urban Yamadori - part 1: Post collection
Adam wrote: "I've worked long and hard to bring this tree from a garden shrub to a Bonsai. Dug it out of a car park in Dec of 2008."
Ah - but grasshopper, you may have worked hard but you haven't worked long. By attempting to get a result quickly, you are actually prolonging the process and diminishing the end result. This assumes, naturally, that you want the best possible bonsai, and this juniper surely has the potential to become something of a masterpiece. It takes anywhere from six to twelve years to turn a plant like this into a bonsai and, as you observed later in your email, this plant isn't ready for styling yet (although you may not realise you made that observation!).
Let's go back to the day you dug this tree two years ago. Your first mistake was to cram it into such a small, narrow pot. Sure, bonsai grow in minimal soil volume, but it isn't a bonsai yet. After collection the most important thing is to get the plant to recover and regain strength, and this means a vigorously active root system which will help the tree respond favourably to training and repotting.
The prevailing wisdom is that you do nothing apart from prune excessive growth for the first three years! Why wait so long? Because the third growing season is when any transplanted plant really takes off - think about shrubs and perennials in the garden: the first couple of years are so-so, the third year they come into their own, right? It is a myth to believe that you need to cramp the roots and slow down the growth rate in order to make a bonsai; in fact you need maximum vigour and strong growth, in the early stages at least.
When you dig a tree, bear in mind that it will more than likely eventually be planted in a wide shallow pot, so you begin to 'potty train' the roots straight away by planting it in a wide shallow container - not a narrow deep one. Shallow containers offer more consistent moisture content, strengthen nebari and they encourage horizontal root growth. Deep narrow containers induce heavy downward growing roots that make eventual replanting into a shallow container much more difficult (and more risky). They also restrict growth because the small surface area limits moisture, fertiliser and air penetration.
So - what to do now? Well, you're proud of the work you've done, but not of the result. So - first thing is to take off all the wire. Ha! I hear you say: "I saw that coming!" Look at it this way, you had some good wiring practice and you discovered all sorts of problems in the process - it has been a valuable learning experience. So - wire off.
Next, since you're coming up for spring there, ease the plant from the pot and replant it into a shallower and much wider container - a wooden box, washing up bowl with drainage holes - whatever, so long as it's the right shape. Don't mess too much with the roots at the sides, just loosen them up where they've coiled around the inside of the pot. Underneath the root ball, cut back as hard as you can any thick roots that might prevent the use of a final, much shallower pot. make sure, though, you have plenty of fine roots left! Where thick, heavy roots cant be cut back hard enough wothout losing too much fine root, cut away patches of bark, right down to and slightly into the wood, just below the soil surface and pack some sphagnum moss around them. This layering process will induce new roots above where the bark was removed and you can cut back the thick roots next time you repot (at least another two, preferably three or more years).
Tie the plant into the container firmly. Rather than use wire over the nebari, where it will cause ugly marks, thread it through the root ball underneath the nebari but over finer roots. I actually use string that decays after a year but lasts long enough for new roots to fill the pot and stabilise the tree. It's important to do this because you're going to be doing a lot of work on this tree before the roots have filled the new container.
If you do these two things, we will have the tree almost in the state it should be in two years after collection, and we can then move on to the next stage.
Part two follows tomorrow....
Colin Lewis
ADVERTISE FREE on Bonsai Forum Classifieds
https://www.BonsaiForum.com
Urban Yamadori Juniper
-
bonsaicrazy
- Aussie Bonsai Fan

- Posts: 5
- Joined: September 5th, 2010, 1:25 am
- Favorite Species: Larch - eat your hearts out
- Bonsai Age: 35
- Location: USA
Urban Yamadori Juniper
You do not have the required permissions to view the files attached to this post.
Last edited by FlyBri on September 12th, 2010, 7:46 am, edited 3 times in total.
Reason: Tidying up the thread to remain on-topic...
Reason: Tidying up the thread to remain on-topic...
-
Makkanan

- Aussie Bonsai Fan

- Posts: 51
- Joined: May 31st, 2009, 7:33 pm
- Favorite Species: Chinese Elm
- Bonsai Age: 8
- Bonsai Club: Yarra Valley & BSV
- Location: Yarra Valley, VIC
Re: Urban yamadori juniper
Thanks for your posting and illustrations.... the larch branch one especially should convince anyone against the sins of going straight from ground to bonsai pot.
Thanks.
Thanks.
Last edited by FlyBri on September 12th, 2010, 7:35 am, edited 1 time in total.
Reason: Tidying up the thread to remain on-topic...
Reason: Tidying up the thread to remain on-topic...
-
Webos
- Aussie Bonsai Fan

- Posts: 1206
- Joined: July 15th, 2009, 12:05 pm
- Favorite Species: Juniper
- Bonsai Age: 0
- Bonsai Club: Southern Vic Bonsai Club
- Location: Southern Vic
Re: Urban yamadori juniper
Welcome to AusBonsai Colin, Glad you were able to make it and we look forward to your contributions. Make sure you have a good look around the forum, I'm sure you'll find some great stuff in here and if you're not careful, you might just learn something about some of our Aussie native trees.
-
bonsaicrazy
- Aussie Bonsai Fan
- Posts: 5
- Joined: September 5th, 2010, 1:25 am
- Favorite Species: Larch - eat your hearts out
- Bonsai Age: 35
- Location: USA
Urban Yamadori - part 2: Preparation
Urban Yamadori - part 2: Preparation
Adam wrote: "I'm a bit limited due to a lot of [small] branches growing out of the ends of [thick] branches leaving me no choice but to use that as my outer limit..."
There's always a choice, grasshopper. You decided to cut corners and try to make something that looks like a bonsai instead of taking the seemingly more circuitous route which, nevertheless, leads to a far, far better bonsai. This is the part where the past two seasons have been wasted, but not to worry, it'll catch up.
When yamadori is dug, either from the mountains or from the back yard, it's branches are always too thick and rigid and the foliage is way out yonder. All you're really interested in is the trunk and nebari.
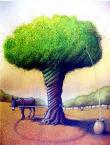
With species such as pines (with some exceptions), cedar (cedrus) larch, spruce, hemlock, etc., which don't generally have the mechanism to produce adventitious growth, you have to decide fairly early on which of the branches is going to be the trunk, and you cut off the rest. Then, for the next three or four years, you work at building ramification and density by pinching and pruning. This is part of preparing the tree for design, not part of the design process.
With broadleaved species, and some conifers such as yew, you wouldn't think twice about digging up a branchless stump and growing a plague of new branches from scratch.
Junipers can and do produce adventitious growth, usually from the junctions of branches or from the trunk at the base of a branch (or where a branch used to be). But cut all the branches off completely and you'll have a wonderful piece of firewood.
To prepare a collected juniper for design takes time and judgment. Bit by bit, you reduce the branches by cutting them back to sub-branches that have sufficient actively growing foliage to sustain the branch, but no more. If necessary you can also shorten these sub-branches to reduce foliage mass more. This achieves two things: it allows light and air access to the inner tree, and it starts to wake up the adventitious bud mechanism. Best do this in early summer, when the tree has a full head of steam. Some new growth will appear at intersections along the branches. maybe, if you're lucky, some will appear close to or even on the trunk.
Keep the outer growth under control - you're not trying to build density, so don't pinch shoots. Instead, prune out sections, taking more away each time, keeping a balance between the emerging adventitious growth and the diminishing outer growth.
Adventitious shoots on junipers come in clusters of sometimes thirty of forty shoots, though normally much less. If this happens where you don't want new shoots, ie: along the heavy branches, cut them out. Note: cut them out, not off! if you leave any residue they will regenerate with a vengeance, and you don't want the tree to waste its energy on futile shoot production. However, if they are conveniently placed, or might be so (remember, no design decisions yet) wait until some shoots in the cluster have gained some robustness, and cut out all but two. Do this wherever adventitious shoots emerge from the trunk or on the bases of branches. No pinching no wiring.
After anything between one and five years, you will be able to kill off all the old branches and work with an entirely new set that you have chosen from the far too many options that you now have and didn't have before. "No choice," you say. Now you do, now you can make a bonsai.
Part three follows tomorrow....
Colin Lewis
ADVERTISE FREE on Bonsai Forum Classifieds
http://www.BonsaiForum.com
Adam wrote: "I'm a bit limited due to a lot of [small] branches growing out of the ends of [thick] branches leaving me no choice but to use that as my outer limit..."
There's always a choice, grasshopper. You decided to cut corners and try to make something that looks like a bonsai instead of taking the seemingly more circuitous route which, nevertheless, leads to a far, far better bonsai. This is the part where the past two seasons have been wasted, but not to worry, it'll catch up.
When yamadori is dug, either from the mountains or from the back yard, it's branches are always too thick and rigid and the foliage is way out yonder. All you're really interested in is the trunk and nebari.
With species such as pines (with some exceptions), cedar (cedrus) larch, spruce, hemlock, etc., which don't generally have the mechanism to produce adventitious growth, you have to decide fairly early on which of the branches is going to be the trunk, and you cut off the rest. Then, for the next three or four years, you work at building ramification and density by pinching and pruning. This is part of preparing the tree for design, not part of the design process.
With broadleaved species, and some conifers such as yew, you wouldn't think twice about digging up a branchless stump and growing a plague of new branches from scratch.
Junipers can and do produce adventitious growth, usually from the junctions of branches or from the trunk at the base of a branch (or where a branch used to be). But cut all the branches off completely and you'll have a wonderful piece of firewood.
To prepare a collected juniper for design takes time and judgment. Bit by bit, you reduce the branches by cutting them back to sub-branches that have sufficient actively growing foliage to sustain the branch, but no more. If necessary you can also shorten these sub-branches to reduce foliage mass more. This achieves two things: it allows light and air access to the inner tree, and it starts to wake up the adventitious bud mechanism. Best do this in early summer, when the tree has a full head of steam. Some new growth will appear at intersections along the branches. maybe, if you're lucky, some will appear close to or even on the trunk.
Keep the outer growth under control - you're not trying to build density, so don't pinch shoots. Instead, prune out sections, taking more away each time, keeping a balance between the emerging adventitious growth and the diminishing outer growth.
Adventitious shoots on junipers come in clusters of sometimes thirty of forty shoots, though normally much less. If this happens where you don't want new shoots, ie: along the heavy branches, cut them out. Note: cut them out, not off! if you leave any residue they will regenerate with a vengeance, and you don't want the tree to waste its energy on futile shoot production. However, if they are conveniently placed, or might be so (remember, no design decisions yet) wait until some shoots in the cluster have gained some robustness, and cut out all but two. Do this wherever adventitious shoots emerge from the trunk or on the bases of branches. No pinching no wiring.
After anything between one and five years, you will be able to kill off all the old branches and work with an entirely new set that you have chosen from the far too many options that you now have and didn't have before. "No choice," you say. Now you do, now you can make a bonsai.
Part three follows tomorrow....
Colin Lewis
ADVERTISE FREE on Bonsai Forum Classifieds
http://www.BonsaiForum.com
You do not have the required permissions to view the files attached to this post.
-
bonsaicrazy
- Aussie Bonsai Fan
- Posts: 5
- Joined: September 5th, 2010, 1:25 am
- Favorite Species: Larch - eat your hearts out
- Bonsai Age: 35
- Location: USA
Re: Urban Yamadori Juniper
Okay, I now I promised part three today, but it's a school weekend and I've had no time to take the photographs I want to use, besides, I'm pooped! Tomorrow, promise....
Colin Lewis
Colin Lewis
-
bonsaicrazy
- Aussie Bonsai Fan
- Posts: 5
- Joined: September 5th, 2010, 1:25 am
- Favorite Species: Larch - eat your hearts out
- Bonsai Age: 35
- Location: USA
Re: Urban Yamadori Juniper - Part 3
Urban Yamadori - part 3: When and where to start work
Adam wrote: "This is it's very first styling."
A noble effort, grasshopper, and not without charm. Where you used 'borrowed branches' on the right, does it not look better than on the left, where you've hidden ugliness? What you have done is turn a little bush that looked a mess into a little bush that looks something like a bonsai. It follows the "Tin Helmet" school of bonsai design - you have used dense outer foliage to conceal a heap of unsightly woodwork inside! This is an approach used in those infuriating two-hour demonstrations where there is a result-hungry audience to please. This is not how bonsai are made. Unfortunately the right way is seldom demonstrated, so who knows it?
So this was the first styling. Okay, you did that, now put it behind you and let's work making a bonsai!
In a few years time you will have those nice supple new branches to work with so the whole tree can have the integrity of structure and design that makes the difference between bonsai and masterpiece bonsai. But in the meantime, there is still a heck of a lot of work to do before you even begin to think about design....
Back up a bit - when you collect a tree you're concerned primarily with the trunk right? So when did the trunk cease to be of primary concern? How can you even begin to consider design if you have no idea of how the trunk is - it's movement, weight, best aspect and - its deadwood? The deadwood is the key to the whole design, it's the heart of the tree.
There will be more deadwood than live vein on this tree - eventually. There is already more than you can see. So, now the wire is off - you have taken the wire off, right? - now the wire IS off, you can spend the next couple of years exploring and working the deadwood. As time progresses and heavy branches are killed as new ones grow, the deadwood will expand naturally, so this is an on-going process that continues right through to initial styling and beyond. But for now there's lots to do.
Brush the bark with a soft brass brush to remove the loose flakes. Old bark has flakes that can be picked off (extremely satisfying) and this may well have too. Be meticulous, especially in all the nooks and crannies. You will discover undulations and a "muscularity" that is hidden beneath all the old loose bark. The aim is a smooth, almost burnished look to the bark, which may take a few attempts to achieve. When you do this you'll notice that some areas of bark are a different colour. Investigate further, these may be dead and can be stripped. Poke around with a sharp object every now and then. See if you can find patches where the bark feels hard and impenetrable rather than soft. These areas are probably dead and can be stripped.
Strip the bark off all the jins, right back into the trunk, and I mean into the trunk: take off the 'collar' as well, so there is a kind of channel around the base of the jin. Peel away a narrow strip of bark beneath the jin as well. If this bark isn't already dead here, it will die soon anyway, you're just helping it along. Wherever there is a dead branch or the stub of a pruned branch, there will be a line of deadwood below it, right down to the root that supplied it. Similarly, when you cut a heavy root and leave no fine roots attached, a line of deadwood develops upward and a branch or two eventually die. This process, in either direction, can take several years. (Weak branches that do not regain vigour after the mandatory three years, are probably dependent on non-existent roots, and shouldn't be relied on.)
As your adventitious growth develops and the heavy branches are killed, don't cut them off, just strip the bark. Never make a flat cut to the trunk when pruning branches on juniper: they never heal over and you will always have a flat round cut surface staring at you. Always make a jin from a pruned branch.
Don't make jins too long: the ones you have are way oversize! That stick in front should be 4cm long when finished, max. The log on the left should lose 7cm and become a short, jagged, hollow remnant. The big thing sticking through the canopy could remain long for the time being, to see if it could be used as a feature in the design later on.
As deadwood becomes exposed, it can be shaped, beginning with the jins. Now, shaping deadwood is whole different ball game. First of all, don't go near this tree with power carving tools - if you have some, use them for making fruit bowls. Nobody on the face of this planet can carve with power tools as well as nature can - with your help.
The only power tool you're likely to need is an ordinary electric drill, for taking the centre out of that log sticking out on the left. The rest you do, over time, by peeling the fibres and exposing the natural grain. You will discover magical twists and turns, secret jins that have been buried beneath annual growth. You need pliers and a strong wrist and some small chisels or gouges to help to lift grain. Soaking the wood for a couple of days, or working after rainy spell, makes the work easier and gives more satisfactory results.
Work slowly and not too often, there is plenty of time. At all costs don't get carried away, step back often and take a long look at what you've done.
After a couple of years work, when you have finished the deadwood you will be able to see the trunk of your future bonsai. Then it will be ready, then you can start thinking about the design.
Colin Lewis
Advertise FREE at Bonsai Forum Classifieds
http://www.BonsaiForum.com
You do not have the required permissions to view the files attached to this post.
-
Gerard
- Aussie Bonsai Fan
- Posts: 2656
- Joined: October 7th, 2009, 12:32 pm
- Favorite Species: pines
- Bonsai Age: 16
- Bonsai Club: BSV, Northwest, Northern Suburbs, VNBC
- Location: Melbourne
- Has thanked: 18 times
- Been thanked: 49 times
Re: Urban Yamadori Juniper
Thankyou Colin,
Very informative with great examples, I hope to read more.
Very informative with great examples, I hope to read more.
Q: Why are we all here?
A: Because we are not all there.
A: Because we are not all there.
