Air layering process (WARNING: many photos)

Share your success stories about defoliation, bare rooting and anything else relating to maintaining healthy bonsai.
User avatar
Kyushu Danji
Aussie Bonsai Fan
Aussie Bonsai Fan
Posts: 307
Joined: January 16th, 2011, 2:57 pm
Favorite Species: Ginkgo, Japanese Maple, Stewartia
Bonsai Club: CBS
Location: Canberra

Re: Air layering process (WARNING: many photos)

Post by Kyushu Danji »

Mojo Moyogi wrote:That Juniper? is Juniperus squamata 'Meyerii' - Meyer's Juniper and they are pretty good for bonsai.

Cheers,
Mojo
Oh I see, thank you for identifying that for me Mojo. There seem to be plenty around here, but this is my first attempt at air layering it. I have read that the tourniquet method of layering works best with conifers, however I am more confident with this ring barking method..so if this fails then I will have to give the other method a go I suppose.

James
User avatar
Kyushu Danji
Aussie Bonsai Fan
Aussie Bonsai Fan
Posts: 307
Joined: January 16th, 2011, 2:57 pm
Favorite Species: Ginkgo, Japanese Maple, Stewartia
Bonsai Club: CBS
Location: Canberra

Re: Air layering process (WARNING: many photos)

Post by Kyushu Danji »

Gerard
Timing is important, if you attempt the layer when growth is rampant results can be achieved in as little as 5-6 weeks. If the layer is left too long the cut will heal and the new roots will die.
I like the rule, layer on Melbourne cup day and cut off on Australia day. I find this works well for most species although I have not attempted conifers.
Two trees which I layered in November are ready to cut, I will do this tomorrow and post some pics.
I think that sounds like a good way to go. To be honest I wish I had planned to air layer a little sooner. Nevertheless, most of the branches I have selected to air layer this time around are destined to be chopped anyway, so I have not lost too much if they do end up failing. I don't think we are due for frosts, or even cool temperatures until late april at the earliest (please, correct me if I'm wrong) and after that, I suppose I will need to work on caring for them over winter. I am a little concerned about them healing before the layer is cut though..

Webos
I usually use clear plastic plastic so that I am able to see the roots as the develop. I think it is also a good idea to use branches that have good strong growth on them since it is the movement of nutrients that causes the phenomenon to occur
In an ideal world, I think I would have used clear plastic as well. However, I am a poor uni student and used whatever was lying around :whistle:

Mick
Mate, you should watch the Grahame Potter clip in this method, very good.


I would love to. Where can I find it?

Craig
Its privet alright syringa only flower in spring and are deciduous.
Good luck with all your layers
Craigw
Haha, thanks for the ID Craig. You must be getting used to my crazy ideas by now :roll: :D
User avatar
Akamatsu
Aussie Bonsai Fan
Aussie Bonsai Fan
Posts: 40
Joined: December 5th, 2010, 10:47 pm
Favorite Species: Japanese Pines, Maples & Azaleas
Bonsai Age: 37
Location: Northern Tablelands NSW

Re: Air layering process (WARNING: many photos)

Post by Akamatsu »

Hi Guys,
What you thought was a lilac I beleive to be a chinese privit. Never seen one as a bonsai but probably no harm in trying?
Akamatsu
盆栽を育てるのが好きです。
User avatar
MattA
Banned
Banned
Posts: 3112
Joined: February 13th, 2010, 2:37 pm
Favorite Species: Lichen
Bonsai Age: 26
Bonsai Club: Killing Trees Inc..
Location: Lower Hunter Valley
Been thanked: 2 times
Contact:

Re: Air layering process (WARNING: many photos)

Post by MattA »

Hey James,

As a few have already said timing is key.. In general I think you should have no problems with most of them. A few things from the photos.

Ash, the same as with the crepe layer you have already fixed, more moss in the top of the bag. Then what you can do to help stop it slumping down is to wrap a few coils of string in a helix around the bag, just tight enough to grip. It will stop everything moving but not compress the moss making it more difficult for roots.

Maples :worship: love them...I am about to start a few on one of my trees. Do you want these for bonsai or garden trees as I would treat them differently depending on that. The lower one doesnt look like it has very much moss in it.

Camellia, I will be interested to know how you go with that as I have my eye on one that i would like to work. Dont ask about me & camellia's :palm:

Rhodo, are going to reduce the growth heavily when you remove it? Let the small bag fill with roots then slip a cut 6"(15cm) plastic pot around tape/wire/tie in position & fill with a good free draining soil mix and cut the layer off when that is getting full. You should be able to remove the whole thing without cutting back much at all then.

Kaffir lime mmmmmmm I have one I am growing for bonsai. If your ring barking was just below a leaf node I reckon this should be the first to root & be cut off.. in no time ;)

Cherry double mmmmmmmmmm if you dont want that branch i will have it... the last time i attempted it the tree was cut down before they were ready to be cut. It depends on the tree & branch... some will root in no time, some wont at all! Some will callous but not root until forced to (do in spring). I dont use any hormones or other treatments so that may help rootex, seasol, worm wee. comfrey tea auxin vegemite?! who knows how many other tings that work for some people.. Honey is b!**%& brilliant for striking cutting & layers :!:

I dont think the gardenia is a gardenia but cant think what it is...

Golden rain..... now this i am really interested to see how it goes.. in theory you are just trying to enhance the roots not strike a root from branching. so it should work no trouble at all...theory as i have never tried...I usually just cut suckers off and pot them up just before bud break in spring. I am going to do that next year to a couple of apple suckers, they will make nice little mame with a few years attention.

Keep an eye on the bags that they dont dry out & let us all know how each one turns out. I will get some pics of various ones of mine up soon on this thread so we can keep it all together.

Matt
Ps if you are cutting the crepe short can i have this piece? ;) :whistle: :lol:
You do not have the required permissions to view the files attached to this post.
42 Mice ~Imperfection
"Experience is a hard teacher because she gives the test first, the lesson afterwards." ~ Vernon Sanders Law
"All the knowledge I possess everyone else can acquire, but my heart is all my own." ~ Johann Wolfgang Von Goeth
"Bonsai becomes great when growers start trees they know they will never see in a pot"
de_keizer
Aussie Bonsai Fan
Aussie Bonsai Fan
Posts: 121
Joined: January 13th, 2011, 12:58 am
Favorite Species: ficus, elm
Bonsai Age: 10
Location: st marys
Been thanked: 3 times

Re: Air layering process (WARNING: many photos)

Post by de_keizer »

make sure the top of the bags is tight so no water gets in there when it rains. if i were you after you take the layer off the juniper you might want to dig it up to use as bonsai, just a thought.
User avatar
Kyushu Danji
Aussie Bonsai Fan
Aussie Bonsai Fan
Posts: 307
Joined: January 16th, 2011, 2:57 pm
Favorite Species: Ginkgo, Japanese Maple, Stewartia
Bonsai Club: CBS
Location: Canberra

Re: Air layering process (WARNING: many photos)

Post by Kyushu Danji »

MattA wrote:Ash, the same as with the crepe layer you have already fixed, more moss in the top of the bag.
MattA wrote:Maples...The lower one doesnt look like it has very much moss in it.
Will fix both of these up today. They were both for use as bonsai, so how would you treat them in this case?
MattA wrote:Rhodo, are going to reduce the growth heavily when you remove it?
I'm thinking of doing what you said and leaving the growth but giving it more of an area to grow in. This was for just general use in the garden.
MattA wrote:Kaffir lime mmmmmmm I have one I am growing for bonsai. If your ring barking was just below a leaf node I reckon this should be the first to root & be cut off.. in no time
I should mention that all of the ring barking I did was just below a leaf node. I will check on this kaffir today because it sits in afternoon sun and tends to get pretty hot (hopefully it hasn't cooked..)
MattA wrote:Cherry double mmmmmmmmmm if you dont want that branch i will have it... the last time i attempted it the tree was cut down before they were ready to be cut.
Thats too bad! How come it was cut??
MattA wrote:I dont think the gardenia is a gardenia but cant think what it is...
I know, I'm not sure what it is either. It has never flowered, but the leaves are gardenia-like. Maybe someone will ID this at some stage.
MattA wrote:Golden rain..... now this i am really interested to see how it goes.. in theory you are just trying to enhance the roots not strike a root from branching. so it should work no trouble at all...
I would have just dug this up along with a big of root as you said, but it sits right at the base of the parent tree, which is probably getting on for 60 years. The root underneath was so thick there was no way I was digging this one out. Hopefully the layer will work though, I would like to try and make this into a bonsai - it even has its own deadwood. I guess the roots will need work when it does come off.

Thanks for the advice :tu:
User avatar
Kyushu Danji
Aussie Bonsai Fan
Aussie Bonsai Fan
Posts: 307
Joined: January 16th, 2011, 2:57 pm
Favorite Species: Ginkgo, Japanese Maple, Stewartia
Bonsai Club: CBS
Location: Canberra

Re: Air layering process (WARNING: many photos)

Post by Kyushu Danji »

de_keizer wrote:make sure the top of the bags is tight so no water gets in there when it rains. if i were you after you take the layer off the juniper you might want to dig it up to use as bonsai, just a thought.
That actually what I have been considering. It has a pretty thick trunk, so I'll see what happens with this layer.
User avatar
MattA
Banned
Banned
Posts: 3112
Joined: February 13th, 2010, 2:37 pm
Favorite Species: Lichen
Bonsai Age: 26
Bonsai Club: Killing Trees Inc..
Location: Lower Hunter Valley
Been thanked: 2 times
Contact:

Re: Air layering process (WARNING: many photos)

Post by MattA »

de_keizer wrote:make sure the top of the bags is tight so no water gets in there when it rains.
This is a really important tip... if too much water gets in the new roots wont be able to grow or will rot off.
cedarlayer.jpg
This cedar layer was done via ringbarking a 1cm wide strip of bark in july & bagged with a mix of old potting mix that has a good portion of sharp sand & grit to which I added some chopped spag to increase the water holding a little. I tried as best to seal the bag but wasnt too successful causing it to dry out regularly. It rooted, but we had a course of really wet weather & all bar one root rotted off. It is in Intensive care at the moment, theres been no needle drop yet so who knows.

What I would do different?
Put a ring of wire directly under the cut to help prevent healing & also start spreading the future nebari.
Suspend a small pot in the tree instead of bagging it. Controlling moisture is critical, not enough or too much water will both have the same effect on new roots, death. Dont cut it off until I have opened the bag first to make sure the roots are still strong & healthy :!: :palm: I hate/love nursing trees...
ICU.jpg
Matt
You do not have the required permissions to view the files attached to this post.
42 Mice ~Imperfection
"Experience is a hard teacher because she gives the test first, the lesson afterwards." ~ Vernon Sanders Law
"All the knowledge I possess everyone else can acquire, but my heart is all my own." ~ Johann Wolfgang Von Goeth
"Bonsai becomes great when growers start trees they know they will never see in a pot"
User avatar
MattA
Banned
Banned
Posts: 3112
Joined: February 13th, 2010, 2:37 pm
Favorite Species: Lichen
Bonsai Age: 26
Bonsai Club: Killing Trees Inc..
Location: Lower Hunter Valley
Been thanked: 2 times
Contact:

Re: Air layering process (WARNING: many photos)

Post by MattA »

Hey James,

With your maples I would wait till they have some roots then overpot on the tree to give them room to grow. Leaving the layer on the tree till late winter, I will come back to winter protection later. As bud break is about to happen you can cut it off, gently straighten the roots & shorten the trunk to a low bud. Pot on & treat similarly to any newly repotted tree.

With the Rhodo, dont rush it, I have done a few & they have taken anything from 3mths to 2yrs!

Citrus love the heat! When was this layer set? It should be well rooted in a month or less!

Take as many layers as you can of the cherry!!!!!! My tree was in the way of a developer, planted in the mid 20's, reduced to nothing in 10 seconds flat. Some had calloused so I potted them up but wasnt able to give them the best care after. One out of 10 rooted & grew well until my dog ate it (yes literally) as a pup my wolfhound cross liked to eat trees :lol:

The golden rain is going to be my kind of tree if it works and i dont see why it shouldnt.

Ok, overwintering layers. If there is a possibility of frost you need to protect the roots... a couple of ways to do this.
1/ wrap a towel around the bag, dont worry about the rest of the branch its used to it!
2/ Better is to wrap several layers of bubblewrap around it & then black plastic over that. It makes an ugly big bag hanging in the tree but I have had layers survive -5 this way. Also set & forget, no need to remember to wrap it one night.

Be prepared to leave them as long as they need. If worst comes and it has to be removed early, after care is ciritcal, not too much not too little water & high humidity. Regular misting the foliage also helps.

Matt
42 Mice ~Imperfection
"Experience is a hard teacher because she gives the test first, the lesson afterwards." ~ Vernon Sanders Law
"All the knowledge I possess everyone else can acquire, but my heart is all my own." ~ Johann Wolfgang Von Goeth
"Bonsai becomes great when growers start trees they know they will never see in a pot"
de_keizer
Aussie Bonsai Fan
Aussie Bonsai Fan
Posts: 121
Joined: January 13th, 2011, 12:58 am
Favorite Species: ficus, elm
Bonsai Age: 10
Location: st marys
Been thanked: 3 times

Re: Air layering process (WARNING: many photos)

Post by de_keizer »

heres the link to the graham potter vid on youtube http://www.youtube.com/user/GrahamWPott ... REGA3jxGJE lindsey far also has a video on air layering at http://www.bonsaifarm.tv/ i hope this is some help to you
User avatar
Kyushu Danji
Aussie Bonsai Fan
Aussie Bonsai Fan
Posts: 307
Joined: January 16th, 2011, 2:57 pm
Favorite Species: Ginkgo, Japanese Maple, Stewartia
Bonsai Club: CBS
Location: Canberra

Re: Air layering process (WARNING: many photos)

Post by Kyushu Danji »

Update:

Thanks to everyone that has posted on this thread so far. Every bit of information has been valuable to me, and I'm sure to many enthusiasts who I will appreciate a thread focused on this air layering process.

With the information I have received so far, I have made some alterations to the attempted air layers:

1. On each layer, I have added more sphagnum moss and compacted this much tighter against the branch.
I decided that there just would not be enough room for the roots to develop with the amount of moss that I had.

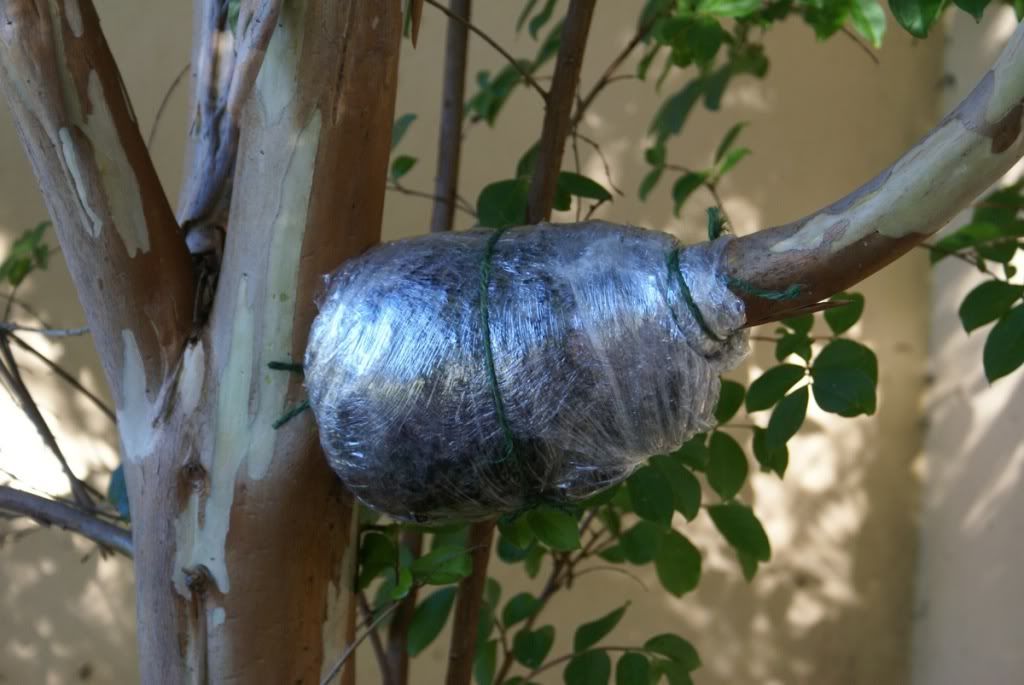
2. I have replaced the thick black plastic with multiple layers of cling film
I was worried about having air pockets that would cause the layer to fail. After watching a few DIY videos about air layering provided by links posted on this thread, I realized that clear plastic was the way to go - not just so I could see what was going on in there, but also because cling wrap really tightens the whole package up and puts pressure on the moss to compact, (hopefully) addressing the air pocket problem.

3. Replaced the everyday string with 'garden twine'
I found that its important to get string that is not too thin, because it will surely break when you are trying to tie everything in place, and not too thick, otherwise it just doesn't hold well on the layer and is loose even when knotted. I think the material used is also a factor in this. My 'garden twine' is just thick cotton thread. As I have gathered, if the layer is not tight enough, it will dry the moss out quickly.

4. Made incisions
I cut three small incisions on the top and bottom of each layer. Since they will be there for a while I am going to have to make sure they are moist enough, and that if it should rain, that the water will be able to escape without rotting the roots.

Here is one example of what I have done with all of the layers I have previously posted:

Crape Myrtle
Image

I intend to leave most of these on until spring, unless by some miracle enough roots have developed before april. Since we get frosts here, the next thing I think I will need to address will be how to protect it from getting too cold.

Feedback and comments are much appreciated :worship:

James
User avatar
Kyushu Danji
Aussie Bonsai Fan
Aussie Bonsai Fan
Posts: 307
Joined: January 16th, 2011, 2:57 pm
Favorite Species: Ginkgo, Japanese Maple, Stewartia
Bonsai Club: CBS
Location: Canberra

Re: Air layering process (WARNING: many photos)

Post by Kyushu Danji »

MattA wrote:Hey James,

With your maples I would wait till they have some roots then overpot on the tree to give them room to grow. Leaving the layer on the tree till late winter, I will come back to winter protection later. As bud break is about to happen you can cut it off, gently straighten the roots & shorten the trunk to a low bud. Pot on & treat similarly to any newly repotted tree.

Citrus love the heat! When was this layer set? It should be well rooted in a month or less!

Ok, overwintering layers. If there is a possibility of frost you need to protect the roots... a couple of ways to do this.
1/ wrap a towel around the bag, dont worry about the rest of the branch its used to it!
2/ Better is to wrap several layers of bubblewrap around it & then black plastic over that. It makes an ugly big bag hanging in the tree but I have had layers survive -5 this way. Also set & forget, no need to remember to wrap it one night.

Be prepared to leave them as long as they need. If worst comes and it has to be removed early, after care is ciritcal, not too much not too little water & high humidity. Regular misting the foliage also helps.

Matt
Thanks for the advice on the individual species. I think I will overpot the maples as you said once roots start developing. The kaffir lime was only done two weeks ago, and I have just managed to add more moss and replace the black plastic with a tighter white cling film, so I will continue to wait until roots show through.
This Japanese maple doesn't seem to bud until late september, and we do get the odd frost that late, so maybe I will wait until then to remove its winter protection. If it is in a pot anyway, hopefully it shouldn't do much harm.

I guess I have a long waiting game ahead of me!

Cheers,
James
User avatar
MattA
Banned
Banned
Posts: 3112
Joined: February 13th, 2010, 2:37 pm
Favorite Species: Lichen
Bonsai Age: 26
Bonsai Club: Killing Trees Inc..
Location: Lower Hunter Valley
Been thanked: 2 times
Contact:

Re: Air layering process (WARNING: many photos)

Post by MattA »

Kyushu Danji wrote: I guess I have a long waiting game ahead of me!
Yep! Thats bonsai.. if you had no patience when you start out with them you will have after a few years :lol:
42 Mice ~Imperfection
"Experience is a hard teacher because she gives the test first, the lesson afterwards." ~ Vernon Sanders Law
"All the knowledge I possess everyone else can acquire, but my heart is all my own." ~ Johann Wolfgang Von Goeth
"Bonsai becomes great when growers start trees they know they will never see in a pot"
User avatar
Kyushu Danji
Aussie Bonsai Fan
Aussie Bonsai Fan
Posts: 307
Joined: January 16th, 2011, 2:57 pm
Favorite Species: Ginkgo, Japanese Maple, Stewartia
Bonsai Club: CBS
Location: Canberra

Re: Air layering process (WARNING: many photos)

Post by Kyushu Danji »

So its been over a month since I started air layering all of these species. I checked the chinese pistachio yesterday, and there are small roots starting to appear underneath the top section where I made the cut. The roots seem to be larger underneath the branch, rather than on the top. From what I can see, what was identified as the privet has also started to form roots. Since it will be getting cooler here soon, I am going to keep these on the tree until next spring just to make sure adequate roots form to support the branch that I will eventually remove. I'm really pleased so far that this work seems to be paying off, even though there are no signs yet of root development on the others yet. I will definitely post more photos next spring when these are severed :yes: :beer:
User avatar
kcpoole
Perpetual Learner
Perpetual Learner
Posts: 12290
Joined: November 12th, 2008, 4:02 pm
Favorite Species: Maple
Bonsai Age: 15
Bonsai Club: the School Of Bonsai
Location: Western Sydney, NSW, Australia
Has thanked: 19 times
Been thanked: 96 times
Contact:

Re: Air layering process (WARNING: many photos)

Post by kcpoole »

Nice thread
when doing my layers with the bag method as show here I do not use string to tie them but wrap with electrical tape

Nice to see how these all go and will add some picks of a few I have done recently

Ken
Check out our Wiki for awesome bonsai information www.ausbonsai.com.au/wiki
What is Bonsai? http://www.ausbonsai.com.au/wiki/index.php?title=Bonsai
What should I do now? http://www.ausbonsai.com.au/wiki/index.php?title=Newbie
How do I grow a Bonsai? http://www.ausbonsai.com.au/wiki/index. ... _a_Bonsai?
Visit a Bonsai nursery to see some real nice trees http://www.ausbonsai.com.au/wiki/index. ... _Nurseries
Post Reply

Return to “Tips, Techniques, Maintenance and Advice”