
viewtopic.php?f=25&t=1352&p=12903&hilit ... ion#p12867 The comments were many and varied but one thing was unanimous, it was one ugly tree. First a little background info. First and foremost I chose to demo on this tree myself. The tree was given to me by a close friend in our club (a founding member) who I have known since I was 17. The tree is the same age as me which puts it at a spritely young 43.
2009 Convention Juniper update
-
Tony Bebb
- Aussie Bonsai Fan

- Posts: 664
- Joined: November 25th, 2008, 10:42 pm
- Favorite Species: Conifers/Pines
- Bonsai Age: 28
- Bonsai Club: Bonsai Society of Queensland Inc.
- Location: Brisbane
- Been thanked: 6 times
- Contact:
2009 Convention Juniper update
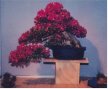
I know it has been a while, but I would like to give an update to the Chinese Juniper I did at the 2009 Convention here in Brisbane. The tree generated lots of comments on Ausbonsai and I thank everybody for their contribution. The original post was at
viewtopic.php?f=25&t=1352&p=12903&hilit ... ion#p12867 The comments were many and varied but one thing was unanimous, it was one ugly tree. First a little background info. First and foremost I chose to demo on this tree myself. The tree was given to me by a close friend in our club (a founding member) who I have known since I was 17. The tree is the same age as me which puts it at a spritely young 43. When I got the tree it was at least twice as tall as the demo height (sorry no pictures) with foliage only up the top, so the first step was to cut the foliage back hard to try and generate some back budding. Chinese Junipers will shoot from the crutch of the branches and you can use these to replace a branch that has become elongated. With the age of the trunk, it did not shoot low down, but did generate many new shoots. The tree was taken out of its grow bag and the roots sawn through and put into the demo pot in spring 2008. I had always wanted to do something with the tree so I put it in my workshop to study the tree and contemplate my options. The positives were a thick trunk, some dead wood and some strong bends with some interesting veins of sap. The negatives were reverse taper at the base, a long straight trunk before the branches, the ‘claw’ structure to the branches and the high foliage. The plan was to angle the trunk and use the main left branch as the trunkline, and split the timber on the right side leaving some on the tree for a jin and invert the separated piece and attach it to the base of the tree to create taper and use the branches of the now dead wood as roots on the right side of the tree.
The upper part of the trunk was also split to create a jin on the upper left side and reduce the trunk to aid bending. This was then strapped with raffia and some bending was applied. More will follow.
The plan was not want to touch the remaining foliage to ensure the sap would draw up the branch and ensure its survival. Pruning the tips would weaken the branch.
The tree recovered nicely and was let to grow freely to strengthen.
As the work was done in May, I left it to grow till the spring of this year when I root pruned it. The root system was terrible from being in a large bag for many years and being let grow into the ground, and had many large roots with fine roots on the end. I pruned it hard and the tree did suffer a bit, but has recovered.
It was potted into a Bonsai pot, but not what it will stay in. The attached wood did not fit in the pot and did not suit the angle, so I removed it to attach it again later. I did have a larger pot, but did not want to over pot it with so little roots as the soil would not dry out as easy and would inhibit root growth. It would also be at risk of developing root fungus in our humidity.
As the dead wood did not suit the angle I decided to reshape it with steam to create more of a bend into the ’roots’. I did this by applying steam to the wood and clamping and continually applying pressure until the correct angle was achieved. There is quite a bit of carving still to do to make it fit right, but this will be done later.
The future plan is to reduce the thickness of timber in the upper trunk and re-strap with raffia to achieve more bending and to lower the foliage. The future design will tend towards Literati, but I will wait to see what can be achieved and what growth occurs in the near future.
When I got the tree it was at least twice as tall as the demo height (sorry no pictures) with foliage only up the top, so the first step was to cut the foliage back hard to try and generate some back budding. Chinese Junipers will shoot from the crutch of the branches and you can use these to replace a branch that has become elongated. With the age of the trunk, it did not shoot low down, but did generate many new shoots. The tree was taken out of its grow bag and the roots sawn through and put into the demo pot in spring 2008. I had always wanted to do something with the tree so I put it in my workshop to study the tree and contemplate my options. The positives were a thick trunk, some dead wood and some strong bends with some interesting veins of sap. The negatives were reverse taper at the base, a long straight trunk before the branches, the ‘claw’ structure to the branches and the high foliage. The plan was to angle the trunk and use the main left branch as the trunkline, and split the timber on the right side leaving some on the tree for a jin and invert the separated piece and attach it to the base of the tree to create taper and use the branches of the now dead wood as roots on the right side of the tree.
The upper part of the trunk was also split to create a jin on the upper left side and reduce the trunk to aid bending. This was then strapped with raffia and some bending was applied. More will follow.
The plan was not want to touch the remaining foliage to ensure the sap would draw up the branch and ensure its survival. Pruning the tips would weaken the branch.
The tree recovered nicely and was let to grow freely to strengthen.
As the work was done in May, I left it to grow till the spring of this year when I root pruned it. The root system was terrible from being in a large bag for many years and being let grow into the ground, and had many large roots with fine roots on the end. I pruned it hard and the tree did suffer a bit, but has recovered.
It was potted into a Bonsai pot, but not what it will stay in. The attached wood did not fit in the pot and did not suit the angle, so I removed it to attach it again later. I did have a larger pot, but did not want to over pot it with so little roots as the soil would not dry out as easy and would inhibit root growth. It would also be at risk of developing root fungus in our humidity.
As the dead wood did not suit the angle I decided to reshape it with steam to create more of a bend into the ’roots’. I did this by applying steam to the wood and clamping and continually applying pressure until the correct angle was achieved. There is quite a bit of carving still to do to make it fit right, but this will be done later.
The future plan is to reduce the thickness of timber in the upper trunk and re-strap with raffia to achieve more bending and to lower the foliage. The future design will tend towards Literati, but I will wait to see what can be achieved and what growth occurs in the near future.
viewtopic.php?f=25&t=1352&p=12903&hilit ... ion#p12867 The comments were many and varied but one thing was unanimous, it was one ugly tree. First a little background info. First and foremost I chose to demo on this tree myself. The tree was given to me by a close friend in our club (a founding member) who I have known since I was 17. The tree is the same age as me which puts it at a spritely young 43.
You do not have the required permissions to view the files attached to this post.
-
John Henry
- Aussie Bonsai Fan

- Posts: 487
- Joined: December 2nd, 2008, 3:19 pm
- Favorite Species: pines
- Bonsai Age: 20
- Bonsai Club: BSV Nth West Vic Native Bendigo
- Location: Melbourne VIC
- Been thanked: 1 time
- Contact:
Re: 2009 Convention Juniper update
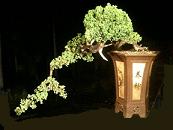
Hi Tony, This is a Blauws juniper that i restyled with you last year at Northwest Bonsai it is going great,unfortunatly the main large Shimpaku that was used for the main demo past away a few weeks later.
Thanks John m
Thanks John m
You do not have the required permissions to view the files attached to this post.
-
Tony Bebb
- Aussie Bonsai Fan
- Posts: 664
- Joined: November 25th, 2008, 10:42 pm
- Favorite Species: Conifers/Pines
- Bonsai Age: 28
- Bonsai Club: Bonsai Society of Queensland Inc.
- Location: Brisbane
- Been thanked: 6 times
- Contact:
Re: 2009 Convention Juniper update
Thanks for the pic John.
What happened to the demo tree??? It didn't even have a root prune or any 'major' pruning. I am disappointed to hear that news
Blauuw looks good. Looks like it could do with good tip prune
Hope other trees are doing well also
Tony
What happened to the demo tree??? It didn't even have a root prune or any 'major' pruning. I am disappointed to hear that news
Blauuw looks good. Looks like it could do with good tip prune
Hope other trees are doing well also
Tony
Imagination is more important than knowledge - Albert Einstein
Click here to visit my Blog - A Bonsai Journey
Click here to visit my Blog - A Bonsai Journey
-
Craig
- Banned

- Posts: 2227
- Joined: July 27th, 2010, 12:12 am
- Favorite Species: Melaleuca
- Bonsai Age: 10
- Contact:
Re: 2009 Convention Juniper update
Hi Tony, mate i really like what you've acheived with the juniper so far, from something with not much appeal to an awesome treein the making  Good work mate, can't wait to see more progress,,,,,Cheers - Craig
Last edited by Craig on December 15th, 2010, 2:36 pm, edited 1 time in total.
-
Gerard
- Aussie Bonsai Fan
- Posts: 2656
- Joined: October 7th, 2009, 12:32 pm
- Favorite Species: pines
- Bonsai Age: 16
- Bonsai Club: BSV, Northwest, Northern Suburbs, VNBC
- Location: Melbourne
- Has thanked: 18 times
- Been thanked: 49 times
Re: 2009 Convention Juniper update
Thanks for the update Tony,
It was interesting to read what people said at the time (I was not a member of this forum and had not seen the thread)
The demonstration was an excellent example of "thinking outside the square" creating something out of some very difficult stock. I am a little dissapointed the development has slowed but am glad to see it still alive and your vision is also still alive.
Looking foreward to seeing future updates and foliage placement.
Q: Why are we all here?
A: Because we are not all there.
A: Because we are not all there.
-
Tony Bebb
- Aussie Bonsai Fan
- Posts: 664
- Joined: November 25th, 2008, 10:42 pm
- Favorite Species: Conifers/Pines
- Bonsai Age: 28
- Bonsai Club: Bonsai Society of Queensland Inc.
- Location: Brisbane
- Been thanked: 6 times
- Contact:
Re: 2009 Convention Juniper update
Thanks Craig and Gerard
Looking forward to the next phase myself. I'll try and get keen and do a drawing (not quite so flash on the verts yet) of what I hope to achieve.
Tony
Looking forward to the next phase myself. I'll try and get keen and do a drawing (not quite so flash on the verts yet) of what I hope to achieve.
Tony
Imagination is more important than knowledge - Albert Einstein
Click here to visit my Blog - A Bonsai Journey
Click here to visit my Blog - A Bonsai Journey
-
Tony Bebb
- Aussie Bonsai Fan
- Posts: 664
- Joined: November 25th, 2008, 10:42 pm
- Favorite Species: Conifers/Pines
- Bonsai Age: 28
- Bonsai Club: Bonsai Society of Queensland Inc.
- Location: Brisbane
- Been thanked: 6 times
- Contact:
Re: 2009 Convention Juniper update
Just when you think things were going OK. Sometimes decisions get made for you.
Sad to report that I no longer have styling decisions to make on this Juniper as it suffered while away on hols and has passed to Bonsai heaven. I may end up using the trunk for a phoenix. Very disappointed.
Tony
Sad to report that I no longer have styling decisions to make on this Juniper as it suffered while away on hols and has passed to Bonsai heaven. I may end up using the trunk for a phoenix. Very disappointed.
Tony
Imagination is more important than knowledge - Albert Einstein
Click here to visit my Blog - A Bonsai Journey
Click here to visit my Blog - A Bonsai Journey
-
andy hodges
- Aussie Bonsai Fan

- Posts: 30
- Joined: March 26th, 2009, 7:52 pm
- Favorite Species: Juniper
- Bonsai Age: 6
- Location: Sunshine Coast, Qld
Re: 2009 Convention Juniper update
Ouch
So sorry to hear about your tree.
Looked like that one meant a lot to you.
Really appreciate your knowledge on here mate, your a real asset to the forum.
So sorry to hear about your tree.
Looked like that one meant a lot to you.
Really appreciate your knowledge on here mate, your a real asset to the forum.
"Someone with an opiniion is always outranked by someone with an experience" David Hart
-
Tony Bebb
- Aussie Bonsai Fan
- Posts: 664
- Joined: November 25th, 2008, 10:42 pm
- Favorite Species: Conifers/Pines
- Bonsai Age: 28
- Bonsai Club: Bonsai Society of Queensland Inc.
- Location: Brisbane
- Been thanked: 6 times
- Contact:
Re: 2009 Convention Juniper update
Thanks Andy. Yeah this one did mean a bit.andy hodges wrote:Ouch
So sorry to hear about your tree.
Looked like that one meant a lot to you.
Really appreciate your knowledge on here mate, your a real asset to the forum.
Hopefully that knowledge can help some more positive results
On to the next tree.
Imagination is more important than knowledge - Albert Einstein
Click here to visit my Blog - A Bonsai Journey
Click here to visit my Blog - A Bonsai Journey
-
bodhidharma
- Aussie Bonsai Fan
- Posts: 5007
- Joined: August 13th, 2009, 1:14 pm
- Favorite Species: English Elm
- Bonsai Age: 24
- Bonsai Club: goldfields
- Location: Daylesford, Victoria....Central Highlands
- Been thanked: 11 times
- Contact:
Re: 2009 Convention Juniper update
Sorry to see it go Tony. Lots of nice stuff done to it though. Put it down to experience and move forward. I have yet to lose a significant tree that i have spent years on but i am sure it will happen.
"Advice is rarely welcome, and the one's who need it the most welcome it the least"
